Showing posts with label Microsoft Visual Studio. Show all posts

Wednesday, September 10, 2025

Announcing Visual Studio 2026: Insiders

Just a few hours ago, the first Public Preview of the next version of Visual Studio is announced along with .NET 10 RC 1. It's Visual Studio 2026 or Visual Studio 18 under the classic versioning system. 
Visual Studio 2026: Insiders
This new release brings significant performance improvements and of course a host of exciting new features.

One of the standout updates is the introduction of the Insiders channel, which replaces the traditional Preview channel from earlier versions of Visual Studio.

There's a lot to explore, and it's available now. Try it out today!


Happy Coding.

Regards,
Jaliya

Monday, February 10, 2025

Visual Studio 2022: HTTP Files and Request Variables

It's a very common scenario that we want to call an endpoint and use the result in subsequent requests. In this post, let's see how we can make use of Request Variables in .http files in Visual Studio 2022 to achieve that. Request Variable is a special kind of a variable (see my previous post for use of variables Visual Studio 2022: HTTP Files and Variables).

So let's start. The first step is to give a request a name.
@HostAddress = http://localhost:5200

### CREATE
# @name createEmployee

POST {{HostAddress}}/employees
Content-Type: application/json
{
   "firstName": "John",
   "lastName": "Doe"
}
Here, the comment: # @name createEmployee which is located just before the request specifies the name of the request. You can use following syntax if you prefer, which is also valid.
// @name createEmployee
Now we can reference this particular named request (createEmployee) using following syntax.
{{<requestName>.(response|request).(body|headers).(*|JSONPath|XPath|<headerName>)}}
For example, say the above endpoint is returning a JSON response, something like the following.
POST: Employee
Now I can use the returned id to Get the employee by Id.
### GET by Id
GET {{HostAddress}}/employees/{{createEmployee.response.body.$.id}}
Accept: application/json
GET: Employee
I can even use the request variable in the request body. Say I want to update the existing employee with a different lastName.
### UPDATE
PUT {{HostAddress}}/employees/{{createEmployee.response.body.$.id}}
Content-Type: application/json
{
    "id": "{{createEmployee.response.body.$.id}}",
    "firstName": "{{createEmployee.response.body.$.firstName}}",
    "lastName": "Bloggs"
}
PUT: Employee

Hope this helps.

Happy Coding.

Regards,
Jaliya

Tuesday, November 21, 2023

Visual Studio 2022 17.9.0 Preview 1.0: Experimental Control Styles

Last week during .NET Conf there were some great announcements in the world of .NET, and also Microsoft has released the latest preview of Visual Studio 2022 17.9.0 Preview 1.0.

With the latest Visual Studio 2022 Preview, we now get to experience the refreshed Visual Studio UI that the Visual Studio team has been working on for some time.

To enable the UI Refresh, from Visual Studio go to Tools -> Environment -> Preview Features and then select  "Experimental control styles". You’ll need to restart Visual Studio for changes to be applied.
Enable Experimental control styles
The first thing you will notice is, now we have an entirely different set of Color Themes.
Visual Studio: Color Themes
If you are used to the Blue theme like I am, unfortunately, it isn't there under new themes.


Do try it out and please leave your feedback on Visual Studio UI Refresh.
Happy Coding.

Regards,
Jaliya

Wednesday, September 27, 2023

Visual Studio 2022 17.8.0 Preview 1.0: Case Preserving Find and Replace

In this post, let's have a look at some nice feature that got introduced with Visual Studio 2022 17.8.0 Preview 1.0. Right now the latest Visual Studio preview is, Visual Studio 2022 17.8.0 Preview 2.0, so as long as you have a Visual Studio version >= 17.8.0 Preview 1.0, you should be able to experience this feature.

In the Replace popups, either Quick Replace (Ctrl + H) or Replace in Files (Ctrl + Shift + H), you should be able to see an additional option "Preserve Case".

Quick Replace (Ctrl + H)
Replace in Files (Ctrl + Shift + H)
So what does this option do?

Consider the following.
// EmployeeId
// employeeId
// employeeid
// EMPLOYEEID
// employeeId
If you do a replace of employeeId with customerid while Preserving case, you can see all of the above is getting replaced to customerid, and it does so while preserving the case of the original word.  
// CustomerId
// customerId
// customerid
// CUSTOMERID
// customerId
Isn't that handy?

Hope this helps.

Happy Coding.

Regards,
Jaliya

Tuesday, September 19, 2023

Visual Studio 2022: HTTP Files and Variables

In this post, let's get to know some different ways to manage variables within HTTP Files.

Let's consider the following simple API.
WebApplicationBuilder builder = WebApplication.CreateBuilder(args);

WebApplication app = builder.Build();

app.MapGet("/users/{userId}", (int userId) =>
{
    return userId;
});

app.Run();

1. Use Inline Variables


You can define the variables in the .http file itself as follows
@HostAddress = http://localhost:5179
@userId = 1

GET {{HostAddress}}/users/{{userId}}
Accept: application/json
In-line variable

2. Use an Environment File


You can define an environment file with the name httpenv.json. The file can be in the same folder as in the .http file or a folder above it. Visual Studio will look for that file in the folder where the HTTP file exists. If it’s not found, Visual Studio will look through the parent directories to find it. When a file is found named httpenv.json, Visual Studio will stop searching for the file. The nearest file to the HTTP file found will then be used.

Here, I am just going to add httpenv.json next to the .http file.
{
  "development": {
    "userId": 2
  },
  "test": {
    "userId": 3
  }
}
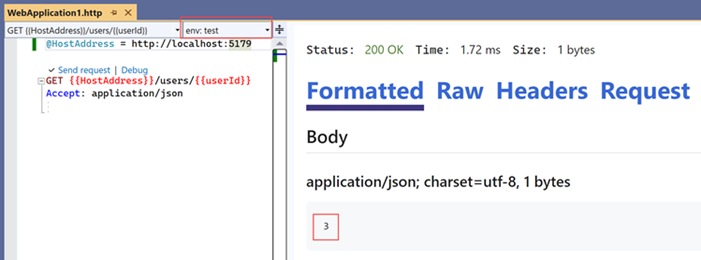
Now I am closing and opening up the .http file (in order for the environment file to be picked), removing @userId = 1 defined in the .http file. Now because of the httpenv.json, I can see the environments in a dropdown as follows.
Environments
Now based on the environment we are selecting, I will get different values.
Environment: development
Environment: test

3. Use a user-specific environment file


You can also add a user-specific environment file named httpenv.json.user, next to the httpenv.json file.
{
  "development": {
    "userId": 4
  }
}
And now when you execute the request, you can see the following output.
User-specific environment file
The order of precedence for the variables is below. Once a match is found that value will be used, and other sources ignored.
  1. Variable declared in the .http file
  2. Variable declared in the httpenv.json.user file
  3. Variable declared in the httpenv.json file
Hope this helps.

Happy Coding.

Regards,
Jaliya

Friday, June 16, 2023

Visual Studio 2022 17.7.0 Preview 2.0: Improved File Comparisons

Visual Studio 2022 17.7.0 Preview 2.0 is released and in this post, let's have a look at one of the handy features that got improved. This feature was initially introduced with Visual Studio 2022 17.7.0 Preview 1.0, but with the latest release, the user experience is more improved.

With this feature, you can compare files within Visual Studio and you no longer have to leave the current context and use an external tool (I was using Visual Studio Code) to compare files.

You can use this feature in multiple ways. The easiest is from the Solution Explorer, multi-select two files by holding down the Ctrl button, then right-click and compare them using the "Compare Selected" option.
Compare Selected
The other options are,
  • Right-click on a single file, and select "Select for Compare". Then navigate to the second file in the Solution Explorer, right-click on that, and click on "Compare with <SelectedFile>".
  • Right-click on a single file, and then click "Compare With…". This will open up the File Explorer. Now you can navigate to any file on disk and select it for comparison.
It's a small feature, but very handy.

Happy Coding.

Regards,
Jaliya

Monday, June 12, 2023

.NET Upgrade Assistant CLI

In this post, let's have a look at the .NET Upgrade Assistant CLI, a CLI tool to upgrade .NET projects to use the latest .NET and benefit from all its nice features.

As you know Visual Studio has this extension .NET Upgrade Assistant for quite some time and the new CLI tool uses the same engine as the Visual Studio Extension.

First, you can install the CLI tool globally by running the following command.
dotnet tool install -g upgrade-assistant
You can upgrade the CLI tool to the latest version by running the following command.
dotnet tool update -g upgrade-assistant
Once the tool is installed, next you need to run the following command.
upgrade-assistant upgrade
upgrade-assistant --help
Why wait, bring your apps to the latest .NET.

Happy Coding.

Regards,
Jaliya

Wednesday, May 10, 2023

Visual Studio 2022: Apply File Scoped Namespaces using Code Cleanup Profile

In this post, let's see how we can apply File scoped namespaces to all the existing C# files using a Code Cleanup Profile.

Imagine you have an old .NET project that uses Block scoped namespaces and you are upgrading the project to the latest .NET and you need to use features like File scoped namespaces that got introduced as part of C# 10.0. If you have many files, you definitely don't need to be updating files one by one.

We can apply this change to all the files at once using a Visual Studio Code Cleanup profile.

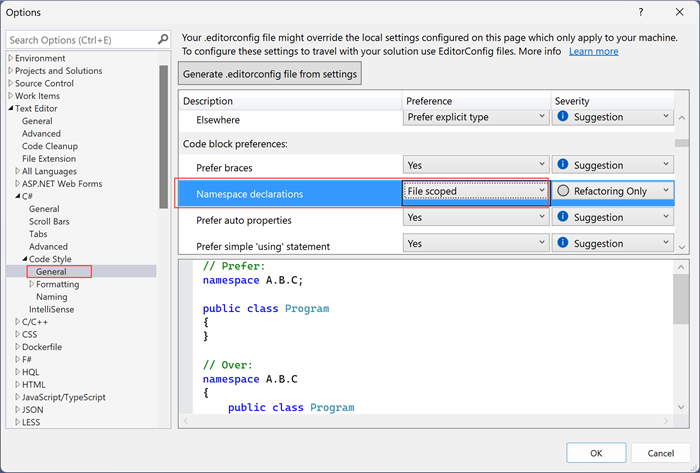
First, we need to set Namespace declarations code style preference to File scoped (if you haven't already) by going into Tools -> Options -> Text Editor -> C# -> Code Style -> General.
Update Code Style
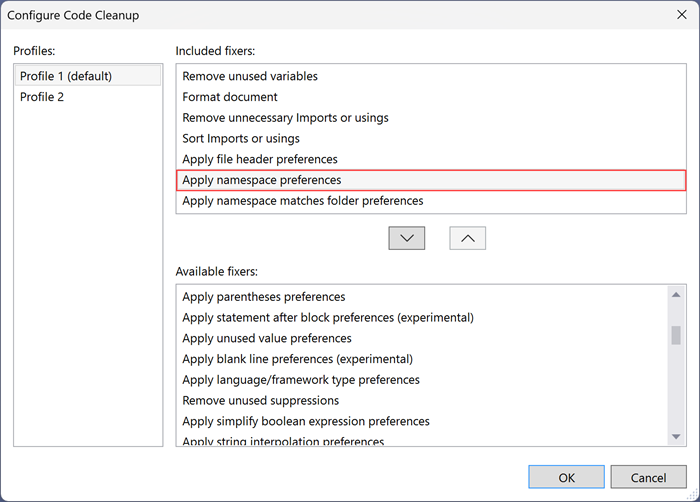
Then go to Analyse -> Code Cleanup -> Configure Code Cleanup and configure your profile, adding the following preference.
Configure Code Cleanup
You can create a new profile just for this or update an existing profile. And then just run your Code Cleanup profile. That should update all your files with File scoped namespaces.

Hope this helps.

Happy Coding.

Regards,
Jaliya

Friday, March 17, 2023

Visual Studio 2022: Web API Endpoint Explorer

In this post, let's have a look at this nice feature that is available in Visual Studio 2022 and that is Web API Endpoint Explorer. I am on Visual Studio 2022 version 17.6.0 Preview 2.0 and I am not really sure when this was introduced, but if you have the latest Visual Studio 2022 Preview, you should be able to try this out.

This feature is wrapped inside a feature flag which you need to enable by going to Tools -> Options -> Environment -> Preview Features and selecting Web API Endpoint Explorer.
Enable Web API Endpoint Explorer
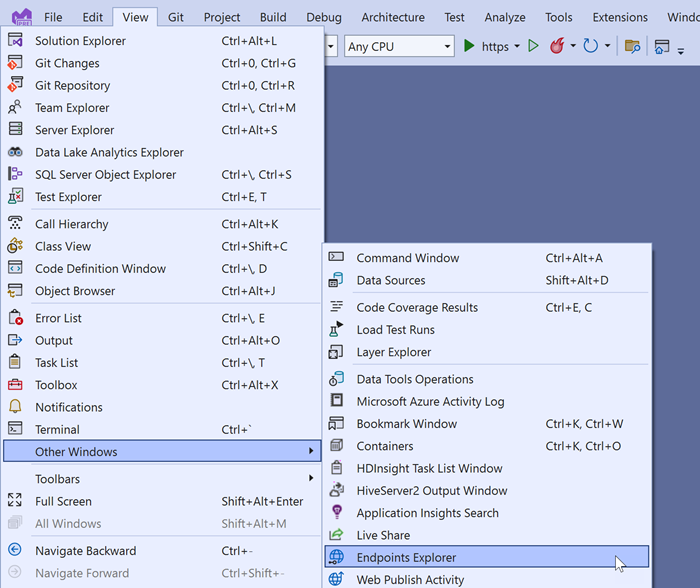
Now you can find this window in View -> Other Windows -> Endpoints Explorer. And you can find this only while you are in a compatible project (API Project).
Endpoints Explorer
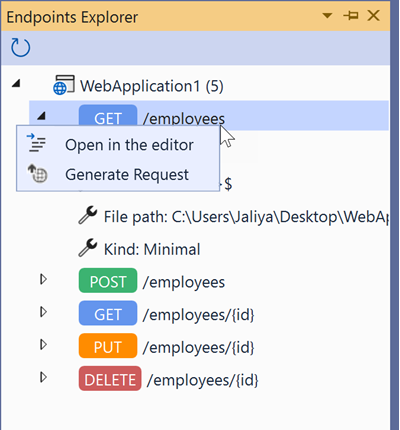
I have clicked on Endpoints Explorer on a simple Minimal API project.
Endpoints Explorer
And look at that. My endpoints are displayed nicely. From the window, I can directly open an endpoint in the code editor and I can even generate a request (using .http Files, read more: Visual Studio 2022: Sending HTTP Requests with .http Files)

That's pretty neat, isn't it.

Hope this helps.

Happy Coding.

Regards,
Jaliya

Wednesday, January 25, 2023

Visual Studio 2022: Sending HTTP Requests with .http Files

Do you know Visual Studio has this nice feature to send HTTP Requests using .http files. It's actually pretty neat.

We just have to create a file with .http extension.
.http Files in Action
We can do all the methods and the output is displaying nicely.

Disclaimer: I am not sure when this feature got added, I am on Microsoft Visual Studio Enterprise 2022 (64-bit) - Version 17.5.0 Preview 4.0 and I don't have a specific extension installed in order to enable this functionality.

Hope this helps!

Happy Coding.

Regards,
Jaliya

Wednesday, January 18, 2023

Visual Studio 2022 Version 17.5 Preview 2: Text Visualizer Improvements

In this post let's explore some nice improvements that got added to Text Visualizer in Visual Studio. This got shipped with Visual Studio 2022 Version 17.5 Preview 2. 

I actually found this accidentally and it's so handy!

Say I have a string variable that holds a JWT token and I want to decode it for some debugging purpose. Usually what I would do is copy-pasting the token into https://jwt.io or https://jwt.ms or some external JWT decoding tool. What if we can see the decoded token without leaving Visual Studio? And that's exactly what the new Text Visualizer brings to the table.

Say I want to see the decoded token of the following.
Debugging a string
I need to click on the View button. And then I am presented with the following.
Text Visualizer
I can just select JWT Decode and just like that I can see the decoded token. 

Along that, you can see there are more options to manipulate the string such as Base64 Encode & Decode,  Url Encode & Decode etc.

Isn't that great? I just love this. Remember, if you want to try this out, you need to install the latest Visual Studio 2022 Preview.

Hope this helps.

Happy Coding.

Regards,
Jaliya

Tuesday, November 8, 2022

Visual Studio 2022: Enable Quick Add for Add New Items

In this post, let's go through a nice extension for Visual Studio 2022 that is soon going to be available within Visual Studio 2022 itself within Preview features.

The extension is Add New File (64-bit) and it's quite nice. 

Note: as of today, the latest preview of Visual Studio 2022 is 17.4.0 Preview 6.0, and this extension is still not available out of the box within Visual Studio, so you will have to download the extension and install it.

Once installed, you can do Shift + F2. When this is shipped with Visual Studio, the shortcut would be Ctrl + Shift + A.

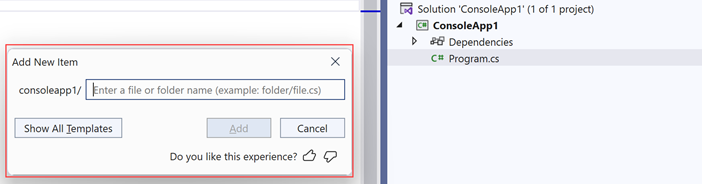
And it's going to bring up this nice little dialog.
Add New Item
You can click on Show All Templates and still go back to the default dialog, or you can just add new items using this tiny dialog.

Say I want to add a new file at the root of the project, I can do something like below.
Add New Item
This will create the MyClass.cs file as a C# class file based on the extension.

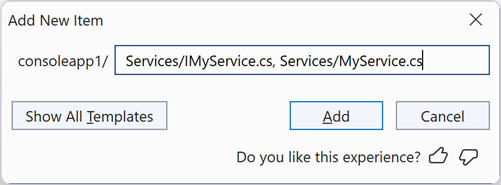
A really nice thing is, I can do something like below.
Add Multiple Items
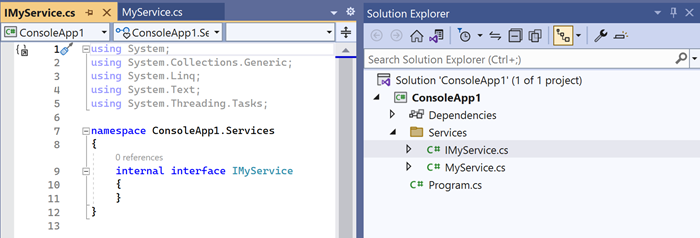
This will create a Services folder, and there it will create IMyService.cs and MyService.cs. And not only that, based on the naming convention of IMyService.cs, it will create an interface and not a class.
Files Created
That's pretty neat, isn't it? Do try this extension out. You can create folders, nested folders, and so on.

Can't wait to see this extension to be baked into Visual Studio 2022. Hopefully within this week (so much going on this week with .NET Conf 2022 coming up in just a couple of hours 😍) or in the next couple of weeks.

And watch the following video by Mads Kristensen to learn some cool features in Visual Studio 2022.
   Cool features in Visual Studio 2022

Happy Coding.

Regards,
Jaliya

Saturday, July 16, 2022

Visual Studio 2022 Version 17.3 Preview 3: IEnumerable Debugger Visualizer Improvements

In this post, let's have a look at one of the nicest features in Visual Studio 2022 Preview that got improved with Visual Studio 2022 version 17.3 Preview 3. 

Visual Studio 2022 version 17.3 Preview 2 introduced IEnumerable Debugger Visualizer that can be used to view .NET collections in a separate Window. The IEnumerable visualizer was displaying collections of objects in a table with a row per object and sortable columns for each field and property. And we were able to export the collection to an Excel file.

Visual Studio 2022 version 17.3 Preview 3 has some nice improvements to IEnumerable Debugger Visualizer, now we can search the collection within the Visualizer. And also we can export the collection to a CSV file as well.

Following is a quick tour of the newest feature of IEnumerable Debugger Visualizer. (please click on the image in order to have good visibility of the image)
IEnumerable Debugger Visualizer
Start using Visual Studio 2022 version 17.3 Preview 3 today.

Happy Coding.

Regards,
Jaliya

Tuesday, May 31, 2022

Visual Studio 2022 17.3.0 Preview 1.1: Introducing Port Tunneling for ASP.NET Core Projects

Last week, it's Microsoft Build week, and hope you have enjoyed it.  

There were some nice announcements and one of my favorites out of them all is this nice feature that got released with Visual Studio 2022 17.3.0 Preview 1.1. That's introducing the private preview of port tunneling in Visual Studio for ASP.NET Core projects. 

With this, I can run my Web Application locally and the URL it's running is public and can be accessed from outside of my local environment. With most of us working from home, I am finding this very helpful. I can do things like, 

  • Share the public URL with a colleague to test out the application. 
  • If it's a Frontend Web Application,  access the URL from my mobile, and see how it's behaving.
  • I don't have to deploy the application to test a Webhook with a third party etc
In order to use this feature, there are a couple of things you need to do first.

The first thing is obviously you need to download and install the latest preview of Visual Studio 2022. And that's Visual Studio 2022 17.3.0 Preview 1.1.

Next, you need to sign up for the private preview program of port tunneling in Visual Studio. Otherwise, you are going to get an error like below when you are going to try it.
Missing sign-up for Port Tunneling program
You can do it by filling out the form here: https://aka.ms/tunnels-signup. Something to note here is, it's going to take some time for access to be granted into the private program and at this time individual users will not be considered, only organizations with tenant IDs.

After signing up with the preview program, log in to Visual Studio with the email address you have used. Then under Tools -> Options -> Environment -> Preview Features, check Enable port tunneling for Web Applications.
Enable port tunneling for Web Applications
Now you are almost set.

Finally, create a new ASP.NET Core Web Application, and once the project is created, update the launchSettings.json as below.

launchSettings.json
{
  "$schema": "https://json.schemastore.org/launchsettings.json",
  "iisSettings": {
    "windowsAuthentication": false,
    "anonymousAuthentication": true,
    "iisExpress": {
      "applicationUrl": "http://localhost:4367",
      "sslPort": 44305
    }
  },
  "profiles": {
    "WebApplication1": {
      "commandName": "Project",
      "dotnetRunMessages": true,
      "launchBrowser": true,
      "launchUrl": "swagger",
      "applicationUrl": "https://localhost:7015;http://localhost:5015",
      "environmentVariables": {
        "ASPNETCORE_ENVIRONMENT": "Development"
      },
      "createTunnel": true,
      "tunnelAuthentication": "public",
    },
    "IIS Express": {
      "commandName": "IISExpress",
      "launchBrowser": true,
      "launchUrl": "swagger",
      "environmentVariables": {
        "ASPNETCORE_ENVIRONMENT": "Development"
      }
    }
  }
}
The only change I have done here is I have added the below properties under the profile I am using to run the Application.
  •  "createTunnel": true 
  • "tunnelAuthentication": "public"
And that's it. Now you can launch the application.
Port Tunneling
Note: Tunnels are created with private access by default, meaning that only the user who created the tunnel can access it after signing in. You can control this access by adding the "tunnelAuthentication" property. Valid values include,
  • private - only the user who created the tunnel can access it after signing in.
  • org - only users in the organization can access it after signing in.
  • public - the tunnel is accessible by anyone and no sign-in is needed.
Hope this helps.

Happy Coding.

Regards,
Jaliya

Monday, May 2, 2022

Visual Studio 2022: Temporary Breakpoints

This is a quick post on a nice feature that got introduced in Visual Studio 2022.

Have you faced this scenario where you have set multiple breakpoints in your code while debugging, and the next time you are running the application locally (maybe after fixing the issues or you are done with the debugging), you keep getting hit on all those breakpoints back to back?

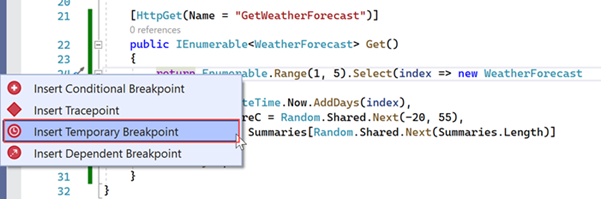
Most of the time, the breakpoints we are adding are temporary and only needed for that particular session. Visual Studio now lets you add Temporary Breakpoints and once it's hit, it's gone.

Insert Temporary Breakpoint
You can also simply use the shortcut Shift + Alt + F9, T and set the temporary breakpoint on the line desired.

Hope this helps!

Happy Coding.

Regards,
Jaliya

Friday, February 4, 2022

Visual Studio 17.1 Preview 5: Streamlined File Scoped Namespacing

This is a quick post on a very nice feature that got introduced with Visual Studio Version 17.1.0 Preview 5.0 (released on February 1, 2022).

I am using .NET 6/C# 10.0 in most of my projects and I have been updating the source files to use File Scoped Namespaces. I have been adding a semicolon at the end of the namespace name and then I had to manually delete unnecessary curly braces. And that was tiring. 

Converting to File Scoped Namespaces

But I no longer have to do that, Hooray! With the Visual Studio Version 17.1.0 Preview 5.0, I can just add the semicolon at the end of the namespace name, and Visual Studio takes care of the rest automatically. I just love this!

If you are planning on migrating your code to use File Scoped Namespaces, I would highly recommend doing so with the latest Visual Studio 2022 Preview, it's going to save you a lot of time.

Happy Coding.

Regards,
Jaliya

Thursday, January 6, 2022

Great Start to the Year: Visual Studio 17.1 Preview 2 is Now Available

It's another year and a newer preview version of Visual Studio 2022 is already out, Visual Studio 2022 version 17.1 Preview 2.  This Preview version got shipped with some very nice features related to,
  • .NET Productivity
  • Git Tooling
  • Code Editor
  • IDE
  • Test tools
  • And more
These include some features that I have been waiting for so long.

.NET Productivity: Go to Definition, Navigate to the Original Source File


This is my favorite of them all and it's a fantastic feature. Now when we do Go to Definition, we are being navigated to the original source file. This is tremendously helpful in situations like we are exploring .NET APIs.

For example, say I need to go to the definition of AddDbContext<TContext>(...)
Go to Definition in Visual Studio 17.1 Preview 2
I can see the full implementation, whereas in prior versions, I am not seeing the method body.
Go to Definition in Earlier Version of Visual Studio

Git Tooling: Enable line-staging support


This one is another favorite. All this time, after doing a change in a file, we could only stage the whole file, not hunks. This feature has been there in most of the other Git tools out there for so many years, but was lacking in Visual Studio Git experience. Now finally, it's arrived.

This feature is not enabled by default, you need to explicitly turn this on. You can do it by navigating into Tools -> Options -> Environment -> Preview Features.
Enable line-staging support
And then we can stage hunks individually if we want to.
Stage Changes/Hunks

Editor: Code Cleanup on Save


Another nice One. With this feature we don't have to do  Ctrl+K, Ctrl+E (code cleanup) explicitly. Visual Studio will do the Code Cleanup on File upon Save automatically. And we can even choose which Profile to be used for the Code Cleanup. This feature again is not enabled by default, you need to explicitely enable it. You can do it by navigating into Tools -> Options -> Text Editor -> Code Cleanup.
Code Cleanup on Save
Aren't these nice?

Read more about all the new features in Visual Studio 17.1 Preview 2,

Happy Coding and Happy New year everyone!

Regards,
Jaliya

Tuesday, November 9, 2021

Visual Studio 2022 and CI/CD Using GitHub Actions Workflows

Finally Visual Studio 2022 (the first-ever 64-bit version of Visual Studio) is released with great features, such as Hot Reload for .NET and C++ (Web, WPF, Windows Forms, you name it), cross-platform testing, etc.

In this post let's see the seamless integration Visual Studio 2022 provides with GitHub actions.

I have a repo hosted in GitHub and I wanted to enable CI/CD to deploy to an Azure App Service. I can do that with very few steps and even without leaving Visual Studio. Let's see how. 

First I am right-clicking on the project and selecting Publish.
Publish
Then it's just following the steps in the wizard. I am including all the steps, so we kind of have a complete guide.

I am deploying to Azure App Service. I am selecting Azure and Clicking on Next.
Azure
I already have a Linux Azure App Service which I am going to use. So I am selecting Azure App Service (Linux) and clicking on Next.
Azure App Service (Linux)
I am selecting my target App Service and clicking on Next.
Select the App Service
I am not going to be using any API Management, so I am skipping this step and going to Next.
API Management - Skipping
Now comes the interesting step. Visual Studio identifies my repo is on GitHub and gives me an option to add GitHub Actions.
CI/CD using GitHub Actions workflows (generated yml file)
So I am going ahead with selecting CI/CD using GitHub Actions workflows (generated yml file) and that's mostly it. 
Workflow File Created and Ready to Push
Visual Studio has already created the workflow yml file with the publishing profile saved as an Action secret. Now I just need to commit and push the changes to remote.
CI/CD
And that is super easy. 

I have this image from back in 2012, it's so true.
Do more of what you love
If you haven't started using Visual Studio 2022, do it now.

You can find the sample code here,

Happy Coding.

Regards,
Jaliya