Thursday, December 26, 2019

Visual Studio: Open Up a New Browser Tab Instead of New Window

The default behavior of Visual Studio when debugging a web application is it opens up a new window of the browser instead of firing up a new tab. But this can be a real pain when you have multiple projects running, you will have many browser instances and it's really hard to navigate in between (well, at least for me).

This is a quick post on how you can get rid of that behavior. Actually, it's pretty easy, I had this configured sometime back, but it took a while for me to figure it out again.

Go to Tools -> Options -> Projects and Solutions -> Web Projects. And there you have this checkbox: Stop debugger when browser window is closed, close browser when debugging stops. You just uncheck it and that's it.
Stop debugger when browser window is closed, close browser when debugging stops
Hope this helps.

Happy Coding.

Regards,
Jaliya

Saturday, December 14, 2019

Session: Integrating ML.NET to an Azure Web App Bot at Global AI Bootcamp 2019, Auckland, New Zealand

Global AI Bootcamp is a free one-day event organized across the world by local communities that are passionate about artificial intelligence on Microsoft Azure. This year, the event takes place on December 14th, with venues on every continent.

Global AI Bootcamp 2019, Auckland, New Zealand was organized by Leila Etaati and Indira Bandari and there were 13 awesome talks delivered by industry experts on AI-related topics. I also had the privilege of delivering a session there and my session was about ML.NET and how we can easily integrate ML.NET into an Azure Web App Bot.


Happy Coding.

Regards,
Jaliya

Wednesday, December 4, 2019

Visual C# Technical Guru - October 2019

Another month as a judge in Microsoft TechNet Guru Awards under Visual C# category. The TechNet Guru Awards celebrate the technical articles on Microsoft TechNet.

Post in Official Blog,
Visual C# Technical Guru - October 2019
Happy Coding.

Regards,
Jaliya

Wednesday, November 20, 2019

Lightning Ignite 2019: Visual Studio Online

Today at the final edition of the Auckland Azure User Group for 2019, there were some amazing lightning talks on some of the coolest announcements from Ignite all delivered by Azure enthusiasts and experts alike. And I got the pleasure of doing a lightning talk on Visual Studio Online.

I have already blogged on most of the things I spoke here. Do check it out.

These were the topics that the lightning talks were on:


Slide Deck:

Happy Coding.

Regards,
Jaliya

Saturday, November 16, 2019

Trying Out Visual Studio Online Public Preview

During this year's Microsoft Build Conference(May 2019), Microsoft first announced Visual Studio Online. And at the Ignite 2 weeks back, the public preview of Visual Studio Online is announced.

I have been trying out Visual Studio Online since then and it really has taken my heart away.

Visual Studio Online basically provides cloud-powered development environments for any type of development. It's like you have set up a virtual machine in the cloud, except you don't need to worry about setting up the OS, installing Visual Studio Code or Visual Studio. And setting up is pretty fast, mostly within like a minute. You can connect to these remote environments through a web browser, your local VS Code or Visual Studio (as of today, Visual Studio option is still in its Private Preview).

When you connected through the browser, you basically have VS Code working inside the browser itself. And when you connected to your remote environment from either of these, you are only doing the code changes in your editor, all the heavy lifting, compiling, building, debugging, restoring, etc, is happening in your remote environment. You can even open up a terminal (through VS Code) and install whatever the tools you want to configure your remote development environment and it will be accessible throughout the lifetime of your environment.

So let’s see these in action.

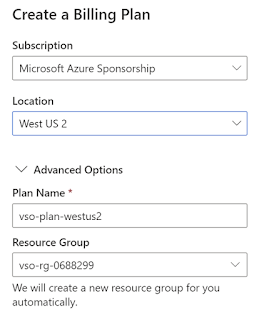
You need to sign up at https://online.visualstudio.com/, then create a billing plan and then you can set up as much as environments you want.
Create a Billing Plan
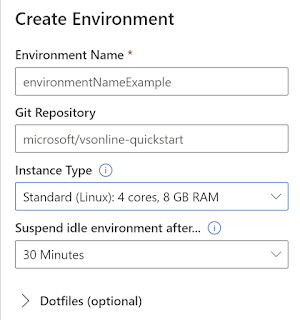
You can select your remote configurations as per your needs.
Create Environment
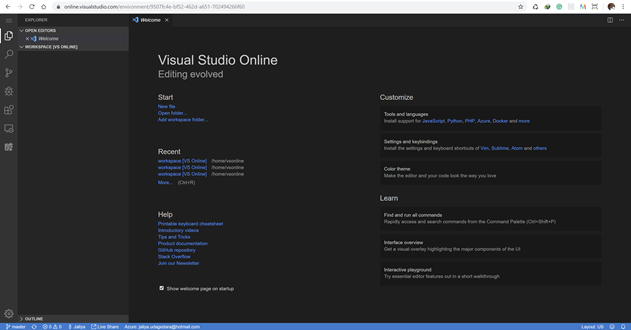
Here a nice thing is, there is an option for you to specify a Git repo, if you specify a repo, the content will be automatically cloned when the environment is setup. Now once the environment is set up, this is what it looks like and this is inside the browser itself.
Visual Studio Online
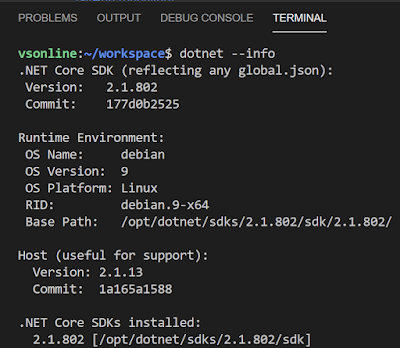
And I just opened up a terminal inside VS Code and ran dotnet --info.
dotnet --info
It’s set up with .NET Core 2.1 on Debian Linux. I have created a Web API application (I am not writing how, as you know it's dotnet new) and let’s run it.
Connecting to the forwarded port
Running


And you can debug through the browser as well.
Debugging
Now let me connect to the environment through Visual Studio Code. You can either do by clicking on the tile in Visual Studio Online dashboard or by directly from your VS Code (You need to have the Visual Studio Online extension installed).
Open in VS Code
Connect to Environment
And here, you will be asked to select the environment. Once the environment is selected and opened, you can just continue your coding you do like your local environment. And inside, Remote Explorer, you can see your environment details.
Remote Explorer
In addition to cloud-hosted environments, Visual Studio Online supports Self-hosted mode in which you can "bring your own" self-hosted environments, registering them with VS Online. For that run the VS Online: Register Local Environment command in the command palette.
Register Location Environment
But note: as of today, registering self-hosted environments while connected to a remote development environment is not yet supported.

On a final note, to use Visual Studio Online, you will need to have an Azure subscription and you will be getting billed only for the amount you use it. Idle environments automatically get suspended after reaching the auto-suspend value (which you have set when the environment was created).

I hope this helps to start off your journey with Visual Studio Online.

Happy Coding.

Cheers,
Jaliya

Thursday, November 14, 2019

Glance at Windows Terminal

I am late to the party but better late than never. I knew Windows Terminal was released a couple of months back, but I couldn't try it out myself until last night. My first impression was, it is amazing.

If you haven't had a look, I strongly suggest you should do it now. You can easily download the Windows Terminal from Microsoft Store, the Microsoft Store for Business, and GitHub. As of today, it's still in Pre-release mode, but still, it's working great.

It's a single tool and you can open up multiple tabs, you don't have to navigate between multiple windows. And most importantly, you can have multiple profiles like PowerShell, CMD, WSL and you can just open them up in tabs. And each one of them can be customized using a single JSON file to suit your preferences.

This is how my Windows Terminal looks like.
Windows Terminal
That looks wonderful, right!

And when you click on Settings, there is a whole bunch of customizations you can do through the profiles.json file. I have a bit of customization done, like below.
{
  "$schema""https://aka.ms/terminal-profiles-schema",
  "defaultProfile""{61c54bbd-c2c6-5271-96e7-009a87ff44bf}",
  "profiles": [
    {
      // Make changes here to the powershell.exe profile
      "guid""{61c54bbd-c2c6-5271-96e7-009a87ff44bf}",
      "name""Windows PowerShell",
      "commandline""powershell.exe",
      "hidden"false,
      "fontSize": 10,
      "useAcrylic"true,
      "acrylicOpacity": 0.7
    },
    {
      // Make changes here to the cmd.exe profile
      "guid""{0caa0dad-35be-5f56-a8ff-afceeeaa6101}",
      "name""cmd",
      "commandline""cmd.exe",
      "hidden"false,
      "fontSize": 10,
      "useAcrylic"true,
      "acrylicOpacity": 0.7
    },
    {
      "guid""{6e9fa4d2-a4aa-562d-b1fa-0789dc1f83d7}",
      "hidden"false,
      "name""Legacy",
      "source""Windows.Terminal.Wsl",
      "fontSize": 10,
      "useAcrylic"true,
      "acrylicOpacity": 0.7
    },
    {
      "guid""{b453ae62-4e3d-5e58-b989-0a998ec441b8}",
      "hidden"false,
      "name""Azure Cloud Shell",
      "source""Windows.Terminal.Azure",
      "fontSize": 10,
      "useAcrylic"true,
      "acrylicOpacity": 0.7
    }
  ],
  "schemes": [],
  "keybindings": [],
  "initialCols": 160,
  "initialRows": 40
}

To view the default settings, hold "alt" while clicking on the "Settings" button. And for documentation on these settings, see: check out Windows Terminal User Documentation.

This is wonderful!

Happy Coding.

Regards,
Jaliya

Saturday, November 9, 2019

Implementing Health Checks in ASP.NET Core

In the world of containerized microservices, those microservices to be able to report it's health is quite critical. I would say it's one of the crucial things to have, so your service can serve the clients without zero downtime. Based on the health status of the services, whatever the container orchestrator you are using (Kubernetes, Azure Service Fabric, AWS ECS, etc.) can decide a lot of things. Such as whether it's required to spin up new instances to maintain the availability, should it continue rolling up updates for services, etc.

Fortunately, ASP.NET Core comes with a built-in health checks feature that was released as part of ASP .NET Core 2.2. In this post, let's see how we can set up health checks for a simple ASP.NET Core Web Application.

I have created an ASP.NET Core 3.1 Web Application, with the default template with Visual Studio.

To start with, you just need to register the required services and define the endpoint to report health.
public void ConfigureServices(IServiceCollection services)
{
    // Other registrations
 
    services.AddHealthChecks();
}
public void Configure(IApplicationBuilder appIWebHostEnvironment env)
{
    // Other configuration
 
    app.UseEndpoints(endpoints =>
    {
        // Other endpoint mappings
 
        endpoints.MapHealthChecks("/health");
    });
}
And now when you run the app and navigate to /health endpoint, you can see it's reporting it's default status.

Healthy
Almost all the applications are depending on other services, such as a database, another service, etc. So ideally you want to have health checks for each of them. For that, you can easily extend your health check registration as below.
services.AddHealthChecks()
    .AddCheck("MyCheck1", () => HealthCheckResult.Healthy("I am healthy"), new List<string> { "tag1" })
    .AddCheck("MyCheck2", () => HealthCheckResult.Unhealthy("I am unhealthy"), new List<string> { "tag2" });
With above, our health endpoint will return Unhealthy, because one of the dependent services is Unhealthy.

Unhealthy
You have a lot of control over determining how to implement health check logic. You just need to have a class implement IHealthCheck and implement it's CheckHealthAsync method as below.
public class ExampleHealthCheck : IHealthCheck
{
    public Task<HealthCheckResultCheckHealthAsync(HealthCheckContext context, CancellationToken cancellationToken = default)
    {
        var isHealthy = true;
 
        if (isHealthy )
        {
            return Task.FromResult(
                HealthCheckResult.Healthy("A healthy result."));
        }
 
        return Task.FromResult(
            HealthCheckResult.Unhealthy("An unhealthy result."));
    }
}
And use like below.
.AddCheck<ExampleHealthCheck>("MyCheck3"nullnew List<string> { "tag3" });
There is this nice package Xabaril/AspNetCore.Diagnostics.HealthChecks which already contains health check logic for most of the providers, so you don't have to reinvent the wheel. Please do check it out.

There is a whole lot of options to customize the health check feature, please visit the following links for more details.
   Health checks in ASP.NET Core

Happy Coding.

Regards,
Jaliya

Wednesday, October 30, 2019

Visual C# Technical Guru - September 2019

Another month as a judge in Microsoft TechNet Guru Awards under Visual C# category. The TechNet Guru Awards celebrate the technical articles on Microsoft TechNet.

Post in Official Blog,

Regards,
Jaliya

Monday, October 28, 2019

C# 8.0: Using Declarations and Pattern-Based Using for Ref Structs

In this post, let's go through another feature that was introduced with C# 8.0 which is using declarations and pattern-based using for ref structs.

We are all familiar with using statements. So basically a using statement is something like this.
using (MyDisposableClass myDisposableClass = new MyDisposableClass())
{
    // some code
}
But to this, your MyDisposableClass needs to implement the interface IDisposable.
public class MyDisposableClass : IDisposable
{
    public void Dispose()
    {
        // some code to cleanup your resources
    }
}
And when the control is leaving enclosing scope, the Dispose method in MyDisposableClass will be called.

So what's wrong with this. There is actually nothing wrong, but using statements needs quite a bit of indenting to the code. If you are using multiple objects that need to be disposed of, the code is going to get a bit messy.
// some code 
using (var fileStream = new FileStream(...))
{
    // some code 
    using (var memoryStream = new MemoryStream())
    {
        // may be some other using statement ...
    }
}
Enter using declarations.
using MyDisposableClass myDisposableClass = new MyDisposableClass();
// some code
So now you can just declare the variable with using, and it will continue to work as it was. And when you have multiple usings,
{
    using var fileStream = new FileStream(...);
    using var memoryStream = new MemoryStream();
    ...
    // dispose of memoryStream
    // dispose of fileStream 
}
So here when the control is leaving the scope, the objects will be disposed in the reverse order in which they are declared.

The other feature is pattern-based using for ref structs. Ref strucs which was introduced with C# 7.2 is a struct declared with the ref modifier and it may not implement any interfaces, so can't implement IDisposable. But still, we can try and do something like this.
{
    using MyRefStruct myRefStruct = new MyRefStruct();
    // some code
}
But in order to that, we need to implement dispose pattern here, that is we have a Dispose method, which is public, parameterless and has a void return type.
public ref struct MyRefStruct
{
    public void Dispose()
    {
        // some code to cleanup your resources
    }
}
So in the using, as the control leaves the enclosing scope, the Dispose method will be called.

Hope this helps.

Happy Coding.

Regards,
Jaliya

Saturday, October 26, 2019

C# 8.0: Default Implementations of Interface Members

C# 8.0 has introduced some great features to the language and one of them is being able to have default implementations for Interface members. A couple of other features are also introduced to Interfaces to support and enhance this feature.

In this post, let's see have a look at what this really is. And to try this out, you’ll need to set up your machine to run .NET Core, including the C# 8.0 compiler. The C# 8.0 compiler is available starting with Visual Studio 2019 version 16.3 or the .NET Core 3.0 SDK.

Up to C# 8.0, this is what we know of Interfaces in .NET.
  • Interface members cannot have a definition / cannot have implementations
  • Interfaces cannot contain fields
  • For interface member declarations, only the new modifier is valid, you can't have any other modifiers like public, protected, private, etc.
  • All the interfaces members are by default, public and abstract
But with C# 8.0, whole a lot of things have changed. The main thing is Interface members can now have a default implementation.

Previously if you add a new method to an interface, all of your classes implementing that interface need to implement that method. Otherwise, it's going throw compile-time errors in the related classes. We all know that is a huge pain. How about being able to define a default implementation in the interface itself and let your classes override whenever they wish to. This is exactly what this feature is all about.

Consider the below code.
public interface IMyInterface
{
    void MyFirstMethod()
    {
        throw new NotImplementedException();
    }
}
 
public class MyFirstClass : IMyInterface
{
    public void MyFirstMethod()
    {
        Console.WriteLine("Hello World");
    }
}
 
public class MySecondClass : IMyInterface { }
So above is not possible prior to C# 8.0, but perfectly valid with C# 8.0. Note: that a class does not inherit members from its interfaces; that is not changed by this feature. So this is not possible.
new MySecondClass().MyFirstMethod();
So along with this, the following are also possible.
  • An interface can have static fields, but not instance fields
  • Interfaces can now have private members
  • Interfaces can now also have static members. This is used for parameterization of the default implementation.
  • Interfaces can also have protected members. They are not accessible by the derived class but via the derived interface.
  • Interfaces can also have virtual members, but the class can’t override the method. An interface can only override it.

Isn't this great!

Happy Coding.

Regards,
Jaliya

Monday, October 7, 2019

.NET Core: Tiered Compilation

A couple of days back during the .NET Conf, there were some major announcements along with the release of .NET Core 3.0. In this post, I am going to write about something which has been there for almost a year, wasn't available by default, but with .NET Core 3.0, it will be enabled by default. This feature is called Tiered Compilation.

Before moving into Tiered Compilation, let's have a quick recap of how .NET Compilation works. First, the code we have written using high-level languages (C#, F#, etc.) will be compiled into an exe or dll which contains CIL (Common Intermediate Language). And during the run-time, the methods are compiled into Native/Machine code. This is being carried out by JIT (Just-In-Time Compiler) and the process is known as jitting. Basically, whenever some method is being called, that method gets jitted and being stored. When this method is called next time, the method won't get jitted again, instead, it will be loaded from the memory. So all the methods in our code were compiled ONLY ONCE.

Let's just go by an example. Imagine you have this MethodA(), which will get called when you are starting your application. And it will get called throughout the life cycle of your application. JIT can do a very good optimization for your MethodA() based on a variety of algorithms. But that would make your application start slowly. On the other hand, JIT can use a simple algorithm and jit the method fast, so your application would start faster, but the generated code might not be properly optimized and the MethodA() will perform slow.

Enter Tiered Compilation. With Tiered Compilation, based on the usage of a method, it can get jitted more than once and can be hot-swapped at runtime. So basically JIT can pick an approach to start the application fast, and then based on the usage of a method and if the method appears hot, it will compile the same method again to generate more efficient code and use it for future calls.

This is how the Tiered Compilation works. First Tiered Compilation breaks the code into 2 buckets.
  1. Code that is eligible for tiering
    1. Tier0
      • This is usually the less optimized code that is generated using minimal optimizations. That is when the method is first invoked, the Tier0 version generated.
    2. Tier1
      • This is whatever code the runtime thinks will run faster than Tier0. If any method appears hot, the runtime would jit the method again with a more optimized version and will replace Tier0.
  2. Code that is NOT eligible for tiering
    • Will be jitted as before Tiered Compilation was introduced
Tiered Compilation was added as an opt-in feature in .NET Core 2.1. But with .NET Core 3.0,  it is enabled by default.

To enable Quick JIT (Tier0 jitted code), update the .csproj as follows.
<PropertyGroup>
  <TieredCompilationQuickJit>true</TieredCompilationQuickJit>
</PropertyGroup>
To disable Tiered compilation,  update the .csproj as follows.
<TieredCompilation>false</TieredCompilation>

More information:
   Tiered Compilation
   Tiered Compilation Guide

Happy Coding.

Regards,
Jaliya
Tuesday, October 1, 2019

Visual C# Technical Guru - August 2019

Another month as a judge in Microsoft TechNet Guru Awards under Visual C# category. The TechNet Guru Awards celebrate the technical articles on Microsoft TechNet.

Post in Official Blog,

Regards,
Jaliya

Monday, September 9, 2019

Introducing Visual Studio Terminal

With the release of Visual Studio 2019 version 16.3 Preview 3, an early preview of Visual Studio Terminal was released. 

While it's still in its early stages, you can still experience how it looks like. Even if you have already installed Visual Studio 2019 version 16.3 Preview 3, the feature is disabled by default. But you can enable it pretty easily bygoing to Tools -> Options. And then under Environment node, find the Preview Features. From there just tick Experimental VS Terminal and restart VS.
Preview Features
Once restarted, you can find the Terminal  Window option under Views toolbar menu item. Or as always, you can use the Search bar.
Visual Studio Terminal
The font in the terminal looks smaller to me, but hopefully, we will get some options to customize the terminal in the future. But for now, this is more than enough for me.

Do try this out!

Happy Coding.

Regards,
Jaliya
Sunday, September 1, 2019

Visual C# Technical Guru - July 2019

Another month as a judge in Microsoft TechNet Guru Awards under Visual C# category. The TechNet Guru Awards celebrate the technical articles on Microsoft TechNet.

Post in Official Blog,

Regards,
Jaliya

Wednesday, August 21, 2019

C# 8.0: notnull Generic Constraint

A couple of months back I wrote a post about C# 8.0: Nullable Reference Types which is a feature coming with C# 8.0. A few days back Microsoft has released .NET Core 3.0 Preview 8. And from .NET Core 3.0 Preview 7 onwards, C# 8.0 is now considered feature complete.

In this post, let's go through this nice feature added regarding Nullable Reference Types which is notnull generic constraint. This feature was released with .NET Core 3.0 Preview 7. Nullable Reference Types is an opt-in feature, meaning it's not enabled by default. In this post, I am not going to explain how you can enable it, you can refer to the old post linked above for that. 

Consider the following code. I have a generic interface, a class that implements it. Even though I have added the interface and the class in the same file, consider this an external library. Now from the Main, I am creating an object of MyClass of type nullable string and calling its method. Note: I have enabled Nullable Reference Types.
#nullable enable
 
namespace ConsoleApp1
{
    interface IMyInterface<TIn>
    {
        void MyMethod(TIn input);
    }
 
    public class MyClass<TIn> : IMyInterface<TIn>
    {
        public void MyMethod(TIn input)
        {
            // some code which uses input
        }
    }
 
    class Program
    {
        static void Main(string[] args)
        {
            stringmyString = null;
 
            var myClass = new MyClass<string?>();
            myClass.MyMethod(myString);
        }
    }
}
The above code will not show any warnings. Now imagine for some reason, I don't want to allow the generic type to be nullable. Enter notnull Generic Constraint.

I can update the code as follows.
interface IMyInterface<TIn>
    where TIn : notnull
{
    void MyMethod(TIn input);
}
 
public class MyClass<TIn> : IMyInterface<TIn>
    where TIn : notnull
{
    public void MyMethod(TIn input)
    {
        // some code which uses input
    }
}
We need to add the constraint to both the interface and the class. As soon as we do that, the following line will issue a warning.
// Warning CS8714  The type 'string?' cannot be used as type parameter 'TIn' in the generic type or method 'MyClass<TIn>'.
// Nullability of type argument 'string?' doesn't match 'notnull' constraint.

var myClass = new MyClass<string?>();
We can fix the warning by update the code as follows.
var myClass = new MyClass<string>();
And then we will need to fix the next warning of trying to pass a nullable string to MyMethod.

I really find this a really handy feature. One of the best examples would be, Microsoft has already constrained Dictionary<TKey, TValue>, where TKey is now to be notnull, which disallows using null as a key.

Hope this helps.

Happy Coding.

Regards,
Jaliya

Thursday, August 1, 2019

ASP.NET Technical Guru - June 2019

Another month as a judge in Microsoft TechNet Guru Awards under ASP.NET category. The TechNet Guru Awards celebrate the technical articles on Microsoft TechNet.

Original Post,

Regards,
Jaliya

Tuesday, July 30, 2019

ASP.NET Core Hosting Models with IIS

With the introduction of ASP.NET Core 2.2, ASP.NET team has introduced 2 hosting models when we are hosting the ASP.NET Core application in IIS.

One is In-process and the other is Out-of-process. In-process hosting is made possible with the introduction of aspNetCoreModuleV2 which is a required to host ASP.NET Core applications targeting 2.2 or higher. You will get this once you install .NET Core Runtime & Hosting Bundle which is a prerequisite.

You can configure the hosting model pretty easily through one of the following approaches.

1. Through Project Properties in Visual Studio, Under Debug
Visual Studio
2. From the csproj file
csproj file
If the <AspNetCoreHostingModel> property isn't present in the file, the default value is OutOfProcess.

By doing this when the project is published, the web.config file will contain information on whether to run the application In-Process or Out-of-process.
<aspNetCore processPath="dotnet" arguments=".\HelloWorld.dll" stdoutLogEnabled="false" stdoutLogFile=".\logs\stdout" hostingModel="InProcess" />
So what’s is In-process and Out-of-process hosting.

In-process

In process basically means the ASP.NET Core application will get run inside IIS Worker process (w3wp.exe) and hence the naming. So here IS HTTP Server (IISHttpServer) is used instead of Kestrel server.

Out-of-process

When on Out-of-process, ASP.NET Core application does not run on IIS Worker process, instead it will be running on Kestrel and all the requests are being forwarded to Kestrel.

So what is preferred and why. In-process is the preferred hosting model in IIS. In-process hosting provides improved performance because requests don’t get proxied over to a separate dotnet process. Microsoft states there is an improved throughput of up to 400% on when In-process hosting model is IIS.

More Information,
Host ASP.NET Core on Windows with IIS

Hope this helps.

Happy Coding.

Regards,
Jaliya
Friday, July 5, 2019

ASP.NET Technical Guru - May 2019

Another month as a judge in Microsoft TechNet Guru Awards under ASP.NET category. The TechNet Guru Awards celebrate the technical articles on Microsoft TechNet.

Original Post,
ASP.NET Technical Guru - May 2019  
Happy Coding.

Regards,
Jaliya

Tuesday, July 2, 2019

Received Microsoft MVP Award in Developer Technologies

I am honored to receive the precious Microsoft Most Valuable Professional (MVP) Award for the sixth consecutive year.

As always looking forward to another great year on top of Microsoft Development Stack.
MVPLogo_thumb[2]
Microsoft Most Valuable Professional (MVP)
Thank you Microsoft for your appreciation and Thank you everyone for your continuous support.

Happy Coding.

Regards,
Jaliya

Monday, July 1, 2019

Task.Wait() Vs Task.GetAwaiter().GetResult()

In this post, let's go through one of the best practices when using async/await.

In some cases, we might want to run an async method synchronously and wait for the execution to be completed. Let's consider the below code.
static void Main(string[] args)
{
    // 1
    RunSomeTask().Wait();
 
    // 2
    //RunSomeTask().GetAwaiter().GetResult();
}
 
private static async Task RunSomeTask()
{
    // some long running work
}
 So our options to call RunSomeTask synchronously would be something like below,
  1. Task.Wait() (or Task.Result to get the return value if it returns something)
  2. Task.GetAwaiter().GetResult()
What would you prefer?

So the best practice is, we should be using Task.GetAwaiter().GetResult() instead of Task.Wait()/Task.Result(). Let's see why.

For the purpose of this post, I am modifying the RunSomeTask() method to throw an exception.
private static async Task RunSomeTask()
{
    await Task.Delay(200);
 
    throw new Exception("Failed because of some reason");
}

Now let's have a look at 2 different outputs.

When used Task.Wait():
Task.Wait()
When used Task.GetAwaiter().GetResult():
Task.GetAwaiter().GetResult()
As you can see when used Task.Wait(), if the task threw an exception, it will be wrapped inside an AggregateException. But when we are using Task.GetAwaiter().GetResult(), it will throw the exception directly which will make things like debugging/logging easy.

That's a very simple tip, but can be really useful.

On a final note, we should avoid calling tasks synchronously as much as possible.

Hope this helps.

Happy Coding.

Regards,
Jaliya