Wednesday, March 22, 2023

Setting PowerShell Aliases Permanently in Windows Terminal

In this post let's see how we can set up PowerShell Aliases permanently in Windows Terminal. First, we need to find out the profile we are on. You can do it by running the $PROFILE command.

$PROFILE
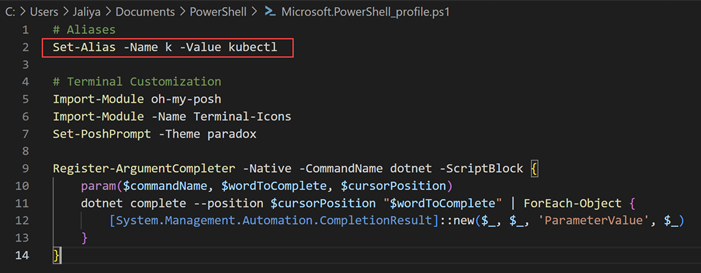
And then we need to edit the profile and add the alias using the Set-Alias command. In my case, I wanted to alias k for kubectl.
Set-Alias -Name k -Value kubectl
My PowerShell profile looks like this.
Edut PowerShell Profile
And that's about it. Now all the aliases we set up are available whenever we open up a new terminal/tab.

Hope this helps.

Regards,
Jaliya

Sunday, March 19, 2023

Attach ACR in a Different Subscription to an Existing AKS

In this post, let's see how we can attach an Azure Container Registry (ACR) to an existing Azure Kubernetes Cluster (AKS), but here the ACR is in a different subscription.

Using Azure CLI, the command to attach an ACR to an existing AKS is,
# Attach using acr-name
az aks update -n <aks-name> -g <resource-group-name> --attach-acr <acr-name>

# Attach using acr-resource-id
az aks update -n <aks-name> -g <resource-group-name> --attach-acr <acr-resource-id>
Since the ACR is in a different subscription, we can't attach using acr-name. Instead, we need to attach using the acr-resource-id.

While you can get the ResourceId from the URL after navigating to your ACR from the Azure Portal, the best approach is to get it from Azure CLI.
# Switch to subscription where ACR resides in
az account set --subscription <SubscriptionId>

# List resource information of the ACR
az resource list --name <acr-name>
And this will list something like below.
az resource list --name <acr-name>
And now you can run the attach command with Resource Id.
# Attach using acr-resource-id
az aks update -n <aks-name> -g <resource-group-name> --attach-acr <acr-resource-id>
Hope this helps.

Happy Coding.

Regards,
Jaliya

Friday, March 17, 2023

Visual Studio 2022: Web API Endpoint Explorer

In this post, let's have a look at this nice feature that is available in Visual Studio 2022 and that is Web API Endpoint Explorer. I am on Visual Studio 2022 version 17.6.0 Preview 2.0 and I am not really sure when this was introduced, but if you have the latest Visual Studio 2022 Preview, you should be able to try this out.

This feature is wrapped inside a feature flag which you need to enable by going to Tools -> Options -> Environment -> Preview Features and selecting Web API Endpoint Explorer.
Enable Web API Endpoint Explorer
Now you can find this window in View -> Other Windows -> Endpoints Explorer. And you can find this only while you are in a compatible project (API Project).
Endpoints Explorer
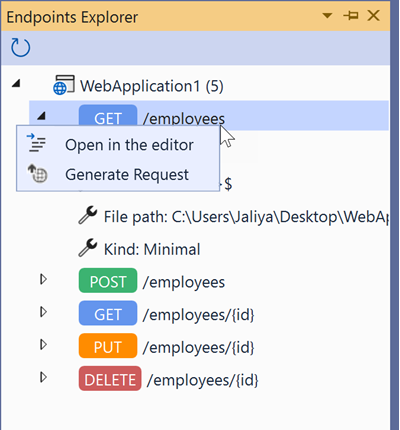
I have clicked on Endpoints Explorer on a simple Minimal API project.
Endpoints Explorer
And look at that. My endpoints are displayed nicely. From the window, I can directly open an endpoint in the code editor and I can even generate a request (using .http Files, read more: Visual Studio 2022: Sending HTTP Requests with .http Files)

That's pretty neat, isn't it.

Hope this helps.

Happy Coding.

Regards,
Jaliya

Wednesday, March 8, 2023

Entity Framework Core and Connection Resiliency

In this post, let's see some built-in features in EF Core that supports Connection Resiliency. For example, if the connection to the database dropped while executing a command, we might need to retry the operation. While we can write the code to do it ourselves, EF Core out of the box supports retry using execution strategies.

The execution strategy can be configured in the following ways.

When configuring the options for your context:

public class MyDbContext : DbContext
{
    public DbSet<Customer> Customers { getset; }

    protected override void OnConfiguring(DbContextOptionsBuilder optionsBuilder)
    {
        optionsBuilder
            .UseSqlServer(
                @"Server=(localdb)\mssqllocaldb;Database=EfCore8;Trusted_Connection=True",
                providerOptions =>
                {
                    providerOptions.EnableRetryOnFailure();
                }
            );
    }
}

In the Program.cs or Startup.cs for an ASP.NET Core application:

WebApplicationBuilder builder = WebApplication.CreateBuilder(args);
builder.Services.AddDbContext<MyDbContext>(options =>
{
    options.UseSqlServer(
        @"Server=(localdb)\mssqllocaldb;Database=EfCore8;Trusted_Connection=True",
        providerOptions =>
        {
            providerOptions.EnableRetryOnFailure();
        });
});

or

public void ConfigureServices(IServiceCollection services)
{
    // some code

    services.AddDbContext<MyDbContext>(options =>
    {
        options.UseSqlServer(
            @"Server=(localdb)\mssqllocaldb;Database=EfCore8;Trusted_Connection=True",
            providerOptions =>
            {
                providerOptions.EnableRetryOnFailure();
            });
    });
}

If you wish to change the defaults of the execution strategy, you can do that by implementing the abstract class ExecutionStrategy.

using Microsoft.EntityFrameworkCore.Storage;

internal class CustomExecutionStrategy : ExecutionStrategy
{
    public CustomExecutionStrategy(ExecutionStrategyDependencies dependenciesint maxRetryCount, TimeSpan maxRetryDelay)         : base(dependencies, maxRetryCount, maxRetryDelay) { }

    protected override bool ShouldRetryOn(Exception exception)
    {
        // your custom logic here

        return true;
    }
}

And register the CustomExecutionStrategy.

protected override void OnConfiguring(DbContextOptionsBuilder optionsBuilder)
{
    optionsBuilder
        .UseSqlServer(
            @"Server=(localdb)\mssqllocaldb;Database=EfCore8;Trusted_Connection=True",
            providerOptions =>
            {
                var maxRetryCount = 5;
                var maxRetryDelay = TimeSpan.FromSeconds(10);

                providerOptions.ExecutionStrategy(dependencies => new CustomExecutionStrategy(dependencies, maxRetryCount, maxRetryDelay));
            }
        );
}

You can even register your own execution strategy by implementing IExecutionStrategy something like below.

using Microsoft.EntityFrameworkCore.Storage;

internal class CustomExecutionStrategy : IExecutionStrategy
{
    private readonly ExecutionStrategyDependencies _dependencies;

    public CustomExecutionStrategy(ExecutionStrategyDependencies dependencies)
    {
        _dependencies = dependencies;
    }

    // interface implementation
}

Hope this helps.

Read More,
   Connection Resiliency

Happy Coding.

Regards,
Jaliya