Monday, September 12, 2022

C# 11.0: Required Members

Just a couple of months to go for .NET 7 final release, as you might already know, some of the C# 11.0 features are already available. 

In this post, let's go through a new feature that is ready to use from Visual Studio 2022 version 17.3, and that is the feature to specify required members in a class, struct or record (including record struct). And that's by using the brand new modifier: required.

Let's go by an example. I will be using a class for simplicity. Consider the following Person class.
public class Person
{
    public string FirstName { getset; }
 
    public string LastName { getset; }
 
    public DateOnly? DateOfBirth { getset; }
}
Generally, it considers a bad practice if you are letting someone to create an object without satisfying the minimum requirements of that particular object. For example here in our scenario, we shouldn't let someone create a Person without specifying FirstName and LastName. Those are kind of mandatory for every person.

So here usually what we do is introduce a constructor and specify the parameters that are needed to create a valid object.
public class Person
{
    public string FirstName { getset; }
 
    public string LastName { getset; }
 
    public DateOnly? DateOfBirth { getset; }
 
    public Person(string firstNamestring lastName)
    {
        FirstName = firstName;
        LastName = lastName;
    }
}
Now, this is looking good. But what if we remove the constructor. The caller has no idea what basic properties are needed to be set when creating a Person object. So we need to have some other way to declare which properties are required.

So C# 11.0 introduced this brand new modifier: required which can be used as follows.
public class Person
{
    public required string FirstName { getset; }
 
    public required string LastName { getset; }
 
    public DateOnly? DateOfBirth { getset; }
}
Now the caller can create a Person object like below using object initialization.
Person person = new()
{
    FirstName = "John",
    LastName = "Doe"
};
And this is nice, isn't it? Now we don't even need to declare a constructor to accept the required parameters. I personally prefer object initialization instead of using a constructor, because say you have a lot of required properties, then in your constructor, you are going to have a lengthy parameters list.

And if you attempted to create a Person without specifying the required parameters, the compiler will emit an error.
Person person = new();
// Required member 'Person.FirstName' must be set in the object initializer or attribute constructor.
// Required member 'Person.LastName' must be set in the object initializer or attribute constructor.
Now say, you have some already written code where you are using a constructor to set required properties and you have updated your required properties with required modifier.
public class Person
{
    public required string FirstName { getset; }
 
    public required string LastName { getset; }
 
    public DateOnly? DateOfBirth { getset; }
 
    public Person(string firstNamestring lastName)
    {
        FirstName = firstName;
        LastName = lastName;
    }
}
And the existing callers would be creating an object like below.
Person person = new("John""Doe");
// Above will throw a compile error
Now here you are going to get a compile error because the compiler doesn't know that from your constructor you are setting values to required properties.  In this case, you need to attribute the constructor with [SetsRequiredMembersattribute like below.
[SetsRequiredMembers]
public Person(string firstNamestring lastName)
{
    FirstName = firstName;
    LastName = lastName;
}
Note: This [SetsRequiredMembersattribute needs to be used with care.

Let's say for some reason, later you have decided DateOfBirth is going to be a required property. Basically something like below.
Person person = new("John""Doe");
// Person is getting created using the constructor, but required DateOfBirth isn't being set
// No compile errors here because [SetsRequiredMembers] is masking the error
 
public class Person
{
    public required string FirstName { getset; }
 
    public required string LastName { getset; }
 
    public required DateOnly DateOfBirth { getset; }
 
    [SetsRequiredMembers]
    public Person(string firstNamestring lastName)
    {
        FirstName = firstName;
        LastName = lastName;
    }
}
This code will get compiled just fine, but logically it isn't correct. [SetsRequiredMembers] attribute is masking the expected error which is DateOfBirth isn't set. So that's something to keep in mind.

Most of the time, required properties shouldn't be allowed to be mutated later, so we can write a more complete code something like below. Here for the FirstName and LastName properties, I have used init keyword (introduced with C# 9.0) to specify that the required parameters should get set only upon the object construction.
Person person = new()
{
    FirstName = "John",
    LastName = "Doe"
};
 
public class Person
{
    public required string FirstName { getinit; }
 
    public required string LastName { getinit; }
 
    public DateOnly? DateOfBirth { getset; }
}
Hope this helps.

Happy Coding.

Regards,
Jaliya

Tuesday, September 6, 2022

Azure Logic Apps: Using HTTP Webhooks

In this post, let's see how we can use a HTTP Webhook in an Azure Logic App to wait for an external event. Note: I am using Azure Logic App Standard model for the purpose of this post.

Imagine we have the following requirement.

  • There's a parent workflow and it publishes a Webhook, where consumers can call
    • Once the Webhook gets called by a consumer, the parent workflow needs to resume its execution
  • There is a consumer, once the consumer received the Webhook information, they can invoke the Webhook at their own decretion,

Let's start by creating the consumer side of things first. Here, in this case, the consumer is another workflow that has a Trigger of type "Request".
Consumer Workflow: When a HTTP request is received
So here my Consumer Workflow accepts a payload that contains the above JSON Schema. The webhookUrl property expects the URL that this consumer will call. Then I have some dummy Delay and then finally I have a HTTP action to make the call to the Webhook.
Consumer Workflow: HTTP Action to call the Webhook
Code
{
  "inputs": {
    "method""POST",
    "uri""@{triggerBody()?['webhookUrl']}",
    "body": {
      "messageFromWebhookConsumer""Name formatting is completed",
      "fullName""@concat(triggerBody()?['reqObject']?['firstName'], ' ', triggerBody()?['reqObject']?['lastName'])"
    }
  }
}
Here when the Consumer calls the Webhook, I am doing some data transformation and sending that as the payload for the Webhook.

Now we are all good with the consumer workflow.

Next, let's create the parent workflow.
Parent Workflow: When a HTTP request is received
Here in the Parent Workflow, I again have an HTTP trigger. It accepts a payload of the above schema. And the idea is, that we pass this data to the Webhook Consumer, and wait for our Webhook to be called after doing its job.

Now let's add the HTTP Webhook action.
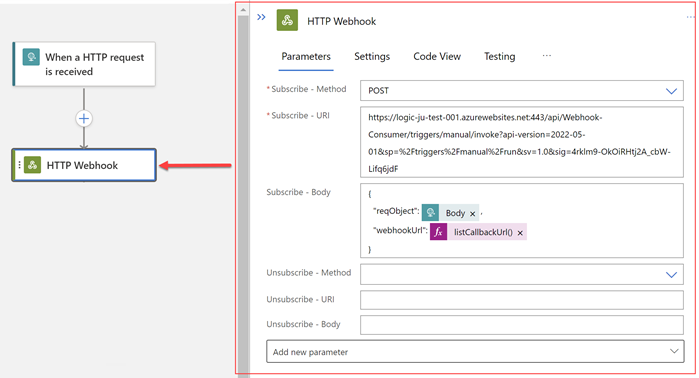
Parent Workflow: HTTP Webhook
Code
{
  "inputs": {
    "subscribe": {
      "method""POST",
      "uri""https://logic-ju-test-001.azurewebsites.net:443/api/Webhook-Consumer/triggers/manual/invoke?api-version=2022-05-01&sp=%2Ftriggers%2Fmanual%2Frun&sv=1.0&sig=4rklm9-OkOiRHtj2A_cbW-Lifq6jd",
      "body": {
        "reqObject""@triggerBody()",
        "webhookUrl""@listCallbackUrl()"
      }
    },
    "unsubscribe": {}
  }
}
Here for the Subscribe - URI, I have specified the URI for the Consumer Workflow Trigger, and I am passing through the request object that was received for the current workflow along with the Webhook URL (callbackUrl), so the Consumer knows what to call. 

To make things simpler, I am not using any Unsubscribe settings.

Now finally I am introducing a dummy variable assignment to capture the request received to the Webhook.
Parent Workflow: Initialize variable
Code
{
  "inputs": {
    "variables": [
      {
        "name""reqReceivedToWebhook",
        "type""object",
        "value""@body('HTTP_Webhook')"
      }
    ]
  }
}

And that's all about it. 

Now we can call the Parent Workflow via an HTTP Request and see how things are integrating together.
Parent Workflow: Run with payload
Now I can see the Parent Workflow is running for some time. Because it has to call the Consumer and wait for it to call the exposed Webhook.
Parent Workflow: Running
And when the Webhook is called, Parent workflow will complete the execution.
Parent Workflow: Succeeded
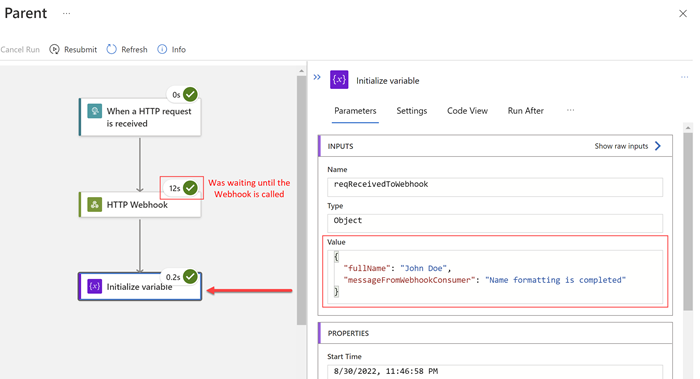
And now when we checked the Parent workflow run, we can see the final output.
Parent Workflow: Run Details
Hope this helps.

Happy Coding.

Regards,
Jaliya

Saturday, September 3, 2022

Azure PowerShell: Utility Script to Add Current IP to Given Set of Azure SQL Servers

I recently had my public IP address refreshed and the moment I saw that I knew a pain that was coming.

I have a couple of Azure SQL Databases sitting on different Azure directories/tenants that I am connecting to regularly from my local SSMS/Azure Data Studio instances. Now I am going to have to remove the existing firewall rule for my previous public IP address and add a new firewall rule for the new IP address in each of these Azure SQL Servers. That's something I was very much frustrated with.

Finally decided to write a script to make things easier for me. Pushed it to a repo and all the information is listed there (the link is at the bottom of the post).

And no longer I have to worry about getting my public IP address refreshed (in terms of accessing Azure SQL Servers of course).
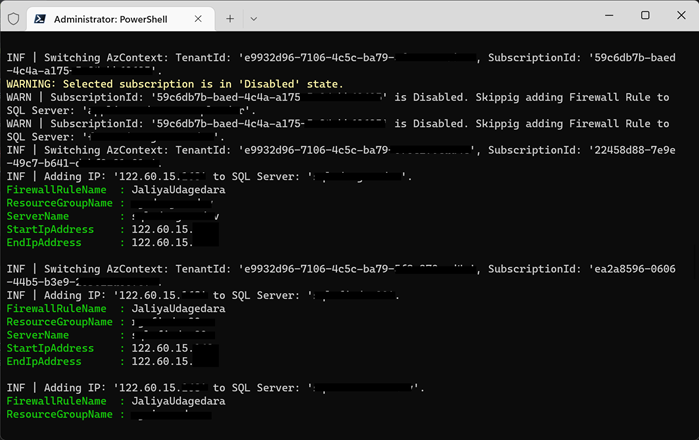
Execution
Script and instructions:

Hope this helps.

Happy Coding.

Regards,
Jaliya

Thursday, September 1, 2022

Introducing Built-In Container Support for the .NET SDK

In this post, let's see how we can create a containerized version of our application by doing just dotnet publish. Note: In order to do this, you’ll need .NET SDK 7.0.100, preview 7 or greater  installed and currently only supported for Web Projects (Microsoft.NET.Sdk.Web).

Let's start with a simple example. Here I am creating a Blazor Server App using the default template.

dotnet new blazorserver -n hello-blazor-container
cd .\hello-blazor-container\

Next, we need to install this new package: Microsoft.NET.Build.Containers. This is the package that lets us build container image from the project.

# add a reference to package that creates the container
dotnet add package Microsoft.NET.Build.Containers

And now this is what our .csproj looks like.

<Project Sdk="Microsoft.NET.Sdk.Web">
 
  <PropertyGroup>
    <TargetFramework>net7.0</TargetFramework>
    <Nullable>enable</Nullable>
    <ImplicitUsings>enable</ImplicitUsings>
    <RootNamespace>hello_blazor_container</RootNamespace>
  </PropertyGroup>
 
 <ItemGroup>
    <PackageReference Include="Microsoft.NET.Build.Containers" Version="0.1.8" />
  </ItemGroup>
  
</Project>

And that's mostly it. All we need to do now is running dotnet publish, setting PublishProfile=DefaultContainer.

# publish
dotnet publish --os linux --arch x64 -p:PublishProfile=DefaultContainer
docker publish
Alternatively, you can update the csproj file as follows and then you can just run dotnet publish without supplying any arguments.
<Project Sdk="Microsoft.NET.Sdk.Web">
 
  <PropertyGroup>
    <TargetFramework>net7.0</TargetFramework>
    <Nullable>enable</Nullable>
    <ImplicitUsings>enable</ImplicitUsings>
    <RootNamespace>hello_blazor_container</RootNamespace>
 
    <RuntimeIdentifier>linux-x64</RuntimeIdentifier>
    <PublishProfile>DefaultContainer</PublishProfile>
  </PropertyGroup>
 
 <ItemGroup>
    <PackageReference Include="Microsoft.NET.Build.Containers" Version="0.1.8" />
  </ItemGroup>
  
</Project>
Now if we examine our local docker images, I can see the new image is created.
docker images
Now let's create a container and run it.
# run the application as a container
docker run -it --rm -p 5000:80 hello-blazor-container:1.0.0
docker run
Now if I open up http://localhost:5000, I can see the application is up and running.
Running Container
You can customize the generated container through MSBuild properties. 

To learn more about this feature, read:

Happy Coding.

Regards,
Jaliya