Wednesday, November 9, 2022

.NET: Using dotnet user-jwts to Create Development Time JWT Tokens

Hope you are enjoying .NET Conf 2022. It's such great content and another 2 more days to go. Don't miss it.

In this post, let's see how we can easily create JWT tokens for Development purposes using dotnet user-jwts

Consider the following code.
using System.Security.Claims;
 
WebApplicationBuilder builder = WebApplication.CreateBuilder(args);
 
// Add services to the container.
builder.Services.AddAuthentication()
    .AddJwtBearer();
 
builder.Services.AddAuthorization();
 
WebApplication app = builder.Build();
 
// Configure the HTTP request pipeline.
app.UseAuthorization();
 
app.UseHttpsRedirection();
 
app.MapGet("/", () => "Hello .NET");
 
app.MapGet("/me", (ClaimsPrincipal user) =>
    {
        return user?.Claims
            .Select(c => new { c.Type, c.Value })
            .ToList();
    })
    .RequireAuthorization();
 
app.Run();
So here, I have added the required services for Authentication/Authorization and have an endpoint that requires an authorized request. On a side note, here you can see I haven't specified the default authentication scheme when registering Authentication. We don't have to specify the default Authentication scheme anymore, if there is only one, it's automatically taken as the default and that's new with ASP.NET Core 7.0. 

Now back to the topic, how do we get a valid token for development purposes here easily?

We can use dotnet user-jwts to create JWT tokens and if we want, we can customize the token, like by adding different different scopes, claims, and so on, so we can dev test our authorization policies.

To get a valid token, we just need to run the following command from the Project directory.
dotnet user-jwts create
And this will give you an output like below.
dotnet user-jwts create
And at the same time, the command will update appsettings.Development.json, with few settings to validate the token in the Development environment.
{
  "Logging": {
    "LogLevel": {
      "Default""Information",
      "Microsoft.AspNetCore""Warning"
    }
  },
  "Authentication": {
    "Schemes": {
      "Bearer": {
        "ValidAudiences": [
          "http://localhost:35983",
          "https://localhost:44310",
          "http://localhost:5000",
          "https://localhost:7028"
        ],
        "ValidIssuer""dotnet-user-jwts"
      }
    }
  }
}
And now we can test the secured endpoint using a tool of our choice, passing the token that got generated under the Bearer scheme in the request's Authorization Header. If I use cURL, I can see I am getting authorized successfully.
Test the secured endpoint
That's pretty neat.

Read more about dotnet user-jwts command options to learn how you can customize the token.

Happy Coding.

Regards,
Jaliya

Tuesday, November 8, 2022

Visual Studio 2022: Enable Quick Add for Add New Items

In this post, let's go through a nice extension for Visual Studio 2022 that is soon going to be available within Visual Studio 2022 itself within Preview features.

The extension is Add New File (64-bit) and it's quite nice. 

Note: as of today, the latest preview of Visual Studio 2022 is 17.4.0 Preview 6.0, and this extension is still not available out of the box within Visual Studio, so you will have to download the extension and install it.

Once installed, you can do Shift + F2. When this is shipped with Visual Studio, the shortcut would be Ctrl + Shift + A.

And it's going to bring up this nice little dialog.
Add New Item
You can click on Show All Templates and still go back to the default dialog, or you can just add new items using this tiny dialog.

Say I want to add a new file at the root of the project, I can do something like below.
Add New Item
This will create the MyClass.cs file as a C# class file based on the extension.

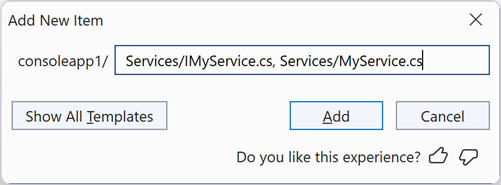
A really nice thing is, I can do something like below.
Add Multiple Items
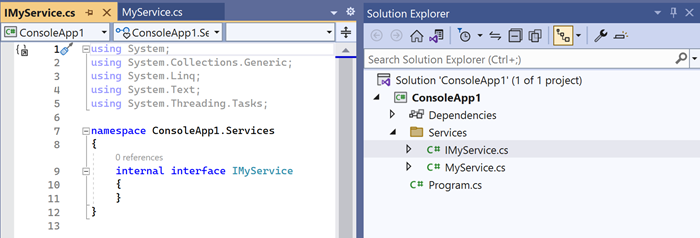
This will create a Services folder, and there it will create IMyService.cs and MyService.cs. And not only that, based on the naming convention of IMyService.cs, it will create an interface and not a class.
Files Created
That's pretty neat, isn't it? Do try this extension out. You can create folders, nested folders, and so on.

Can't wait to see this extension to be baked into Visual Studio 2022. Hopefully within this week (so much going on this week with .NET Conf 2022 coming up in just a couple of hours 😍) or in the next couple of weeks.

And watch the following video by Mads Kristensen to learn some cool features in Visual Studio 2022.
   Cool features in Visual Studio 2022

Happy Coding.

Regards,
Jaliya

Monday, November 7, 2022

Azure Logic App: HTTP Authentication with Azure AD

In this post let's see how easy it is to call REST API secured with Azure AD (or Azure AD B2C).

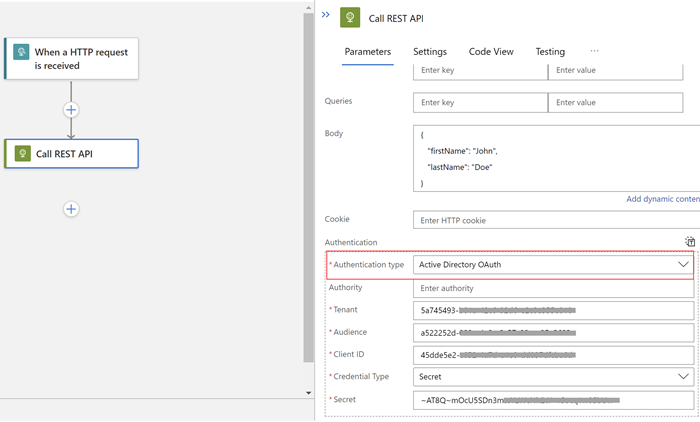
First, we need to select the Authentication type as Active Directory OAuth.

Then it's just a matter of entering the required information. 

Active Directory OAuth
Now, what are the values?
  • Authority: We can leave the Authority empty.Tenant: 
  • Tenant: TenaneId of the Azure Directory
  • Audience: We need to do an App Registration in the Azure AD, which you might have already done when setting up the REST API. If you haven't, you can follow the following guide, it's pretty in detail: Quickstart: Register an application with the Microsoft identity platform
  • Client ID: The Application (client) ID of the App Registration
  • Credential Type: Secret or Certificate (I have selected Secret for simplicity)
  • Secret: A secret you have generated under App Registration
Hope this helps.

Happy Coding.

Regards,
Jaliya

Wednesday, November 2, 2022

.NET 7.0: ArgumentNullException.ThrowIfNullOrEmpty()

In this post, let's have a look at this nice little feature that's available with .NET 7 and C# 11.0.

With .NET 6 and C# 10.0, we have got a simplified method to check an Argument for null (I have written a post a few months ago: C# 10.0: Nice Little Features).

ArgumentNullException.ThrowIfNull(argument);

But if the argument type is a string, and you need to check it for Empty, we had to fall back to the old approach, which is something like below.

string @string = "";

if (string.IsNullOrEmpty(@string))
{
    throw new ArgumentNullException(nameof(@string));
};

And with .NET 7 and C# 11.0, we don't have to do that anymore. We now have: ArgumentException.ThrowIfNullOrEmpty()

string @string = "";

ArgumentNullException.ThrowIfNullOrEmpty(@string);

I really like this, It's a small thing, but of course, small things matter.

Hope this helps.

Happy Coding.

Regards,
Jaliya