Showing posts with label MongoDB. Show all posts

Tuesday, June 9, 2026

Connecting to Azure DocumentDB (with MongoDB compatibility) using Microsoft Entra ID Managed Identity

In this post, let's have a look at how we can connect a .NET application to Azure DocumentDB (with MongoDB compatibility) using a Microsoft Entra ID Managed Identity instead of a password in the connection string. Idea is Azure hands the identity a token at runtime, the driver passes it to the cluster, and the cluster validates it against Microsoft Entra ID. For local development, DefaultAzureCredential falls back to your local identity as in any other services.

What is Azure DocumentDB (with MongoDB compatibility)?

If the name is new to you: Azure DocumentDB (with MongoDB compatibility) is the rebrand of what you may know as Azure Cosmos DB for MongoDB (vCore). It's a fully managed, MongoDB-compatible document database, around 99% compatible via the MongoDB wire protocol and BSON. So our existing MongoDB drivers and tools (the C# driver, mongosh, Compass, Studio 3T) will work against it as-is.

Prerequisites

A few things to have in place before we start:
  • An Azure Cosmos DB for MongoDB (vCore) cluster on a paid tier (M10 or higher). Entra auth is not available on Free.
  • A user-assigned managed identity assigned to your app (App Service, Container Apps, AKS, etc.).
  • For local development, Azure CLI, Azure Developer CLI etc logged in to the right tenant.
Step 1: Enable Entra auth on the cluster

First, we need to enable Microsoft Entra ID as an allowed auth mode on the cluster. 

This currently lives behind a preview API surface, so we need --latest-include-preview.
# Set these once for the session.
$RESOURCE_GROUP = "<resource-group>"
$CLUSTER = "<cluster-name>"
$LOCATION = "<region>"

# Enable Entra ID auth (keep NativeAuth).
'{"authConfig":{"allowedModes":["MicrosoftEntraID","NativeAuth"]}}'| 
Set-Content authConfig.json -Encoding ascii -NoNewline az resource patch ` --resource-group $RESOURCE_GROUP ` --name $CLUSTER ` --resource-type Microsoft.DocumentDB/mongoClusters ` --properties "@authConfig.json" ` --latest-include-preview
Step 2: Register the principal as a cluster user

Now he cluster needs to know which principals are allowed in and what they can do. We register each principal (by its object id) as a cluster user with a role on a database.

For the managed identity, register it as a ServicePrincipal
# App's managed identity, registered as a ServicePrincipal.
$PRINCIPAL_ID = az identity show `
    --resource-group $RESOURCE_GROUP `
    --name <identity-name> `
    --query principalId `
    --output tsv

'{"identityProvider":{"type":"MicrosoftEntraID","properties":{"principalType":"ServicePrincipal"}},"roles":[{"db":"admin","role":"root"}]}' |
    Set-Content user.json -Encoding ascii -NoNewline

az resource create `
    --resource-group $RESOURCE_GROUP `
    --name "$CLUSTER/users/$PRINCIPAL_ID" `
    --resource-type Microsoft.DocumentDB/mongoClusters/users `
    --location $LOCATION `
    --properties "@user.json" `
    --latest-include-preview
A couple of notes:
  • principalType is either ServicePrincipal or User. A managed identity is registered as a ServicePrincipal and User for your own account during local development.
  • vCore currently only allows the cluster root role on the admin database for Entra principals, there is no per-database readWrite option, so Entra access is effectively cluster-admin.
For local development, register your own Entra user the same way, object id from your signed-in CLI session, and the type is User:
# Your own user (local dev).
$PRINCIPAL_ID = az ad signed-in-user show `
    --query id `
    --output tsv

'{"identityProvider":{"type":"MicrosoftEntraID","properties":{"principalType":"User"}},"roles":[{"db":"admin","role":"root"}]}' |
    Set-Content user.json -Encoding ascii -NoNewline

az resource create `
    --resource-group $RESOURCE_GROUP `
    --name "$CLUSTER/users/$PRINCIPAL_ID" `
    --resource-type Microsoft.DocumentDB/mongoClusters/users `
    --location $LOCATION `
    --properties "@user.json" `
    --latest-include-preview
If you prefer Portal, Step 1 and 2 are basically these.
Authentication
Step 3: The .NET code

Now the code. We need a tiny shim that fetches an Entra access token and feeds it to the driver. The driver exposes an IOidcCallback interface (from the MongoDB.Driver.Authentication.Oidc namespace), and we back it with an Azure.Core.TokenCredential.

The two facts that are easy to get wrong:
  • The token scope is https://ossrdbms-aad.database.windows.net/.default.
  • For a guest or local user, you typically need to pin the tenantId in the TokenRequestContext. A managed identity ignores it, so leaving it null is fine in Azure.
Here's the callback. It implements both the sync and async variants, returning an OidcAccessToken with the token and its remaining lifetime:
using Azure.Core;
using MongoDB.Driver.Authentication.Oidc;

internal sealed class EntraOidcCallback(TokenCredential credential, string? tenantId) : IOidcCallback
{
    // vCore validates a token issued for the Azure OSS RDBMS resource.
    private static readonly string[] _scopes = ["https://ossrdbms-aad.database.windows.net/.default"];

    public OidcAccessToken GetOidcAccessToken(OidcCallbackParameters parameters, CancellationToken cancellationToken)
    {
        TokenRequestContext tokenRequestContext = BuildContext();

        AccessToken accessToken = credential.GetToken(tokenRequestContext, cancellationToken);

        return ToOidcAccessToken(accessToken);
    }

    public async Task<OidcAccessToken> GetOidcAccessTokenAsync(OidcCallbackParameters parameters, CancellationToken cancellationToken)
    {
        TokenRequestContext tokenRequestContext = BuildContext();

        AccessToken accessToken = await credential.GetTokenAsync(tokenRequestContext, cancellationToken);

        return ToOidcAccessToken(accessToken);
    }

    private static OidcAccessToken ToOidcAccessToken(AccessToken accessToken) =>
        new(accessToken.Token, accessToken.ExpiresOn - DateTimeOffset.UtcNow);
private TokenRequestContext BuildContext() { // A guest/local user needs the home tenant pinned.
// A managed identity ignores it.
if (string.IsNullOrEmpty(tenantId)) { return new TokenRequestContext(_scopes);
} return new TokenRequestContext(_scopes, tenantId: tenantId);
} }
And now let's build the MongoClient.
using Azure.Identity;
using MongoDB.Driver;

string host = "<HOST_NAME>.mongocluster.cosmos.azure.com";
string tenantId = "<TENANT_ID>"; 

MongoClientSettings settings = MongoClientSettings.FromUrl(MongoUrl.Create($"mongodb+srv://{host}/"));
settings.UseTls = true;
settings.RetryWrites = false;
settings.MaxConnectionIdleTime = TimeSpan.FromMinutes(2);

TokenCredential credential = new DefaultAzureCredential();
settings.Credential = MongoCredential.CreateOidcCredential(new EntraOidcCallback(credential, tenantId));

MongoClient mongoClient = new(settings);

// Omitted for brevity

Hope this helps.

Happy Coding.

Regards,
Jaliya

Saturday, February 28, 2026

Connecting Azure to MongoDB Atlas via Private Endpoints

In this post, let's see how we can set up Azure Private Endpoints to connect to a MongoDB Atlas cluster.

When we connect to a MongoDB Atlas cluster, we typically use a connection string like this:

mongodb+srv://<CLUSTER_NAME>.bzmphh.mongodb.net

This goes over the public internet. If we are on Azure and want traffic to stay private and routed through Azure's backbone network, we need a Private Endpoint.

Setting up a Private Endpoint between Azure and Atlas involves both sides:
  • Atlas
    • A Private Link Service that our Azure VNet can connect to
  • Azure
    • A Private Endpoint in our VNet's subnet that gets a private IP
    • An Azure Private DNS Zone so our apps resolve the Atlas hostname to the private IP instead of the public one

Let's walk through how to achieve this step by step using PowerShell. Please note that we need az cli and atlas cli for this.

$atlasProjectId = "<ATLAS_PROJECT_ID>"
$atlasClusterName = "<ATLAS_CLUSTER_NAME>"
$atlasRegion = "<ATLAS_REGION>"

$subscription = "<AZURE_SUBSCRIPTION_ID>"
$resourceGroup = "<RESOURCE_GROUP>"
$location = "<REGION>"
$vnetName = "<VNET>"
$subnetName = "<SNET_FOR_PRIVATE_ENDPOINT>"

$peName = "<PE_NAME>"
$peNicName = "<PE_NAME>_nic"
First, we need to create the Private Link Service in Atlas. This is the resource that Azure will connect to.
atlas privateEndpoints azure create `
    --projectId $atlasProjectId `
    --region $atlasRegion 
--output json | ConvertFrom-Json
# Wait for some time before running below
$peServices = atlas privateEndpoints azure list
--projectId $atlasProjectId | ConvertFrom-Json

$peService = peServices[0]
$endpointServiceId = $peService.id $privateLinkServiceResourceId = $peService.privateLinkServiceResourceId
Now we create the Private Endpoint in our Azure VNet. 
az account set --subscription $subscription

$pe = az network private-endpoint create `
    --resource-group $resourceGroup `
    --location $location `
    --name $peName `
    --nic-name $peNicName `
    --vnet-name $vnetName `
    --subnet $subnetName `
    --private-connection-resource-id $privateLinkServiceResourceId `
    --connection-name "$peName-connection" `
    --manual-request true | ConvertFrom-Json

$peResourceId = $pe.id
Note the "--manual-request true" flag is required because Atlas needs to accept the connection on their side.

The Private Endpoint creates a NIC in our subnet. We need its private IP for our next step.
$pePrivateIp = az network nic show `
    --subscription $subscription `
    --resource-group $resourceGroup `
    --name $peNicName `
    --query "ipConfigurations[0].privateIPAddress" -o tsv
Now we need to ask Atlas to accept the connection.
atlas privateEndpoints azure interfaces create $endpointServiceId `
    --privateEndpointId $peResourceId `
    --privateEndpointIpAddress $pePrivateIp `
    --projectId $atlasProjectId
Now we need a Private DNS Zone so that apps inside the VNet resolve Atlas hostnames to our private IP. We can derive the DNS Zone Name from the cluster's connection string.
$cluster = atlas clusters describe $atlasClusterName `
    --projectId $atlasProjectId -o json | ConvertFrom-Json

$srvHost = $cluster.connectionStrings.standardSrv -replace "mongodb\+srv://", ""
$dnsZoneName = $srvHost.Substring($srvHost.IndexOf('.') + 1)
# Result: bzmphh.mongodb.net

az network private-dns zone create `
    --resource-group $resourceGroup `
    --name $dnsZoneName
Note that we use a specific subdomain (bzmphh.mongodb.net) rather than mongodb.net. This avoids hijacking DNS resolution for all MongoDB Atlas clusters, only our cluster's traffic goes through the private endpoint.

The DNS zone needs to be linked to our VNet so resources inside it can resolve the private records.
$vnetResourceId = az network vnet show `
    --subscription $subscription `
    --resource-group $resourceGroup `
    --name $vnetName `
    --query "id" -o tsv

az network private-dns link vnet create `
    --resource-group $resourceGroup `
    --zone-name $dnsZoneName `
    --name $vnetName `
    --virtual-network $vnetResourceId `
    --registration-enabled false
After registering the PE, Atlas generates private endpoint-specific connection strings. We can find those using the following:
$connectionStrings = atlas clusters connectionStrings describe $atlasClusterName `
    --projectId $atlasProjectId `
    -o json | ConvertFrom-Json
atlas clusters connectionStrings describe
This gives us everything we need, the PE-specific hostnames, ports, and replica set info.

Now we parse the Atlas connection strings and create the DNS records in our Private DNS Zone.
$peConnStr = $connectionStrings.privateEndpoint[0]

$srvHostFull = $peConnStr.srvConnectionString -replace "mongodb\+srv://", ""
$srvPrefix = $srvHostFull.Split('.')[0]

$connPart = ($peConnStr.connectionString -replace "mongodb://", "").Split('?')[0].TrimEnd('/')
$hostPortEntries = $connPart.Split(',')
$aRecordHostFull = $hostPortEntries[0].Split(':')[0]
$aRecordName = $aRecordHostFull -replace "\.$dnsZoneName$", ""
$ports = $hostPortEntries | ForEach-Object { $_.Split(':')[1] }

$queryParams = ($peConnStr.connectionString -split '\?')[1]
$txtValue = ($queryParams -split '&' | Where-Object {
    $_ -match "authSource|replicaSet"
}) -join '&'
Now create the actual records:
# A Record
az network private-dns record-set a add-record `
    --resource-group $resourceGroup `
    --zone-name $dnsZoneName `
    --record-set-name $aRecordName `
    --ipv4-address $pePrivateIp

# SRV Records
foreach ($port in $ports) {
    az network private-dns record-set srv add-record `
        --resource-group $resourceGroup `
        --zone-name $dnsZoneName `
        --record-set-name "_mongodb._tcp.$srvPrefix" `
        --target $aRecordHostFull `
        --priority 0 --weight 0 --port $port
}

# TXT Record
az network private-dns record-set txt add-record `
    --resource-group $resourceGroup `
    --zone-name $dnsZoneName `
    --record-set-name $srvPrefix `
    --value "`"$txtValue`""
Once done, I can see something like this in our Private DNS Zone.
Private DNS Zone: Recordsets

Why Not Just an A Record?

If the private endpoint gives us a single private IP, why do we need three types of DNS records?

When our app uses a connection string like:
mongodb+srv://<CLUSTER_NAME>-pl-0.bzmphh.mongodb.net
The MongoDB driver doesn't just do a simple hostname lookup. It performs three DNS queries:
  • SRV Record
    • This tells the driver which hosts and ports to connect to. For private endpoints, the port is 1024 (not the standard 27017). The SRV record returns:
<CLUSTER_NAME>-pl-0-0.bzmphh.mongodb.net:1024
<CLUSTER_NAME>-pl-0-0.bzmphh.mongodb.net:1025
<CLUSTER_NAME>-pl-0-0.bzmphh.mongodb.net:1026
Without SRV records, the driver wouldn't know which port to use and would default to 27017, which won't work over Private Link.
  • TXT Record
    • This provides the replica set name and auth database:
authSource=admin&replicaSet=atlas-5x58u7-shard-0
Without this, the driver wouldn't know which replica set to join or where to authenticate.
  • A Record
    • This resolves the hostname to the Private IP address of our Private Endpoint. This is what actually routes traffic through Azure Private Link instead of the public internet.
What If You Skip SRV and TXT?

You could technically use a "mongodb://" connection string instead of "mongodb+srv://" and hardcode everything:
mongodb://<CLUSTER_NAME>-pl-0-0.bzmphh.mongodb.net:1024,<CLUSTER_NAME>-pl-0-0.bzmphh.mongodb.net:1025,<CLUSTER_NAME>-pl-0-0.bzmphh.mongodb.net:1026/?authSource=admin&replicaSet=atlas-5x58u7-shard-0
But that means your application configuration now contains infrastructure details, ports, replica set names, and host entries. If anything changes on Atlas's side, you'd need to update and redeploy your app. With "mongodb+srv://", your app connection string is just "mongodb+srv://<CLUSTER_NAME>-pl-0-0.bzmphh.mongodb.net", clean and stable. If something changes, you update the DNS records (infrastructure), not the app config.

So all three are required for "mongodb+srv://" to work over Private Link.

Once everything is set up, you can run the following and verify inside the VNet:
# Check DNS resolution
nslookup <CLUSTER_NAME>-pl-0.bzmphh.mongodb.net

# Test connection
mongosh 'mongodb+srv://<CLUSTER_NAME>-pl-0.bzmphh.mongodb.net' \
    --username dbadmin --password 'yourpassword'
The A record should resolve to your private IP, and mongosh should connect without going over the public internet.

Note: The domain (bzmphh.mongodb.net), -pl-x suffix, and port numbers shown here are examples. Update them to match the values for your own Atlas cluster and Private Endpoint setup.

Hope this helps.

Happy Coding.

Regards,
Jaliya

Tuesday, December 23, 2025

Studio 3T and Azure Cosmos DB for MongoDB

When working with MongoDB, having a reliable GUI tool makes all the difference. Studio 3T has been my go-to tool for years, and it obviously works seamlessly with MongoDB. And most importantly, it works very well with Azure Cosmos DB for MongoDB.

There are several MongoDB GUI tools available, but Studio 3T stands out for a few reasons:
  • Visual Query Builder: Build queries visually if you prefer not to write JSON
  • IntelliShell: Auto-completion for MongoDB queries with syntax highlighting
  • Aggregation Editor: Step-by-step pipeline builder with stage-by-stage output preview
  • SQL Query: Write SQL and have it translated to MongoDB query language
  • Import/Export: Easily move data between MongoDB, JSON, CSV, and SQL databases
Connecting to Azure Cosmos DB for MongoDB from Studio 3T is just as easy as any MongoDB. Just copy the Connection String and paste it in, and you are connected.

Note: Azure Cosmos DB for MongoDB requires SSL, which is already included in the connection string.

SQL to MongoDB


If you are coming from a SQL background, the SQL Query feature is a lifesaver. Write a query like:
SELECT * 
FROM employees 
WHERE department = 'IT'
ORDER BY name 
LIMIT 10
And Studio 3T translates it to:
db.employees
.find({ department"IT" })
   .sort({ name: 1 })
   .limit(10);
Do try it out.

Happy Coding.

Regards,
Jaliya

Saturday, August 9, 2025

Azure Automation Runbooks and Azure Cosmos DB for MongoDB

I recently wanted to run a daily job on an Azure Cosmos DB for MongoDB. I thought Logic Apps would be a good fit, but surprisingly there is still a no connector that supports Azure Cosmos DB for MongoDB (currently only supports Azure Cosmos DB for NoSQL), and that's a bummer.

But there are of course other approaches we can take, like Azure Automation Runbooks. 

In this post, let's see how we can create an Azure Automation Python Runbook to query Azure Cosmos DB for MongoDB.

I have an Azure Automation account created and I have created a Python 3.10 Runbook. Now in order to connect to MongoDB, I am going to use pymongo package. 

First let's add the package to Automation Account. Note: For Python 3.10 packages, only .whl files targeting cp310 Linux OS are currently supported.

I am downloading the pymongo package to my local computer.

pip download pymongo `
    --platform manylinux2014_x86_64 `
    --only-binary=:all: `
    --python-version 3.10

Upon completion of above command, I can see 2 .whl files, pymongo and a dependency.

.whl files
Then I am uploading both these .whl files to Python packages under Automation Account.

Add Python packages

Now I can run some python code to query my Azure Cosmos DB for MongoDB.

from pymongo import MongoClient

MONGODB_CONNECTIONSTRING = "mongodb://..."
DATABASE_NAME = "<Database_Name>"
COLLECTION_NAME = "<Collection_Name>"

client = MongoClient(MONGODB_CONNECTIONSTRING, ssl=True)
db = client[DATABASE_NAME]
collection = db[COLLECTION_NAME]

documents = collection.find(
    {
        # query to filter documents
    })

documents = list(documents)

client.close()
# TODO: Work with documents

Hope this helps.

Happy Coding.

Regards,
Jaliya

Wednesday, April 5, 2023

Azure Kubernetes Service: Running MongoDB as a StatefulSet with Azure Files as PersistentVolume

In this post let's see how we can run MongoDB as a StatefulSet in AKS and maintain its storage outside of the pods so data is safe from the ephemeral nature of pods. We are going to maintain the database storage in File Shares in an Azure Storage Account.

Preparation


In Azure, I already have an AKS created. 

And then I have created a simple ASP.NET Core Minimal API which reads and writes data from/to a MongoDB. We will use this API to test the functionality.
using KubeStorage.Mongo.Api.Models;
using KubeStorage.Mongo.Api.Services;
using Microsoft.AspNetCore.Http.HttpResults;

WebApplicationBuilder builder = WebApplication.CreateBuilder(args);

builder.Services.Configure<CustomerDatabaseSettings>(builder.Configuration.GetSection("CustomersDatabase"));
builder.Services.AddSingleton<CustomersService>();

WebApplication app = builder.Build();

app.UseHttpsRedirection();

app.MapGet("/customers/{id}"async Task<Results<Ok<Customer>, NotFound>> (CustomersService customersServicestring id) =>
{
    Customer? customer = await customersService.GetAsync(id);
    if (customer == null)
    {
        return TypedResults.NotFound();
    }

    return TypedResults.Ok(customer);
});

app.MapGet("/customers"async (CustomersService customersService) =>
{
    return TypedResults.Ok(await customersService.GetAsync());
});

app.MapPost("/customers"async (CustomersService customersService, Customer customer) =>
{
    await customersService.CreateAsync(customer);

    return TypedResults.Created($"/customers/{customer.Id}", customer);
});

app.Run();

I have containerized this and have it available as a Docker image.

Now let's run MongoDB as a StatefulSet in AKS, maintain its storage in Azure File Shares, and use the above API to consume the database.

Start


First, let's start by creating a K8s namespace for the demo.
apiVersion: v1
kind: Namespace
metadata:
  name: demo-mongodb
Now let's create a K8s StorageClass (SC). This will be used to dynamically provision storage.
kind: StorageClass
apiVersion: storage.k8s.io/v1
metadata:
  name: sc-azurefile-mongo
provisioner: file.csi.azure.com # replace with "kubernetes.io/azure-file" if aks version is less than 1.21
reclaimPolicy: Retain # default is Delete
allowVolumeExpansion: true
mountOptions:
  - dir_mode=0777
  - file_mode=0777
  - uid=0
  - gid=0
  - mfsymlinks
  - cache=strict
  - actimeo=30
parameters:
  skuName: Standard_LRS
  location: eastus2
Here you can customize dynamic provisioning parameters and those are listed here: Create and use a volume with Azure Files in Azure Kubernetes Service (AKS): Dynamic provisioning parameters.  

And another important thing to note here, SCs are cluster-scoped resources.

The next step is creating a StatefulSet and its wrapper Service for MongoDB.
apiVersion: apps/v1
kind: StatefulSet
metadata:
  name: mongo
  namespace: demo-mongodb
spec:
  selector:
    matchLabels:
      app: mongodb
  serviceName: mongodb
  replicas: 3
  template:
    metadata:
      labels:
        app: mongodb
    spec:
      terminationGracePeriodSeconds: 10
      containers:
        - name: mongodb
          image: mongo:latest
          command:
            - mongod
            - "--bind_ip_all"
            - "--replSet"
            - rs0
          ports:
            - containerPort: 27017
          volumeMounts:
            - name: vol-azurefile-mongo
              mountPath: /data/db
  volumeClaimTemplates:
    - metadata:
        name: vol-azurefile-mongo
      spec:
        storageClassName: sc-azurefile
        accessModes:
          - ReadWriteOnce
        resources:
          requests:
            storage: 1Gi

---

apiVersion: v1
kind: Service
metadata:
  name: mongodb
  namespace: demo-mongodb
spec:
  clusterIP: None
  ports:
    - name: tcp
      port: 27017
      protocol: TCP
  selector:
    app: mongodb
Here, I am creating a StatefulSet of mongo:latest with 3 replicas. One of the advantages of  StatefulSet is, for a StatefulSet with n replicas, when Pods are being deployed, they are created sequentially, ordered from {0..n-1}. And then I am setting up a ReplicaSet named rs0 by running the command section. The important section is the volumeClaimTemplates, where we will create storage using PersistentVolumes provisioned by our storage class sc-azurefile.

And then I have a headless service wrapping the MongoDB StatefulSet

Now let's apply all these configurations to our AKS.
k apply
And let's make sure everything is created.
k get all --namespace demo-mongodb
And now if I check the node resource group for my AKS, I can see a new Storage Account is provisioned and Azure Files are created for each replica.
Azure File Shares Created For Each Replica
MongoDB Files
Now since MongoDB replicas are running, let's configure the ReplicaSet. I am shelling into the primary relica.
kubectl exec --namespace demo-mongodb mongo-0 --stdin --tty  -- mongosh
Mongo Shell
Now run the following set of commands in the Mongo Shell.
rs.initiate()
var cfg = rs.conf()
cfg.members[0].host="mongo-0.mongodb:27017"
rs.reconfig(cfg)
rs.add("mongo-1.mongodb:27017")
rs.add("mongo-2.mongodb:27017")
rs.status()
And note here, hostnames must follow below.
<mongo-pod-name>.<mongodb-headless-service>:<mongodb-port>
And make sure rs.status() is all successful. Something like below.
rs0 [direct: primary] test> rs.status()
{
  ...
  members: [
    {
      _id: 0,
      name'mongo-0.mongodb:27017',
      health: 1,
      state: 1,
      stateStr'PRIMARY',
      ...
    },
    {
      _id: 1,
      name'mongo-1.mongodb:27017',
      health: 1,
      state: 2,
      stateStr'SECONDARY',
      syncSourceHost'mongo-0.mongodb:27017',
      ...
    },
    {
      _id: 2,
      name'mongo-2.mongodb:27017',
      health: 1,
      state: 2,
      stateStr'SECONDARY',
      ...
    }
  ],
  ok: 1,
  ...
}
Let's exit from the Shell. 

Finally, let's create a deployment and a service for our test API.
apiVersion: apps/v1
kind: Deployment
metadata:
  name: api-bridge-mongodb
  namespace: demo-mongodb
spec:
  selector:
    matchLabels:
      app: api-bridge-mongodb
  template:
    metadata:
      labels:
        app: api-bridge-mongodb
    spec:
      containers:
        - name: api-bridge-mongodb
          image: myacr.azurecr.io/demo/mongodb/api:dev
          imagePullPolicy: Always
          env:
            - name: CustomersDatabase__ConnectionString
              value: mongodb://mongo-0.mongodb:27017,mongo-1.mongodb:27017,mongo-2.mongodb:27017?replicaSet=rs0

---

apiVersion: v1
kind: Service
metadata:
  name: api-bridge-mongodb
  namespace: demo-mongodb
spec:
  type: LoadBalancer
  ports:
    - port: 5051
      targetPort: 80
      protocol: TCP
  selector:
    app: api-bridge-mongodb
    
---
Note here for our test API, I am using the MongoDB Cluster ConnectionString.

Now let's test things out. I am getting the IP for our Test API.
k get services --namespace demo-mongodb
And let's hit the endpoints.
GET: /customers
No errors at least. Let's create a Customer.
POST: /customers
And now let's get all Customers.
GET: /customers
Hope this helps. You can find the complete code sample here,
   https://github.com/jaliyaudagedara/aks-examples/tree/main/storages/mongodb

Happy Coding.

Regards,
Jaliya

Monday, February 6, 2023

Azure Cosmos DB for MongoDB: Backup and Restore Databases using MongoDB Command Line Database Tools

In this post let's see how we can backup and restore databases in an Azure Cosmos DB for MongoDB account using MongoDB Command Line Database Tools.

I am using Windows and the first step is to download MongoDB Command Line Database Tools. As of today, the version is 100.6.1 and I have downloaded the zip version. You can even download the msi and install the tools.

Backup

You can run the mongodump.exe from the command prompt providing the connection string of your Azure Cosmos DB for MongoDB account, the database you want to backup and an output path to write the backup files to.

mongodump.exe --uri "<connectionString>" --db <databaseName> --out <backupDirectory> 

mongodump.exe

Restore

You can run the mongorestore.exe from the command prompt providing the connection string of your Azure Cosmos DB for MongoDB account, a target database name, and the directory containing the backup files of the database.

mongorestore.exe --uri "<connectionString>" --db <databaseName> --dir <backupDirectory\databaseName>

mongorestore.exe
I am yet to confirm whether this approach is recommended, but so far I haven't faced any issues with the restored database. Collections and their documents count look great.

If you want to copy a database from one Azure Cosmos DB for MongoDB account to other, you can try this out. I have tried, Copy data to or from Azure Cosmos DB for MongoDB using Azure Data Factory or Synapse Analytics, but unfortunately, it didn't work out well due to some issues, hence tried MongoDB Command Line Database Tools.
   Issue: Copy Activity: Copying data from and to Azure Cosmos DB for MongoDB: Failing due to incorrect Data Type 
   Issue: Copy Activity: Copying data from and to Azure Cosmos DB for MongoDB: "The retrieved type of data JObject is not supported yet"

Hope this helps. 

Please don't forget to leave a comment on whether this approach worked for you or not.

Happy Coding.

Regards,
Jaliya

____________________________________________________________________________________________________________________________

Update on 2023/02/08:

I have received some recommendations from Product Group: Azure Cosmos DB.
  • Native MongoDB tools would be recommended for smaller workloads
  • Azure Data Factory (ADF) for medium (<1TB)
  • Spark if it’s a large dataset (>1 TB)

Wednesday, August 24, 2022

Connecting to Azure Cosmos DB API for MongoDB using Azure Data Studio

Did you know that we can connect to an Azure Cosmos DB API for MongoDB using Azure Data Studio. There is an extension: Azure Cosmos DB API for MongoDB for Azure Data Studio, it's still in it's preview stage, but works great.

This extension in Azure Data Studio includes features such as,

  • Connection manager & query editor
  • Provisioning and scaling containers
  • Integrated terminal

Let's have a look at how easy it is to use this extension.

First, you need to download and install Azure Data Studio (if you haven't already). Then search for mongo under extensions. 
Install Azure Cosmos DB API for MongoDB extension
Select Azure Cosmos DB API for MongoDB, install it and then reload/restart the Azure Data Studio. Once that's done, click on New Connection and select Mongo account as the Connection Type.
Connect to MongoDB account
Now copy and paste the Connection string of your Azure Cosmos DB API for MongoDB account and click on Connect. Once you are connected. you will see all your databases.
Connected to Azure Cosmos DB API for MongoDB account
You can right-click on the connected account and select Manage to see more options. 
Manage Mongo account
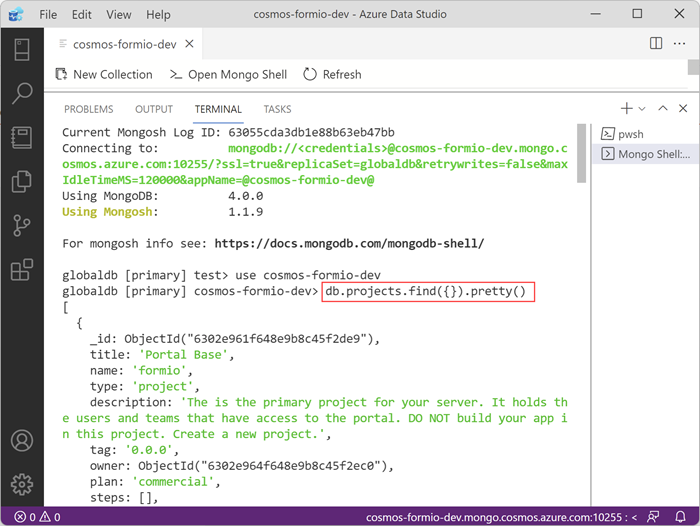
Here I am opening an existing database and going to Open Mongo Shell to run a simple query on that database.
Executing queries on Mongo Shell
Do try it out, you are going to love it.

Happy Coding.

Regards,
Jaliya