Monday, December 5, 2022

ASP.NET Core Web API: Exception Handling

In this post, let's see how we can provide a common approach for handling exceptions in ASP.NET Core Web APIs in the Development environment as well as in Production environments.

It's quite easy, basically, we can introduce UseExceptionHandler Middleware to handle exceptions.

Consider the following code.
WebApplicationBuilder builder = WebApplication.CreateBuilder(args);
 
// Add services to the container.
builder.Services.AddControllers();
 
WebApplication app = builder.Build();
 
// Configure the HTTP request pipeline.
if (app.Environment.IsDevelopment())
{
    app.UseExceptionHandler("/error-development");
}
else
{
    app.UseExceptionHandler("/error");
}
 
app.UseHttpsRedirection();
 
app.UseAuthorization();
 
app.MapControllers();
 
app.Run();
Here I have added UseExceptionHandler passing in different routes based on the environment. Now we need to define controller actions to respond to /error-development and /error routes.
using Microsoft.AspNetCore.Diagnostics;
using Microsoft.AspNetCore.Mvc;
using System.Net;
 
namespace WebApplication1.Controllers;
 
[ApiController]
[ApiExplorerSettings(IgnoreApi = true)]
public class ErrorController : ControllerBase
{
    private readonly IHostEnvironment _hostEnvironment;
 
    public ErrorController(IHostEnvironment hostEnvironment)
    {
        _hostEnvironment = hostEnvironment;
    }
 
    [Route("/error-development")]
    public IActionResult HandleErrorDevelopment()
    {
        if (!_hostEnvironment.IsDevelopment())
        {
            return NotFound();
        }
 
        IExceptionHandlerFeature exceptionHandlerFeature = HttpContext.Features.Get<IExceptionHandlerFeature>()!;
 
        if (exceptionHandlerFeature == null)
        {
            return Problem(
                title: $"'{nameof(IExceptionHandlerFeature)}' not found.");
        }
 
        return exceptionHandlerFeature.Error switch
        {
            NotImplementedException notImplementedException => Problem(
                title: notImplementedException.Message,
                detail: notImplementedException.StackTrace,
statusCode: (int)HttpStatusCode.NotImplemented), _ => Problem( title: exceptionHandlerFeature.Error.Message, detail: exceptionHandlerFeature.Error.StackTrace) }; } [Route("/error")] public IActionResult HandleError() => Problem(); }
Note: The actions aren't attributed with HttpVerbs and the controller is attributed with [ApiExplorerSettings(IgnoreApi = true)] to exclude from OpenAPI specification (if there's any).

For the Development environment, based on the type of the exception, I am returning different statusCodes and I am including the StackTrace to troubleshoot the issue easily. 

For an example, consider the following action.
[HttpGet(Name = "GetWeatherForecast")]
public IEnumerable<WeatherForecast> Get()
{
    throw new NotImplementedException("Not implemented.");
}
If we call the above action when running on a Development environment, I will be getting a response like below. It's the standard RFC 7807-compliant Problem Detail.
Development: StatusCode: 501
And now if I change the endpoint to throw a different exception,
[HttpGet(Name = "GetWeatherForecast")]
public IEnumerable<WeatherForecast> Get()
{
    throw new Exception("Something happened.");
}
I am getting the default Internal Server Error status code with the StackTrace.
Development: StatusCode: 500
And when in a production environment, we just get the response hiding internal details.
Production: StatusCode: 500

Hope this helps.

Happy Coding.

Regards,
Jaliya

Sunday, December 4, 2022

ASP.NET Core: Suppress Implicit Required Model Validation For Non Nullable Reference Types

In this post, let's see how we can disable implicit required model validation for non-nullable reference types when the nullable context is enabled in an ASP.NET Core Web Application.

Let's consider the following sample.

#nullable enable
 
using Microsoft.AspNetCore.Mvc;
 
WebApplicationBuilder builder = WebApplication.CreateBuilder(args);
 
// Register Services.
builder.Services.AddControllers();
 
WebApplication app = builder.Build();
 
// Configure the HTTP request pipeline.
app.UseHttpsRedirection();
 
app.MapControllers();
 
app.Run();

[ApiController]
[Route("[controller]")]
public class EmployeesController : ControllerBase
{
    [HttpPost]
    public ActionResult<EmployeeCreate([FromBodyEmployee employee)
    {
        return employee;
    }
}
 
public class Employee
{
    public string FirstName { getset; }
 
    public string LastName { getset; }
 
    public Employee(string firstNamestring lastName)
    {
        FirstName = firstName;
        LastName = lastName;
    }
}

Here if we try to post a payload with null values for reference types that are not marked with nullable, ASP.NET Core by default is doing a model validation and throwing an error.

For example, here if we post a payload without setting the value for LastName, I am getting the following error.
ASP.NET Core Model Validation
But there are times, we need to offload the validation to a separate module. In that case, we can easily suppress this validation as follows.
builder.Services.AddControllers(x =>
{
    x.SuppressImplicitRequiredAttributeForNonNullableReferenceTypes = true;
});
And then, we won't be seeing that validation anymore.
ASP.NET Core: Suppress Implicit Required Attribute For Non Nullable Reference Types
Hope this helps.

Happy Coding.

Regards,
Jaliya

Friday, December 2, 2022

JsonExtensionDataAttribute in System.Text.Json.Serialization

In this post let's have a look at this nice attribute JsonExtensionDataAttribute that's available in System.Text.Json.Serialization Namespace.

I had a requirement where I have an integration API that connects a client application with a third-party API. The client application is sending some JSON that needs to be sent to the third-party API as is, and at the same time, within the integration API, I need to intercept and read some values in the JSON. The JSON schema can be huge, and the Integration API doesn't really care about the full JSON schema. So how do we define a POCO class having the properties I really care about and let other properties get deserialized/serialized without any data loss.

Let's go by an example.

Consider the following JSON schema.

string jsonString =
    """
    {
        "_id": "57d0a0a676f943a4007e1525",
        "modified": "2022-09-07T23:20:06.949Z",
        "title": "Register",
        "display": "form",
        "type": "form",
        "name": "register",
        "path": "register",
        "components": [
            {
                "label": "First Name",
                "key": "firstName",
                "type": "textfield",
                "placeholder": "",
                "prefix": "",
                "suffix": "",
                "multiple": false
            },
            {
                "label": "Last Name",
                "key": "firstName",
                "type": "textfield",
                "placeholder": "",
                "prefix": "",
                "suffix": "",
                "multiple": false
            }
        ],
        "tags": []
    }
    """;

Now let's say, I only care about _idname and type properties.

I can create a POCO class, something like below.

public class Form
{
    [JsonPropertyName("_id")]
    public string Id { getset; }
 
    public string Name { getset; }
 
    public string Type { getset; }
}

But then the issue is, upon deserialization, I am going to lose some data. And this is where JsonExtensionDataAttribute comes in handy.

public class Form
{
    [JsonPropertyName("_id")]
    public string Id { getset; }
 
    public string Name { getset; }
 
    public string Type { getset; }
 
    [JsonExtensionData]
    public Dictionary<stringobject> JsonExtensionData { getset; }
}

Now when I deserialized the jsonString to Form what's going to happen is, the properties with matching members will get their values and the properties that do not have a matching member will get added to the JsonExtensionData dictionary.

JsonSerializerOptions jsonSerializerOptions = new()
{
    PropertyNamingPolicy = JsonNamingPolicy.CamelCase
};
 
Form form = JsonSerializer.Deserialize<Form>(jsonString, jsonSerializerOptions);

Here if I have a look at the form, it's going to look like this.

Deserialization
You can see that properties with matching members got their values and the rest went into the Dictionary.

And now when I serialize the form, the values in the Dictionary are written back as expected. 

string serializedString = JsonSerializer.Serialize(form, jsonSerializerOptions);
//{
//    "_id": "57d0a0a676f943a4007e1525",
//    "name": "register",
//    "type": "form",
//    "modified": "2022-09-07T23:20:06.949Z",
//    "title": "Register",
//    "display": "form",
//    "path": "register",
//    "components": [
//        {
//            "label": "First Name",
//            "key": "firstName",
//            "type": "textfield",
//            "placeholder": "",
//            "prefix": "",
//            "suffix": "",
//            "multiple": false
//        },
//        {
//            "label": "Last Name",
//            "key": "firstName",
//            "type": "textfield",
//            "placeholder": "",
//            "prefix": "",
//            "suffix": "",
//            "multiple": false
//        }
//    ],
//    "tags": []
//}

Isn't it nice?

Happy Coding.

Regards,
Jaliya

Thursday, December 1, 2022

C# 11.0: File-local Types

In this post let's have a look at one of the newest additions to C#, which is the file access modifier. 

For types that are declared with file access modifier, its visibility or scope is only limited to the file in which it's declared.

Consider the below code.

File1.cs

namespace MyNamespace;
 
file class MyClass
{
    public static void MyMethod()
    {
        //
    }
}

File2.cs

namespace MyNamespace;
 
file class MyClass
{
    public static void MyMethod()
    {
        //
    }
}

Here I have 2 classes with the same name and within the same namespace but in different files. With C# 11.0, this will build just fine. Prior to C# 11.0, we weren't able to do this.

file keyword can be applied only to the following types.

And it's allowed only at the top-level type. 

public class MyClass
{
    // Error: Not allowed as MyOtherClass is a nested type
    file class MyOtherClass
    { 
    
    }
}

It's very unlikely we will be using this file access modifier during business application development. But wanted to share it, because in case you see it, you know what it is.

More read:
   file (C# Reference)
   File-local types

Hope this helps.

Happy Coding.

Regards,
Jaliya

Wednesday, November 9, 2022

.NET: Using dotnet user-jwts to Create Development Time JWT Tokens

Hope you are enjoying .NET Conf 2022. It's such great content and another 2 more days to go. Don't miss it.

In this post, let's see how we can easily create JWT tokens for Development purposes using dotnet user-jwts

Consider the following code.
using System.Security.Claims;
 
WebApplicationBuilder builder = WebApplication.CreateBuilder(args);
 
// Add services to the container.
builder.Services.AddAuthentication()
    .AddJwtBearer();
 
builder.Services.AddAuthorization();
 
WebApplication app = builder.Build();
 
// Configure the HTTP request pipeline.
app.UseAuthorization();
 
app.UseHttpsRedirection();
 
app.MapGet("/", () => "Hello .NET");
 
app.MapGet("/me", (ClaimsPrincipal user) =>
    {
        return user?.Claims
            .Select(c => new { c.Type, c.Value })
            .ToList();
    })
    .RequireAuthorization();
 
app.Run();
So here, I have added the required services for Authentication/Authorization and have an endpoint that requires an authorized request. On a side note, here you can see I haven't specified the default authentication scheme when registering Authentication. We don't have to specify the default Authentication scheme anymore, if there is only one, it's automatically taken as the default and that's new with ASP.NET Core 7.0. 

Now back to the topic, how do we get a valid token for development purposes here easily?

We can use dotnet user-jwts to create JWT tokens and if we want, we can customize the token, like by adding different different scopes, claims, and so on, so we can dev test our authorization policies.

To get a valid token, we just need to run the following command from the Project directory.
dotnet user-jwts create
And this will give you an output like below.
dotnet user-jwts create
And at the same time, the command will update appsettings.Development.json, with few settings to validate the token in the Development environment.
{
  "Logging": {
    "LogLevel": {
      "Default""Information",
      "Microsoft.AspNetCore""Warning"
    }
  },
  "Authentication": {
    "Schemes": {
      "Bearer": {
        "ValidAudiences": [
          "http://localhost:35983",
          "https://localhost:44310",
          "http://localhost:5000",
          "https://localhost:7028"
        ],
        "ValidIssuer""dotnet-user-jwts"
      }
    }
  }
}
And now we can test the secured endpoint using a tool of our choice, passing the token that got generated under the Bearer scheme in the request's Authorization Header. If I use cURL, I can see I am getting authorized successfully.
Test the secured endpoint
That's pretty neat.

Read more about dotnet user-jwts command options to learn how you can customize the token.

Happy Coding.

Regards,
Jaliya

Tuesday, November 8, 2022

Visual Studio 2022: Enable Quick Add for Add New Items

In this post, let's go through a nice extension for Visual Studio 2022 that is soon going to be available within Visual Studio 2022 itself within Preview features.

The extension is Add New File (64-bit) and it's quite nice. 

Note: as of today, the latest preview of Visual Studio 2022 is 17.4.0 Preview 6.0, and this extension is still not available out of the box within Visual Studio, so you will have to download the extension and install it.

Once installed, you can do Shift + F2. When this is shipped with Visual Studio, the shortcut would be Ctrl + Shift + A.

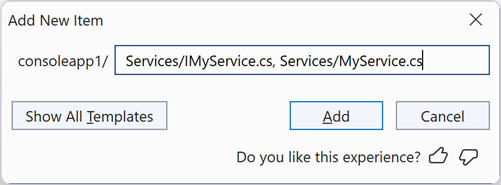
And it's going to bring up this nice little dialog.
Add New Item
You can click on Show All Templates and still go back to the default dialog, or you can just add new items using this tiny dialog.

Say I want to add a new file at the root of the project, I can do something like below.
Add New Item
This will create the MyClass.cs file as a C# class file based on the extension.

A really nice thing is, I can do something like below.
Add Multiple Items
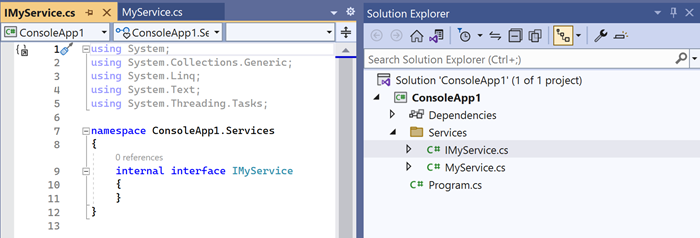
This will create a Services folder, and there it will create IMyService.cs and MyService.cs. And not only that, based on the naming convention of IMyService.cs, it will create an interface and not a class.
Files Created
That's pretty neat, isn't it? Do try this extension out. You can create folders, nested folders, and so on.

Can't wait to see this extension to be baked into Visual Studio 2022. Hopefully within this week (so much going on this week with .NET Conf 2022 coming up in just a couple of hours 😍) or in the next couple of weeks.

And watch the following video by Mads Kristensen to learn some cool features in Visual Studio 2022.
   Cool features in Visual Studio 2022

Happy Coding.

Regards,
Jaliya

Monday, November 7, 2022

Azure Logic App: HTTP Authentication with Azure AD

In this post let's see how easy it is to call REST API secured with Azure AD (or Azure AD B2C).

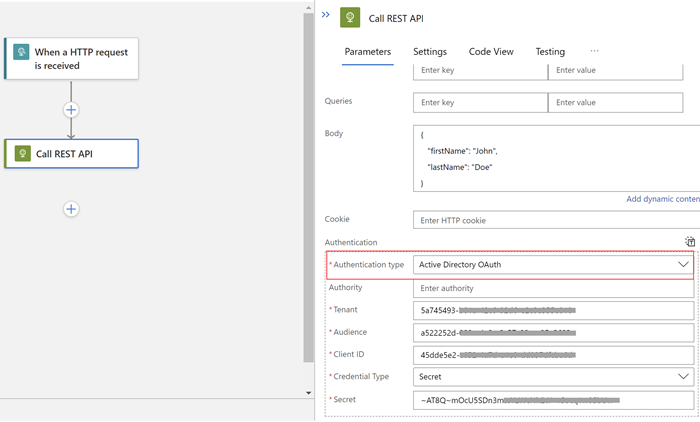
First, we need to select the Authentication type as Active Directory OAuth.

Then it's just a matter of entering the required information. 

Active Directory OAuth
Now, what are the values?
  • Authority: We can leave the Authority empty.Tenant: 
  • Tenant: TenaneId of the Azure Directory
  • Audience: We need to do an App Registration in the Azure AD, which you might have already done when setting up the REST API. If you haven't, you can follow the following guide, it's pretty in detail: Quickstart: Register an application with the Microsoft identity platform
  • Client ID: The Application (client) ID of the App Registration
  • Credential Type: Secret or Certificate (I have selected Secret for simplicity)
  • Secret: A secret you have generated under App Registration
Hope this helps.

Happy Coding.

Regards,
Jaliya

Wednesday, November 2, 2022

.NET 7.0: ArgumentNullException.ThrowIfNullOrEmpty()

In this post, let's have a look at this nice little feature that's available with .NET 7 and C# 11.0.

With .NET 6 and C# 10.0, we have got a simplified method to check an Argument for null (I have written a post a few months ago: C# 10.0: Nice Little Features).

ArgumentNullException.ThrowIfNull(argument);

But if the argument type is a string, and you need to check it for Empty, we had to fall back to the old approach, which is something like below.

string @string = "";

if (string.IsNullOrEmpty(@string))
{
    throw new ArgumentNullException(nameof(@string));
};

And with .NET 7 and C# 11.0, we don't have to do that anymore. We now have: ArgumentException.ThrowIfNullOrEmpty()

string @string = "";

ArgumentNullException.ThrowIfNullOrEmpty(@string);

I really like this, It's a small thing, but of course, small things matter.

Hope this helps.

Happy Coding.

Regards,
Jaliya

Wednesday, October 19, 2022

Microsoft Ignite After Party: Auckland, New Zealand

Today we had our Microsoft Ignite After Party in Auckland, New Zealand and it was great to be part of it with fellow MVPs in New Zealand.

There I was in a Panel Discussion discussing a lot of nice things coming with .NET 7.
Microsoft Ignite After Party: Auckland, New Zealand
Special thanks to Rory Braybrook and Marcus Bristol for running the party.

Happy Coding.

Regards,
Jaliya

Thursday, October 13, 2022

ASP.NET Core: HTTP Logging

In this post let's see how easy it is to set up HTTP Logging in an ASP.NET Core application.

You just need to add the HTTP Logging middleware to the HTTP pipeline.

WebApplication app = builder.Build();
 
// Enable HTTP Logging
app.UseHttpLogging();

The default logging configuration for Microsoft.AspNetCore is Warning. You might need to update appsettings.json as follows.

{
  "Logging": {
    "LogLevel": {
      "Default""Information",
      "Microsoft.AspNetCore""Warning",
      "Microsoft.AspNetCore.HttpLogging.HttpLoggingMiddleware""Information"
    }
  }
}
And now we can see basic HTTP logging.
Default Logging
You can customize the HTTP logging options using HttpLoggingOptions. For example, the below specifies what fields to be logged.
WebApplicationBuilder builder = WebApplication.CreateBuilder(args);
 
// Customize HTTP Logging options
builder.Services.AddHttpLogging(logging =>
{
    logging.LoggingFields = HttpLoggingFields.RequestPath
        | HttpLoggingFields.RequestMethod
        | HttpLoggingFields.RequestScheme
        | HttpLoggingFields.ResponseStatusCode
        | HttpLoggingFields.Response;
    
    // TODO: Customize more options
});
And the output would be something like below.
Customized Logging
A couple of important things to note,
  • This feature is only available from ASP.NET Core 6.0 onwards.
  • By default, pre-defined sensitive fields will be Redacted (ex: Authorization header). Still, you might log sensitive information if you are logging request/response bodies. So look out for what you are logging.
  • HTTP Logging can reduce performance. For example, you might not want to log huge request/response bodies. Not only that, you can get a huge bill for your Log Analytics Workspace as well (if you are using Application Insights of course).

That's pretty straightforward, isn't it?

More read:
   HTTP Logging in ASP.NET Core

Happy Coding.

Regards,
Jaliya

Friday, October 7, 2022

EF Core 7.0: Save and Query JSON in Relational Databases

In this post, let's have a look at a new feature that's going to be available with EF Core 7.0 and that's the support for saving and querying JSON columns in Relational Databases. 

You can try this feature with the latest RC builds or using daily builds.

Tip: How to get .NET Daily Builds

Add a NuGet.config file to your project with the following content.

<?xml version="1.0" encoding="utf-8"?>
<configuration>
  <packageSources>
    <clear />
    <add key="dotnet7" value="https://pkgs.dev.azure.com/dnceng/public/_packaging/dotnet7/nuget/v3/index.json" />
    <add key="NuGet.org" value="https://api.nuget.org/v3/index.json" />
  </packageSources>
</configuration>

For the purpose of this post, I am targeting Microsoft SQL Server as the relational database provider.

Consider the following scenario. Say we have a Customer entity, and a Customer has a Contact record that contains his/her Address and List of PhoneNumbers

public class Customer
{
    public int Id { getinit; }
 
    public string Name { getinit; }
 
    public Contact Contact { getset; } = null!;
 
    public Customer(string name)
    {
        Name = name;
    }
}
 
public class Contact
{
    public required Address Address { getset; }
 
    public List<PhoneNumber> PhoneNumbers { getset; } = new();
}
 
public class Address
{
    public required string Street { getset; }
 
    public required string City { getset; }
 
    public required string State { getset; }
 
    public required string PostalCode { getset; }
}
 
public class PhoneNumber
{
    public PhoneNumberType Type { getset; }
 
    public string Number { getset; }
 
    public PhoneNumber(PhoneNumberType typestring number)
    {
        Type = type;
        Number = number;
    }
}
 
public enum PhoneNumberType
{
    Mobile,
    Home
}

And whenever we load a Customer, we want his/hers Contact details to be loaded automatically because we don't want to do explicit Includes. 

In order to achieve this, we can configure the Customer entity as follows.

public class MyDbContext : DbContext
{
    public DbSet<Customer> Customers { getset; }
 
    protected override void OnConfiguring(DbContextOptionsBuilder optionsBuilder)
    {
        // Configure
    }
 
    protected override void OnModelCreating(ModelBuilder modelBuilder)
    {
        modelBuilder.Entity<Customer>()
            .OwnsOne(x => x.Contact, contactOptions =>
            {
                contactOptions.OwnsOne(x => x.Address);
                
                // Since PhoneNumbers is a Collection, it needs to be a separate table
                // Here we are just customizing the table
                contactOptions.OwnsMany(x => x.PhoneNumbers, phoneNumberOptions =>
                {
                    phoneNumberOptions
                        .Property(x => x.Type)
                        .HasConversion<string>();
 
                    phoneNumberOptions.ToTable("CustomerPhoneNumbers");
                });
            });
    }
}
And above model configuration will create a table structure as follows.
Table Structure
Since PhoneNumbers is a Collection, it needs to be in a separate table. With the JSON column support, we can store the Contact as JSON and avoid data being split across multiple tables.
protected override void OnModelCreating(ModelBuilder modelBuilder)
{
    modelBuilder.Entity<Customer>()
        .OwnsOne(x => x.Contact, contactOptions =>
        {
            contactOptions.ToJson();
 
            contactOptions.OwnsOne(x => x.Address);
 
            contactOptions.OwnsMany(x => x.PhoneNumbers);
        });
}
And this will produce a single table as follows.
Table Structure
When we store the data, it will be as follows.
JSON Column
Contact is basically stored as a JSON.

{
  "Address": {
    "City""Seattle",
    "PostalCode""98052",
    "State""WA",
    "Street""123 Main St"
  },
  "PhoneNumbers": [
    {
      "Number""111-123-4567",
      "Type""Mobile"
    },
    {
      "Number""222-123-4568",
      "Type""Home"
    }
  ]
}

Querying

We can do queries on JSON data, for example, consider the following.

List<Customer> customersInWA = await context.Customers
    .Where(x => x.Contact.Address.State == "WA")
    .ToListAsync();

The generated SQL statements will be as follows. The nice thing is EF uses JSON capabilities of SQL Server

SELECT [c].[Id], [c].[Name], JSON_QUERY([c].[Contact],'$')
FROM [Customers] AS [c]
WHERE CAST(JSON_VALUE([c].[Contact],'$.Address.State') AS nvarchar(max)) = N'WA'

Projection

List<stringdistinctStates = await context.Customers
    .Select(x => x.Contact.Address.State)
    .Distinct()
    .ToListAsync();
The generated SQL statement:
SELECT DISTINCT CAST(JSON_VALUE([c].[Contact],'$.Address.State') AS nvarchar(max))
FROM [Customers] AS [c]

Update

Customer janeDoe = await context.Customers.SingleAsync(x => x.Name == "Jane Doe");
janeDoe.Contact.Address.PostalCode = "20877";
await context.SaveChangesAsync();

The generated SQL statement:

[Parameters=[@p0='["20877"]' (Nullable = false) (Size = 9), @p1='2'], CommandType='Text', CommandTimeout='30']

SET IMPLICIT_TRANSACTIONS OFF;
SET NOCOUNT ON;
UPDATE [Customers] SET [Contact] = JSON_MODIFY([Contact], 'strict $.Address.PostalCode', JSON_VALUE(@p0, '$[0]'))
OUTPUT 1
WHERE [Id] = @p1;

Current Limitations (to my knowledge):

  • Complex queries that query through JSON arrays, still can't be translated into SQL. As far as I know, it's going to be available in EF Core 8.0. Basically, something like below won't work.

// Following query will be failed to translate into SQL
List<Customer> customersHavingHomePhoneNumbers = await context.Customers
    .Where(x => x.Contact.PhoneNumbers.Any(x => x.Type == PhoneNumberType.Home))
    .ToListAsync();

More Read:
   JSON Columns

Hope this helps.

Happy Coding.

Regards,
Jaliya

Thursday, October 6, 2022

OAuth 2.0: Authorization Code with PKCE

In this post, let's have a look at Authorization Code with PKCE (Short for Proof Key for Code Exchange, pronounced: pixy) Flow in OAuth 2.0.

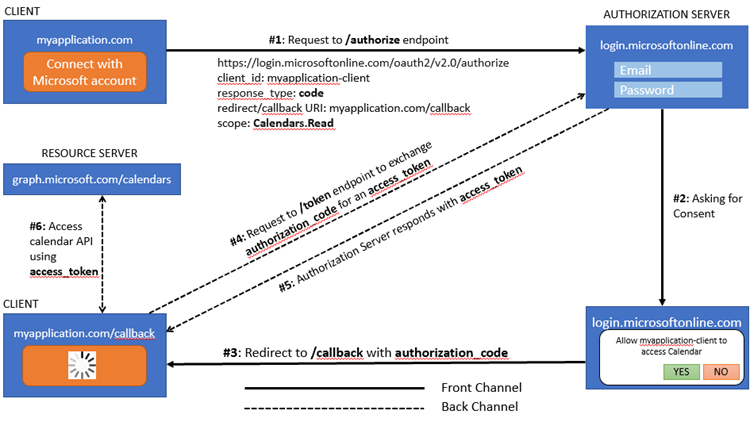
In a previous post (OAuth 2.0: Authorization Code Vs Implicit Flow), I wrote about Authorization Code flow in OAuth 2.0, I'd highly suggest reading that post first before this, as I am not going to explain Authorization Code flow here in this post.

Authorization Code Flow
In the Authorization Code flow, in order to exchange authorization code to an access_token, when the Client makes to call to /token endpoint, the client needs to send the client_secret and that introduces a security risk because it has to be stored somewhere.

With the Authorization Code with PKCE, before starting the Authorization Code Flow, the Client generates a random value called code_verifier. The client then hashes this code_verifier and the result is called the code_challenge. Now the authorization code flow starts the same way, except /authorize request includes code_challenge in the query string.

GET: https://login.microsoftonline.com/<tenant>/oauth2/v2.0/authorize?
&client_id=myapplication-client
&response_type=code
&redirect_uri=https://myapplication.com/callback
&scope=Calendars.Read
&state=some-state
&code_challenge=fwfLrb--atJiWz5SBUa1-OkzAQIP1w6uuDAA2fAp-Yg

The Authorization Server stores the code_challenge for later verification and after the user authenticates, redirects back to the client with an authorization code, just like in the Authorization Code flow. Now when the client makes the request to exchange the authorization code for an access_token, it sends the code_verifier instead of the client_secret.

POST: https://login.microsoftonline.com/<tenant>/oauth2/v2.0/token
content type application/x-www-form-urlencoded
 
grant_type=authorization_code
client_id=myapplication-client
code=<code_received_from_authorize_endpoint>
code_verifier=y5jMOEF7Nk2sHLZcdZ-eR19hLd4xZL32f-79qljcJNotYRD_FQGzF5v5ouMpABFkvp0zH7JNxHe57JpV

Now the Authorization Server hashes the code_verifier and compares it to the code_challenge it stored earlier. if the hashed value matches, then only the Authorization Server will return the access_token.

Note

Microsoft identity platform and OAuth 2.0 authorization code flow requires code_challenge_method to be included in the authorization code request ( request to /authorize endpoint). That's basically the method used to generate the code_challenge. This SHOULD be S256, but the spec allows the use of plain if the client can't support SHA256.

And when exchanging authorization code for an access_token (via /token endpoint), client_secret is required for web apps and web APIs as those can store the client_secret securely on the server side. But if the client_secret is sent from a native app, /token endpoint is going to respond with a Bad Request with a message "Public clients should not send a client_secret  when redeeming a publicly acquired grant".

Hope this helps.

Happy Coding.

Regards,
Jaliya