In this post let’s see how we can setup a very basic Angular 2 application with TypeScript on top of ASP.NET Core using Visual Studio 2015.
This post is totally based on the official sample used in 5 MIN QUICKSTART using Angular 2 for TypeScript which is available in following URL.
I will not be going into deeper descriptions here because above mentioned article almost explains everything. I will be adopting the code used in the same article and will be doing modifications on the go to match my requirements.
Without further ado, let’s start by firing up Visual Studio 2015 and creating an ASP.NET Core Web Application. Please note that I have installed Node.js and npm.
 |
| ASP.NET Core Web Application |
 |
| Empty Template |
Now open up the startup.cs and modify the code as follows.
using Microsoft.AspNetCore.Builder;
using Microsoft.AspNetCore.Hosting;
using Microsoft.Extensions.DependencyInjection;
using Microsoft.Extensions.Logging;
namespace AspNetCoreAngular2TypeScriptDemo
{
public class Startup
{
public void ConfigureServices(IServiceCollection services)
{
}
public void Configure(IApplicationBuilder app, IHostingEnvironment env, ILoggerFactory loggerFactory)
{
loggerFactory.AddConsole();
if (env.IsDevelopment())
{
app.UseDeveloperExceptionPage();
}
app.UseDefaultFiles();
app.UseStaticFiles();
}
}
}
You may need to install "Microsoft.AspNetCore.StaticFiles" dependency and add necessary usings. Here I have specified app.UseDefaultFiles() to server a default file and app.UseStaticFiles() to enable static file serving.
Right click on the project and add a new JSON file named “typings.json”.
typings.json
{
"globalDependencies": {
"core-js": "registry:dt/core-js#0.0.0+20160602141332",
"jasmine": "registry:dt/jasmine#2.2.0+20160621224255",
"node": "registry:dt/node#6.0.0+20160807145350"
}
}
A file named typings.json is needed to install typings, otherwise npm will throw a warning saying no typings.json is found.
Right click on the project and add npm Configuration File.
 |
| npm Configuration File |
package.json
{
"version": "1.0.0",
"name": "AspNetCoreAngular2TypeScriptDemo",
"scripts": {
"postinstall": "typings install",
"typings": "typings"
},
"private": true,
"dependencies": {
"@angular/common": "2.0.0-rc.5",
"@angular/compiler": "2.0.0-rc.5",
"@angular/core": "2.0.0-rc.5",
"@angular/forms": "0.3.0",
"@angular/http": "2.0.0-rc.5",
"@angular/platform-browser": "2.0.0-rc.5",
"@angular/platform-browser-dynamic": "2.0.0-rc.5",
"@angular/router": "3.0.0-rc.1",
"@angular/router-deprecated": "2.0.0-rc.2",
"@angular/upgrade": "2.0.0-rc.5",
"systemjs": "0.19.36",
"core-js": "^2.4.1",
"reflect-metadata": "^0.1.8",
"rxjs": "5.0.0-beta.6",
"zone.js": "^0.6.12",
"bootstrap": "^3.3.7"
},
"devDependencies": {
"gulp": "^3.9.1",
"del": "^2.2.1"
}
}
Here I did some modifications to make it simpler. You can see that in postinstall (after all the packages are installed), I have set to run typings install command. Now when you restore/install npm packages, you can see that upon all the packages are completed installing, npm is running typings install. It will create a folder named typings which will contain TypeScript definition files. To see the npm progress, open up output window and Select output from Bower/npm.
Right click on the project and add TypeScript JSON Configuration File.
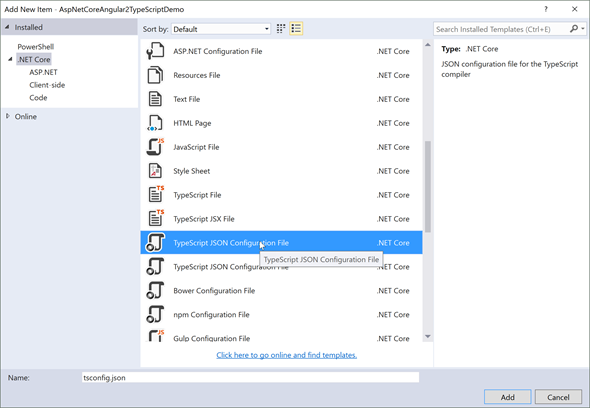 |
| TypeScript JSON Configuration File |
tsconfig.json
{
"compilerOptions": {
"noImplicitAny": true,
"noEmitOnError": true,
"removeComments": false,
"sourceMap": true,
"target": "es5",
"experimentalDecorators": true
},
"compileOnSave": true
}
I have compileOnSave enabled, so every time I save my TypeScript files, TypeScript to JavaScript compilation will be done.
Right click on the project and add Gulp Configuration File.
 |
| Gulp Configuration File |
gulpfile.js
var gulp = require('gulp');
var del = require('del');
var paths = {
nodeModules: 'node_modules/**/*.js'
};
gulp.task('clean', function () {
return del(['wwwroot/scripts/**/*']);
});
gulp.task('build', function () {
gulp.src(paths.nodeModules).pipe(gulp.dest('wwwroot/scripts'))
});
I have 2 tasks, build task to copy all the node_modules to a folder named scripts inside wwwroot and clean task to delete all content inside scripts folder. This is just for the demonstration, may be you can have a task to clean up JavaScript files which gets created upon compiling TypeScript files.
Run the build task by right clicking on gulpfile.js -> Task Runner Explorer.
 |
| Task Runner Explorer |
Upon task completion, you can see a new folder named scripts created under wwwroot. You can see all your node_modules copied into scripts folder.
Create a folder inside wwwroot named app and create following three TypeScript files, app.component.ts, app.module.ts and main.ts over there.
app.component.ts
import { Component } from '@angular/core';
@Component({
selector: 'my-app',
template: '<h1>Welcome to Angular 2 with TypeScript</h1>'
})
export class AppComponent { }
app.module.ts
import { NgModule } from '@angular/core';
import { BrowserModule } from '@angular/platform-browser';
import { AppComponent } from './app.component';
@NgModule({
imports: [BrowserModule],
declarations: [AppComponent],
bootstrap: [AppComponent]
})
export class AppModule { }
main.ts
import { platformBrowserDynamic } from '@angular/platform-browser-dynamic';
import { AppModule } from './app.module';
platformBrowserDynamic().bootstrapModule(AppModule);
As in the original example, we are using
systemjs to dynamically load modules. Add a JavaScript file named
systemjs.config.js inside
wwwroot folder.
 |
| systemjs.config.js |
systemjs.config.js
(function (global) {
// map tells the System loader where to look for things
var map = {
'app': 'app', // 'dist',
'@angular': 'scripts/@angular',
'rxjs': 'scripts/rxjs'
};
// packages tells the System loader how to load when no filename and/or no extension
var packages = {
'app': { main: 'main.js', defaultExtension: 'js' },
'rxjs': { defaultExtension: 'js' }
};
var ngPackageNames = [
'common',
'compiler',
'core',
'forms',
'http',
'platform-browser',
'platform-browser-dynamic',
'router',
'router-deprecated',
'upgrade',
];
// Individual files (~300 requests):
function packIndex(pkgName) {
packages['@angular/' + pkgName] = { main: 'index.js', defaultExtension: 'js' };
}
// Bundled (~40 requests):
function packUmd(pkgName) {
packages['@angular/' + pkgName] = { main: '/bundles/' + pkgName + '.umd.js', defaultExtension: 'js' };
}
// Most environments should use UMD; some (Karma) need the individual index files
var setPackageConfig = System.packageWithIndex ? packIndex : packUmd;
// Add package entries for angular packages
ngPackageNames.forEach(setPackageConfig);
var config = {
map: map,
packages: packages
};
System.config(config);
})(this);
Add index.html file inside wwwroot folder.
index.html
<html>
<head>
<title>AspNetCoreAngular2TypeScriptDemo</title>
<meta charset="UTF-8">
<meta name="viewport" content="width=device-width, initial-scale=1">
<!-- 1. Load libraries -->
<!-- Polyfill(s) for older browsers -->
<script src="scripts/core-js/client/shim.min.js"></script>
<script src="scripts/zone.js/dist/zone.js"></script>
<script src="scripts/reflect-metadata/Reflect.js"></script>
<script src="scripts/systemjs/dist/system.src.js"></script>
<!-- 2. Configure SystemJS -->
<script src="systemjs.config.js"></script>
<script>
System.import('app').catch(function(err){ console.error(err); });
</script>
</head>
<!-- 3. Display the application -->
<body>
<my-app>Loading...</my-app>
</body>
</html>
Now we are all good. Compile and run the project.
 |
| Output |
It's working.
I have pushed the project into a GitHub repository and please do play around.
Happy Coding.
Regards,
Jaliya


