Wednesday, November 22, 2023

ASP.NET Core 8.0: Keyed Services in Dependency Injection

There are often times that we have different implementations of an interface and we need to resolve a particular implementation when doing dependency injection.

With ASP.NET Core 8.0, we now have support for Keyed Services.

Consider the following interface and its implementations.
public interface IMyService
{
    string GetValue();
}

public class MyService1 : IMyService
{
    public string GetValue() => "MyService1";
}

public class MyService2 : IMyService
{
    public string GetValue() => "MyService2";
}
Now we can register these Services with keys as follows.
WebApplicationBuilder builder = WebApplication.CreateBuilder(args);

builder.Services.AddKeyedScoped<IMyService, MyService1>("service1");
builder.Services.AddKeyedScoped<IMyService, MyService2>("service2");
You can register Keyed services with other lifetimes as well (Transient and Singleton).

Now we can resolve a specific implementation by key using [FromKeyedServices] attribute.

From the constructor
// Note:
//    I am using Primary Constructor which is new with .NET 8.0
//    You can use the other constructor as well

public class MyClass([FromKeyedServices("service1")] IMyService myService)
{
    public string GetValue() => myService.GetValue();
}
From an API Endpoint
app.MapGet("/", ([FromKeyedServices("service2")] IMyService myService) =>
{
    return myService.GetValue();
});
Hope this helps.

Happy Coding.

Regards,
Jaliya

Tuesday, November 21, 2023

Visual Studio 2022 17.9.0 Preview 1.0: Experimental Control Styles

Last week during .NET Conf there were some great announcements in the world of .NET, and also Microsoft has released the latest preview of Visual Studio 2022 17.9.0 Preview 1.0.

With the latest Visual Studio 2022 Preview, we now get to experience the refreshed Visual Studio UI that the Visual Studio team has been working on for some time.

To enable the UI Refresh, from Visual Studio go to Tools -> Environment -> Preview Features and then select  "Experimental control styles". You’ll need to restart Visual Studio for changes to be applied.
Enable Experimental control styles
The first thing you will notice is, now we have an entirely different set of Color Themes.
Visual Studio: Color Themes
If you are used to the Blue theme like I am, unfortunately, it isn't there under new themes.


Do try it out and please leave your feedback on Visual Studio UI Refresh.
Happy Coding.

Regards,
Jaliya

Monday, November 6, 2023

Azure API Management: Self-Signed Certificate Authentication with ASP.NET Core Web API Running in an Azure Web Apps for Containers

I recently spent quite an interesting time trying to get self-signed Certificate Authentication working with ASP.NET Core Web API Running in Azure Web Apps for Containers. The caller was an Azure API Management, that was making a send-request as part of its policy, something like the following.

<send-request mode="new" response-variable-name="httpresponse" timeout="10" ignore-error="true">
    <set-url>@("https://app-something-001.azurewebsites.net/api/values)</set-url>
    <set-method>GET</set-method>
    <authentication-certificate certificate-id="self-signed-certificate" />
</send-request>

There were a couple of important things that had to be in place in order for it to finally work. So in this post, let's have a look at those, so hopefully someone might find it helpful.

The first piece is to get the Certificate Authentication working locally.

1: Configure Kestrel configuration options to AllowCertificates and if required introduce additional  client certificate validation

WebApplicationBuilder builder = WebApplication.CreateBuilder(args);

builder.WebHost.ConfigureKestrel(serverOptions =>
{
    serverOptions.ConfigureHttpsDefaults(options =>
    {
        options.ClientCertificateMode = ClientCertificateMode.AllowCertificate;
        options.ClientCertificateValidation = (certificatechainerrors) =>
        {
            // TODO: Additional client certificate validation logic here
            return true;
        };
    });
});

2: Customize Certificate Authentication Options to allow self-signed certificates

builder.Services.AddAuthentication(CertificateAuthenticationDefaults.AuthenticationScheme)
.AddCertificate(options =>
    {
     // Default is Chained only, All is required Chained | SelfSigned
        options.AllowedCertificateTypes = CertificateTypes.All;
        options.RevocationMode = X509RevocationMode.NoCheck;
        options.ValidateCertificateUse = false;

        options.Events = new CertificateAuthenticationEvents
        {
          OnCertificateValidated = context =>
             { // TODO: Further validation if required
              Claim[] claims = new[]
                 {
                  new Claim(ClaimTypes.NameIdentifier, context.ClientCertificate.Subject, ClaimValueTypes.String, context.Options.ClaimsIssuer),
                     new Claim(ClaimTypes.Name, context.ClientCertificate.Subject, ClaimValueTypes.String, context.Options.ClaimsIssuer)
                 };

                 context.Principal = new ClaimsPrincipal(new ClaimsIdentity(claimscontext.Scheme.Name));

                 context.Success();

                 return Task.CompletedTask;
             },
             OnAuthenticationFailed = context =>
             {
              context.Fail("Invalid certificate");

                 return Task.CompletedTask;
             }
        };
});
builder.Services.AddAuthorization();

3: Check whether everything is working locally. 

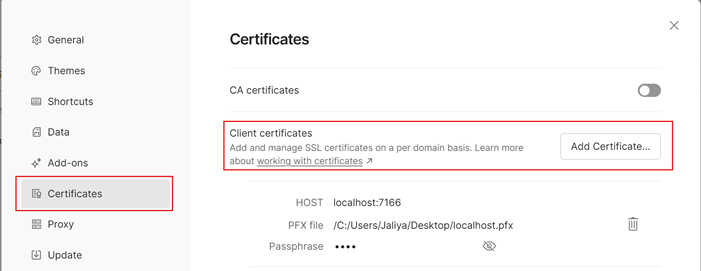
Send a request to an endpoint that requires authorization using a Tool like Postman and configure the certificate to be sent along.

Postman Certificate Authentication
So when a request matches the HOST, Postman will automatically associate the certificate to the request.

Once the Certificate Authentication is working locally, the next step is getting it to work when running on Azure Web Apps for Containers.

Here there are some very important things. 

4: Configure Incoming client certificates in Azure App Service Configuration -> General Settings.

Incoming Client Certificates

5: The most important thing: in Azure App Services, TLS termination of the request happens at the frontend load balancer. When forwarding the request to your app code with client certificates enabled, App Service injects an X-ARR-ClientCert request header with the client certificate. App Service does not do anything with this client certificate other than forwarding it to your app. Your app code is responsible for validating the client certificate.

So we need to do some code changes as follows. 

First, configure Services as below.

builder.Services.Configure<ForwardedHeadersOptions>(options =>
{
    options.ForwardedHeaders = ForwardedHeaders.XForwardedFor | ForwardedHeaders.XForwardedProto;
    // Only loopback proxies are allowed by default. Clear that restriction to enable this explicit configuration.
    options.KnownNetworks.Clear();
    options.KnownProxies.Clear();
});

// Configure the application to client certificate forwarded the frontend load balancer
builder.Services.AddCertificateForwarding(options => 

    options.CertificateHeader = "X-ARR-ClientCert"
}); // builder.Services.AddAuthentication...

Then we need to update the middleware order adding UseForwardedHeaders and UseCertificateForwarding to the beginning of the execution order.

WebApplication app = builder.Build();

app.UseForwardedHeaders();
app.UseCertificateForwarding();

// Note: HttpLogging should be after UseForwardedHeaders and UseCertificateForwarding. // otherwise those won't get logged
app.UseHttpLogging();

app.UseHttpsRedirection();

app.UseAuthentication();
app.UseAuthorization(); // ...

And hopefully, that should get the things to work.

The certificate was successfully authenticated
If things aren't working as expected, enable Debug logging in the application and start troubleshooting from there.

Another important note: If you try to route a request with certificate authentication to your local machine using Tunneling in Visual Studio, it will always fail because it's still not supported (as of today). Follow the feature request here: Support forwarding HTTPS client certificates.

Hope this helps.

Happy Coding.

Regards,
Jaliya

Wednesday, November 1, 2023

Azure API Management: Enriching Requests with Additional Headers and Use of Caching

In this post let's see how we can customize Azure API Management (APIM) Policy to enrich requests with additional headers and also let's look at how we can make use of caching.

The demo scenario is as follows:
  • I have an example BE API, which requires a specific HTTP Header: X-Tenant-Code, in order for it to serve.
  • A client sends a request with JWT Token, but the client has no knowledge of X-Tenant-Code HTTP header.
  • Inside the APIM, we need to inspect the JWT Token, and based on a Claim in the token (in this case, it's AppId/ClientId), we need to find out Tenant information by calling another API endpoint, let's say Tenant API. And then populate X-Tenant-Code HTTP header from the response data.
  • We don't need to be calling the Tenants API all the time, instead, we can cache Tenant information in APIM itself (while we can use the inbuilt cache, it's recommended to use external Cache, currently only Redis is supported)
Now let's start.

1: The first step is accessing the JWT token and extracting claims. (Read more on how to access JWT token: API Management policy expressions)
<!-- Get ClientId From JWT Token -->
<set-variable  name="clientid" 
    value="@(context.Request.Headers.GetValueOrDefault("Authorization","").Split(' ')[1].AsJwt()?.Claims.GetValueOrDefault("appid"))" />
2: Now I am checking whether the Tenant Information already exists in APIM Cache for the given ClientId.
<!--Look for tenantinfo for this specific client in the cache and set it to context variable 'tenantinfo' -->
<cache-lookup-value  key="@("tenantinfo-" + context.Variables["clientid"])"  variable-name="tenantinfo" />
3: Now I need to have a conditional expression. That is, if the item is not in the cache, then I need to call another API endpoint, passing in the ClientId to get the Tenant information. Let's assume, the endpoints return a  JSON response.
<choose>
<!-- Didn't find tenantinfo in cache -->
    <when condition="@(!context.Variables.ContainsKey("tenantinfo"))">
     <!-- Make a HTTP request to GET Tenant, copying current HTTP request headers -->
        <!-- Store the response in context variable 'tenantinforesponse' -->
        <send-request mode="copy" response-variable-name="tenantinforesponse" timeout="10" ignore-error="true">
         <set-url>@("https://app-azarch-tenants-service-001.azurewebsites.net/" + context.Variables["clientid"])</set-url>
            <set-method>GET</set-method>
        </send-request>

        <!-- Store response body in context variable 'tenantinfo' as a JObject -->
        <set-variable  name="tenantinfo"  value="@(((IResponse)context.Variables["tenantinforesponse"]).Body.As<JObject>())" />

        <!-- Store result in cache for 1 day (86400 seconds) -->
        <cache-store-value  key="@("tenantinfo-" + context.Variables["clientid"])"  value="@((JObject)context.Variables["tenantinfo"])"  duration="86400" />
    </when>
</choose>
4: At this state, the context variable: tenantinfo , is populated. And now we can use it to populate X-Tenant-Code header.
<!-- Set the X-Tenant-Code header to the tenantCode value from the context variable 'tenantinfo' -->
<set-header name="X-Tenant-Code" exists-action="override">
<value>@((string)((JObject)context.Variables["tenantinfo"]).GetValue("tenantCode"))</value>
</set-header>
The complete policy looks as follows.
<policies>
    <inbound>
        <!-- Get ClientId From JWT Token -->
        <set-variable name="clientid" 
            value="@(context.Request.Headers.GetValueOrDefault("Authorization","").Split(' ')[1].AsJwt()?.Claims.GetValueOrDefault("appid"))" />

        <!--Look for tenantinfo for this specific client in the cache and set it to context variable 'tenantinfo' -->
        <cache-lookup-value key="@("tenantinfo-" + context.Variables["clientid"])" variable-name="tenantinfo" />

        <choose>
            <!-- Didn't find tenantinfo in cache -->
            <when condition="@(!context.Variables.ContainsKey("tenantinfo"))">
              
                <!-- Make a HTTP request to GET Tenant, copying current HTTP request headers -->
                <!-- Store the response in context variable 'tenantinforesponse' -->
                <send-request mode="copy" response-variable-name="tenantinforesponse" timeout="10" ignore-error="true">
                    <set-url>@("https://app-azarch-tenants-service-001.azurewebsites.net/" + context.Variables["clientid"])</set-url>
                    <set-method>GET</set-method>
                </send-request>

                <!-- Store response body in context variable 'tenantinfo' as a JObject -->
                <set-variable 
                    name="tenantinfo" 
                    value="@(((IResponse)context.Variables["tenantinforesponse"]).Body.As<JObject>())" />

                <!-- Store result in cache for 1 day (86400 seconds) -->
                <cache-store-value 
                     key="@("tenantinfo-" + context.Variables["clientid"])" 
                     value="@((JObject)context.Variables["tenantinfo"])" 
                     duration="86400" />
                      
            </when>
        </choose>

        <!-- Set the X-Tenant-Code header to the tenantCode value from the context variable 'tenantinfo' -->
        <set-header name="X-Tenant-Code" exists-action="override">
            <value>@((string)((JObject)context.Variables["tenantinfo"]).GetValue("tenantCode"))</value>
        </set-header>
        <base />
    </inbound>
    <backend>
        <base />
    </backend>
    <outbound>
        <base />
    </outbound>
    <on-error>
        <base />
    </on-error>
</policies>
And that's it.

You can set up External Cache, from the following menu item.
APIM: External Cache
Using an external cache can be really handy if you want to inspect the cache items more visually. Something like below (I wrote a post a while ago on Connecting to Azure Cache for Redis Instance from RedisInsight, do check it out).
APIM Cache
Hope this helps.

Happy Coding.

Regards,
Jaliya