Showing posts with label MacOS. Show all posts

Wednesday, January 9, 2019

.NET Core 2.2: Runtime Events

In this post let’s go through one of the features which got introduced with .NET Core 2.2 which is the ability to capture .NET Core runtime events within your .NET Core application.

Prior to .NET Core 2.2, these CoreCLR events were unable to be consumed within your .NET Core application, it was only available to be observed in ETW (Event Tracing for Windows) on Windows or from LTTng on Linux.

With .NET Core 2.2, these events are getting routed through an EventListener, so within your EventListener, you can decide what to do with it. It basically doesn’t matter on which OS you are on, it works on all Windows/MacOS and Linux.

Let’s have a look at an example. I have created an ASP.NET Core Web API Application targetting .NET Core 2.2.
<Project Sdk="Microsoft.NET.Sdk.Web">
 
  <PropertyGroup>
    <TargetFramework>netcoreapp2.2</TargetFramework>
    <AspNetCoreHostingModel>InProcess</AspNetCoreHostingModel>
  </PropertyGroup>
  
  <ItemGroup>
    <PackageReference Include="Microsoft.AspNetCore.App" />
  </ItemGroup>
 
</Project>
There I have the following EventListener.
public class SimpleEventListener : EventListener
{
    private readonly ILogger<SimpleEventListener> _logger;
 
    public SimpleEventListener(ILogger<SimpleEventListener> logger)
    {
        _logger = logger;
    }
 
    // Called whenever an EventSource is created.
    protected override void OnEventSourceCreated(EventSource eventSource)
    {
        // Watch for the .NET runtime EventSource and enable all of its events.
        if (eventSource.Name.Equals("Microsoft-Windows-DotNETRuntime"))
        {
            EnableEvents(eventSource, EventLevel.Verbose, (EventKeywords)(-1));
        }
    }
 
    // Called whenever an event is written.
    protected override void OnEventWritten(EventWrittenEventArgs eventData)
    {
        // Write the contents of the event to the console.
        _logger.LogInformation($"ThreadID = {eventData.OSThreadId} ID = {eventData.EventId} Name = {eventData.EventName}");
 
        for (var i = 0; i < eventData.Payload.Count; i++)
        {
            string payloadString = eventData.Payload[i] != null ? eventData.Payload[i].ToString() : string.Empty;
            _logger.LogInformation($"\tName = \"{eventData.PayloadNames[i]}\" Value = \"{payloadString}\"");
        }
 
        _logger.LogInformation("\n");
    }
}

Now I am enabling the SimpleEventListener from Startup.ConfigureServices method.
public void ConfigureServices(IServiceCollection services)
{
    services.AddMvc().SetCompatibilityVersion(CompatibilityVersion.Version_2_2);
 
    ServiceProvider provider = services.BuildServiceProvider();
    var simpleEventListener = new SimpleEventListener(provider.GetRequiredService<ILogger<SimpleEventListener>>());
}

That’s it. Now if you run the application, you should be able to see all the CoreCLR events.
image
.NET Core 2.2: Visual Studio on Windows: CoreCLR Events
I just ran the same application inside MacOS, it works the same.
image
.NET Core 2.2: Rider on MacOS: CoreCLR Events
Now, if I change the target framework to 2.1 and return the application, we can’t see CoreCLR events.
image
.NET Core 2.1: Visual Studio on Windows: No CoreCLR Events
This is some awesome piece of work.

Happy Coding.

Regards,
Jaliya

Thursday, October 11, 2018

.NET Core on MacOS: Code Coverage with Coverlet

I wanted to check the code coverage on a .NET Core project I am working on. But I am on MacOS, and unfortunately, Visual Studio for Mac nor JetBrains Rider (on MacOS) does not support code coverage as of today. JetBrains is going to port dotCover to be cross-platform so we will have Rider + dotCover in near future which is something to look forward to.

I found this brilliant tool coverlet developed by Toni Solarin-Sodara. Coverlet is a cross-platform code coverage library for .NET Core, with support for line, branch and method coverage. I just gave it a try now, it looks amazing and with very little steps, I can get the code coverage.

First I need to add the coverlet.msbuild nuget package to the unit test project.
# From the folder which contains UnitTests.csproj file
dotnet add package coverlet.msbuild

# If the folder contains multiple .csproj files, specify the targetted .csproj file
dotnet add <MyProject.UnitTests.csproj> package coverlet.msbuild
Then I can just run,
dotnet test <MyProject.UnitTests.csproj> /p:CollectCoverage=true
But for some reason, I was getting this error "...coverlet.msbuild.targets: error: Failed to resolve assembly:...". After a little bit of googling, found this issue where it says to run dotnet test command with /p:CopyLocalLockFileAssemblies=true flag.
dotnet test <MyProject.UnitTests.csproj> /p:CollectCoverage=true /p:CopyLocalLockFileAssemblies=true
And yes, that did it and I am presented with most awaited code coverage.

Code Coverage
There are a lot of options that you can configure with coverlet and you should definitely try it.

Hope this helps.

Happy Coding.

Regards,
Jaliya

Tuesday, October 2, 2018

ASP.NET Core: Setting Up HTTPS Local Development Certificate in MacOS

In this post let’s see how we can configure local HTTPS certificate in MacOS for an ASP.NET Core web application.

You can use dotnet-dev-cert which is a command line tool to generate certificates used in ASP.NET Core during local development. To install the tool, you can simply run the following command (note: the version can be different, it's the version as of today).
dotnet tool install --global dotnet-dev-certs --version 2.1.1 
Once installed, you can generate a certificate just by running the below command.
dotnet dev-certs https -ep localhost.pfx -p dev
image
dotnet dev-certs
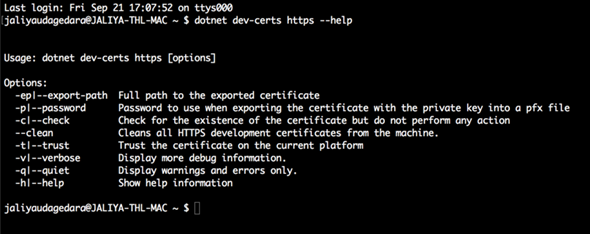
You can run the command with --help flag to see more options about the tool.
dotnet dev-certs https --help

image
dotnet dev-certs https --help
Once the certificate is generated, you should be able to see the certificate in Keychain Access. You can easily open Keychain Access by using Spotlight or, navigating to Applications -> Utilities -> Keychain Access.

image
Keychain Access
Now you need to trust the certificate for SSL by double-clicking on the certificate, expanding Trust and selecting Always Trust in Secure Socket Layter (SSL) dropdown.
image
Keychain Access
Hope this helps.

Happy Coding.

Regards,
Jaliya

Saturday, September 22, 2018

JetBrains Rider, MacOS and ASP.NET Core Web Application Permission Denied on localhost Port 80

At work, I am on MacOS and using JetBrains Rider as the primary IDE. Switching to MacOS and Rider was not at all easy, still struggling most of the time. Switching between Windows and MacOS is more harder.

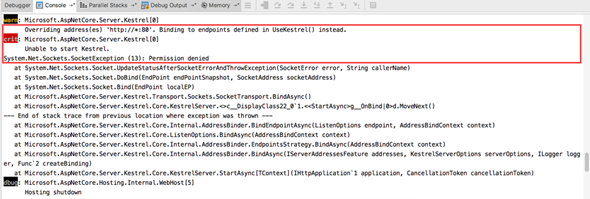
I wanted to run ASP.NET Core Web Application in localhost port 80, but it kept giving me permission denied error.
image
Permission Denied
Using the following command, I checked for any processes that use port 80, but unfortunately, there wasn’t any.
sudo lsof -i ':80'
Checked the firewall as well, and it was switched off. Then I realized, I was not running Rider as admin (sudo in MacOS). Just googled how to start a program as sudo, and there wasn't any straightforward option just like Windows has as Run as administrator. But using the terminal, did able to get to Rider run as sudo.
sudo /Applications/Rider\ 2018.2.app/Contents/MacOS/rider 
image
run as sudo
But once it's started running as sudo, it is a fresh instance, meaning the IDE doesn't have any imported settings which is kind of bad. But it did solve the permission issue, web application successfully started running on port 80.

Thought this might help someone.

Happy Coding.

Regards,
Jaliya