Showing posts with label ASP.NET Web API. Show all posts

Wednesday, April 17, 2024

Azure API Management: Replace Backend Service URLs in Response Body

In this post, let's see how we can replace backend API URLs in the response body from an Azure API Management (APIM) policy.

Say, we have a backend API endpoint that has the following code.

WebApplicationBuilder builder = WebApplication.CreateBuilder(args);

WebApplication app = builder.Build();

app.UseHttpsRedirection();

app.MapGet("/endpoints", (HttpContext httpContext) =>
{
    string baseUrl = $"{httpContext.Request.Scheme}://{httpContext.Request.Host}";

    return new
    {
        StatusQueryUri = $"{baseUrl}/status",
        HealthQueryUri = $"{baseUrl}/health",
    };
})
.WithName("GetEndpoints")
.WithOpenApi(); // other endpoints

And it would work as follows.

Response from Backend API
Now if we are exposing this API via Azure APIM, we can't be returning internal endpoints. We need to replace the Base URL with the corresponding APIM API endpoints.

To achieve that we can use set-body policy and do something like the following.

<policies>
  <inbound>
    <base />
  </inbound>
  <backend>
    <base />
  </backend>
  <outbound>
    <base />
    <set-body>
    @{
        string urlToReplace = context.Request.Url.Scheme + "://" + context.Request.Url.Host;
        string urlToReplaceWith = context.Request.OriginalUrl.Scheme
          + "://" + context.Request.OriginalUrl.Host 
          + context.Api.Path;
          
        string response = context.Response.Body.As<string>();
        return response.Replace(urlToReplace, urlToReplaceWith);
    }
    </set-body>
  </outbound>
  <on-error>
    <base />
  </on-error>
</policies>

Here,

The output is as follows:

Response from APIM
Hope this helps.

Happy Coding.

Regards,
Jaliya
Friday, March 17, 2023

Visual Studio 2022: Web API Endpoint Explorer

In this post, let's have a look at this nice feature that is available in Visual Studio 2022 and that is Web API Endpoint Explorer. I am on Visual Studio 2022 version 17.6.0 Preview 2.0 and I am not really sure when this was introduced, but if you have the latest Visual Studio 2022 Preview, you should be able to try this out.

This feature is wrapped inside a feature flag which you need to enable by going to Tools -> Options -> Environment -> Preview Features and selecting Web API Endpoint Explorer.
Enable Web API Endpoint Explorer
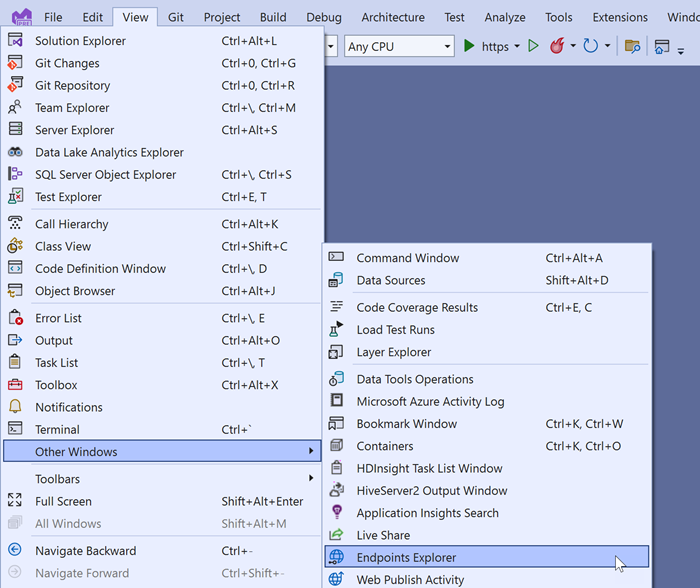
Now you can find this window in View -> Other Windows -> Endpoints Explorer. And you can find this only while you are in a compatible project (API Project).
Endpoints Explorer
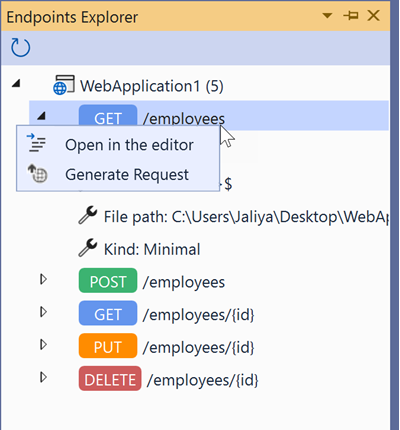
I have clicked on Endpoints Explorer on a simple Minimal API project.
Endpoints Explorer
And look at that. My endpoints are displayed nicely. From the window, I can directly open an endpoint in the code editor and I can even generate a request (using .http Files, read more: Visual Studio 2022: Sending HTTP Requests with .http Files)

That's pretty neat, isn't it.

Hope this helps.

Happy Coding.

Regards,
Jaliya

Monday, December 5, 2022

ASP.NET Core Web API: Exception Handling

In this post, let's see how we can provide a common approach for handling exceptions in ASP.NET Core Web APIs in the Development environment as well as in Production environments.

It's quite easy, basically, we can introduce UseExceptionHandler Middleware to handle exceptions.

Consider the following code.
WebApplicationBuilder builder = WebApplication.CreateBuilder(args);
 
// Add services to the container.
builder.Services.AddControllers();
 
WebApplication app = builder.Build();
 
// Configure the HTTP request pipeline.
if (app.Environment.IsDevelopment())
{
    app.UseExceptionHandler("/error-development");
}
else
{
    app.UseExceptionHandler("/error");
}
 
app.UseHttpsRedirection();
 
app.UseAuthorization();
 
app.MapControllers();
 
app.Run();
Here I have added UseExceptionHandler passing in different routes based on the environment. Now we need to define controller actions to respond to /error-development and /error routes.
using Microsoft.AspNetCore.Diagnostics;
using Microsoft.AspNetCore.Mvc;
using System.Net;
 
namespace WebApplication1.Controllers;
 
[ApiController]
[ApiExplorerSettings(IgnoreApi = true)]
public class ErrorController : ControllerBase
{
    private readonly IHostEnvironment _hostEnvironment;
 
    public ErrorController(IHostEnvironment hostEnvironment)
    {
        _hostEnvironment = hostEnvironment;
    }
 
    [Route("/error-development")]
    public IActionResult HandleErrorDevelopment()
    {
        if (!_hostEnvironment.IsDevelopment())
        {
            return NotFound();
        }
 
        IExceptionHandlerFeature exceptionHandlerFeature = HttpContext.Features.Get<IExceptionHandlerFeature>()!;
 
        if (exceptionHandlerFeature == null)
        {
            return Problem(
                title: $"'{nameof(IExceptionHandlerFeature)}' not found.");
        }
 
        return exceptionHandlerFeature.Error switch
        {
            NotImplementedException notImplementedException => Problem(
                title: notImplementedException.Message,
                detail: notImplementedException.StackTrace,
statusCode: (int)HttpStatusCode.NotImplemented), _ => Problem( title: exceptionHandlerFeature.Error.Message, detail: exceptionHandlerFeature.Error.StackTrace) }; } [Route("/error")] public IActionResult HandleError() => Problem(); }
Note: The actions aren't attributed with HttpVerbs and the controller is attributed with [ApiExplorerSettings(IgnoreApi = true)] to exclude from OpenAPI specification (if there's any).

For the Development environment, based on the type of the exception, I am returning different statusCodes and I am including the StackTrace to troubleshoot the issue easily. 

For an example, consider the following action.
[HttpGet(Name = "GetWeatherForecast")]
public IEnumerable<WeatherForecast> Get()
{
    throw new NotImplementedException("Not implemented.");
}
If we call the above action when running on a Development environment, I will be getting a response like below. It's the standard RFC 7807-compliant Problem Detail.
Development: StatusCode: 501
And now if I change the endpoint to throw a different exception,
[HttpGet(Name = "GetWeatherForecast")]
public IEnumerable<WeatherForecast> Get()
{
    throw new Exception("Something happened.");
}
I am getting the default Internal Server Error status code with the StackTrace.
Development: StatusCode: 500
And when in a production environment, we just get the response hiding internal details.
Production: StatusCode: 500

Hope this helps.

Happy Coding.

Regards,
Jaliya

Thursday, May 12, 2022

.NET 7 Preview 4: Introducing Self-describing Support for Minimal APIs in ASP.NET Core

.NET 7 Preview 4 is released and it includes some nice features related to ASP.NET Core Minimal APIs. One of them is the support for self-describing API endpoints. 

In this post, let's have a look at how it works.

Consider the below Minimal API endpoints prior to .NET 7 Preview 4.

app.MapGet("/employees", async (EmployeeContext dbContext) =>
{
    return Results.Ok(await dbContext.Employees.ToListAsync());
});

Now if we have a look at the Swagger document, I can see something like this.

GET: /employees
It only says the endpoint returns 200, but nothing about the response type.

Let's have a look at another example. Consider the below endpoint.

app.MapGet("/employees/{id}", async (int id, EmployeeContext dbContext) =>
{
    Employee employee = await dbContext.Employees.FindAsync(id);
    if (employee is null)
    {
        return Results.NotFound();
    }
 
    return Results.Ok(employee);
});

And this would appear in the Swagger document as follows.

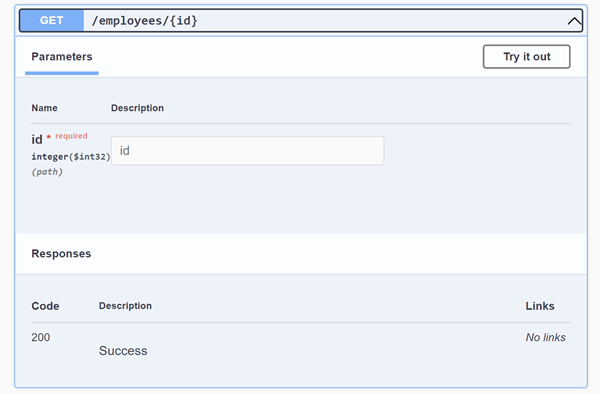
GET: /employees/{id}
Again nothing about the Response Type, and obviously no sign about the endpoint returning 404.
 
If we are to enrich these missing details, we will have to update the code as follows.

app
    .MapGet("/employees", async (EmployeeContext dbContext) =>
    {
        return Results.Ok(await dbContext.Employees.ToListAsync());
    })
    .Produces<List<Employee>>();
 
app
    .MapGet("/employees/{id}", async (int id, EmployeeContext dbContext) =>
    {
        Employee employee = await dbContext.Employees.FindAsync(id);
        if (employee is null)
        {
            return Results.NotFound();
        }
 
        return Results.Ok(employee);
    })
    .Produces<Employee>()
    .Produces(StatusCodes.Status404NotFound);

And now we can see the Swagger document is updated.

GET: /employees
GET: /employees/{id}
But what if we can let the APIs describe themselves without adding additional annotations.

With .NET 7 Preview 4, I can change the above endpoints as follows.

app.MapGet("/employees", async (EmployeeContext dbContext) =>
{
    return TypedResults.Ok(await dbContext.Employees.ToListAsync());
});

This will describe the endpoint the same way it did with annotations. 

The only change I did here is use the new TypedResults factory class instead of Results factory class when generating the result. The new TypedResults factory class will create Typed results (as the name suggests of course) instead of IResult as it did with Results factory class. And all these Typed results implement a new interface IEndpointMetadataProvider.

public interface IEndpointMetadataProvider
{
    static abstract void PopulateMetadata(EndpointMetadataContext context);
}

The framework will call PopulateMetadata() when the endpoint is built and that adds the necessary endpoint metadata to describe the HTTP response type.

Now when we have multiple return types, we need to explicitly specify the return types as follows.

app.MapGet("/employees/{id}", async Task<Results<Ok<Employee>, NotFound>> (int id, EmployeeContext dbContext) =>
{
    Employee employee = await dbContext.Employees.FindAsync(id);
    if (employee is null)
    {
        return TypedResults.NotFound();
    }
 
    return TypedResults.Ok(employee);
});

And this also will describe the endpoint the same way it did with annotations. 

You can find the complete sample code here.
   https://github.com/jaliyaudagedara/minimal-api

More Read
   ASP.NET Core updates in .NET 7 Preview 4

Hope this helps.

Happy Coding.

Regards,
Jaliya

Tuesday, August 17, 2021

.NET 6 Preview 7: Introducing Static Results Utility Class for Producing Common HTTP Responses as IResult Implementations

Last week .NET 6 Preview 7 was released and one of the new features that got introduced to the world of ASP.NET Core is a new static Results utility class to produce common HTTP responses as IResults. IResult is a new return type that got introduced with Minimal APIs. 

If you are new to Minimal APIs in ASP.NET Core or need to refresh your memories, you can read these posts.

Previously we had to use/maintain our own class to Map IActionResult to IResult.  With this new Results utility class, we no longer have to do that.

If you explore the Results class, it has IResult types for almost all the regularly used HTTP responses.
IResult
You can find the sample code here,
      (PR for Updating packages to .NET Preview 7 and introduce use of static Results utility class)

Hope this helps.

Happy Coding.

Regards,
Jaliya

Friday, July 16, 2021

.NET 6 Preview 6: Introducing OpenAPI Support in Minimal APIs in ASP.NET Core

We are getting closer to .NET 6 final release and this week .NET 6 Preview 6 was released. .NET 6 Preview 4 has introduced Minimal APIs in ASP.NET Core. With .NET 6 Preview 6, we now have OpenAPI support for Minimal APIs. In this post, let's see how we can set up Swagger for a project that uses the Minimal API approach.

If you are new to Minimal APIs in ASP.NET Core or need to refresh your memories, you can read this post I have written a couple of months back: .NET 6 Preview 4: Introducing Minimal APIs in ASP.NET Core. I am going to upgrade the sample project (minimal-api) used in that post to .NET 6 Preview 6 and add support for OpenAPI.

First, I am upgrading all the relevant packages to their latest previews, and I am installing Swashbuckle.AspNetCore latest package.
<Project Sdk="Microsoft.NET.Sdk.Web">

  <PropertyGroup>
    <TargetFramework>net6.0</TargetFramework>
    <LangVersion>preview</LangVersion>
  </PropertyGroup>

  <ItemGroup>
    <PackageReference Include="Microsoft.EntityFrameworkCore.SqlServer" Version="6.0.0-preview.6.21352.1" />
    <PackageReference Include="Microsoft.Extensions.Configuration.Abstractions" Version="6.0.0-preview.6.21352.12" />
    <PackageReference Include="Swashbuckle.AspNetCore" Version="6.1.4" />
  </ItemGroup>

</Project>
In my case, I had only 2 packages installed.
Once the packages are updated, setting up Swagger is pretty straightforward, it's more or less the same to what we have done over all these years.

First, set up the required dependencies.
builder.Services.AddEndpointsApiExplorer();

builder.Services.AddSwaggerGen(c =>
{
    c.SwaggerDoc("v1", new OpenApiInfo { Title = "Minimal API", Description = "OpenAPI specification for Minimal API", Version = "v1" });
});
Then add Swagger OpenAPI specification and Swagger UI to the middleware.
app.UseSwagger();
app.UseSwaggerUI(c =>
{
    c.SwaggerEndpoint("/swagger/v1/swagger.json", "Minimal API V1");
});
That's just it. Now run the application and navigate to https://localhost:5001/swagger and we have Swagger specification at our disposal.
Swagger UI
You can find the sample code here,
   https://github.com/jaliyaudagedara/minimal-api 
      (Commit for Updating packages to .NET Preview 6 and adding OpenAPI support)

Hope this helps.

Happy Coding.

Regards,
Jaliya

Friday, July 15, 2016

Session : ASP.NET Core 1.0 : What’s New with Web API at Sri Lanka .NET Forum

Yesterday delivered a session at Sri Lanka .NET Forum monthly meetup. The session was titled as "ASP.NET Core 1.0 : What’s New with Web API". It was a house full session with attendees over 70.

Some of the attendees were new to ASP.NET Core and had to give them a brief on .NET Core and what ASP.NET Core really is. I didn’t have any slides, the total one hour session was filled with demos and of course there were a lot of questions during the session and after. As a summary following is what I have discussed and demoed.
  • ASP.NET Core Overview
  • ASP.NET Full Framework vs ASP.NET Core
  • ASP.NET Core Startup Class
  • Routing (Attribute and Centralized)
  • Formatting
  • Swagger
You can find the sample code used in the demo in GitHub.
   AspNetCoreWebApiOverview

For more information,
   Meetup Event

Happy Coding.

Regards,
Jaliya

Thursday, July 7, 2016

Deploy ASP.NET Core 1.0 Web Application inside a Virtual Directory of an Existing App Service on Microsoft Azure

In this post let’s see how we can deploy ASP.NET Core 1.0 web application inside a virtual directory of an existing app service on Microsoft Azure. Let’s start from very scratch and that's by creating two ASP.NET Core applications.

So I have created following two applications, one is ASP.NET Core Web Application and the other is ASP.NET Core Web API Application.

image
Solution
Now what I am going to do is deploy Web App as a App Service, create a virtual directory there and then deploy the Web API application under the virtual directory. Idea is accessing the Web App and Web API as follows.
Assuming you have basic knowledge of deploying a web application to Azure, I am not going to go through those steps. Now I have deployed my Web App.

Next step is creating a virtual directory beneath that. For that navigate to created App Services' Application Settings as follows.

image
App Service
Now in the Application Settings blade, scroll to the bottom and add a virtual directory as follows. Make sure to tick Application check box.
image
Virtual Directory
That’s pretty straight forward. Next step is to publish the Web API application. Before that we need to modify the Route Token in the controller removing the “api” as follows.
image
Route Token
Now let’s publish the Web API application. For that you need to make sure you change the publishing profile as follows. (You can import the same publishing profile that you have used for the Web App or you can just select Microsoft Azure App Service in publishing dialog and follow the steps)

image
Publishing Connection Information
Here as you can see, I have appended “/api” (my virtual directory name) to the Site name and Destination URL. Now  I am all good and I can continue with the publishing. And once the Web API application is published, you will most likely see this error.

image
Error
That is because in the web.config file in the Web API project, you have the following line.

image
web.config
Just remove it and publish the file. Here I strongly prefer editing the web.config through FileZilla or some FTP client. And that’s it. Now you should be able to see the API endpoint working.

image
ValuesController

Thursday, June 23, 2016

Setting up Hangfire in an ASP.NET Web API Application

If you want to run some background tasks inside your ASP.NET Web API application, I strongly suggest you have a look at Hangfire. You don’t need a separate Windows Service or anything, you can just spawn the task within the Web API. Having said that, Hangfire gives you extended functionality to run your background task as a Console Application or as a Windows Service. For the persistence storage for the tasks, Hangfire uses SQL Server, MySQL, Redis etc.

In this post let’s see how you can setup Hangfire with an ASP.NET Web API application. For that let’s start off by creating a ASP.NET Web API project.

After the project is created install Hangfire using Package Manager Console by simply running the Install-Package Hangfire command. Alternatively you can use Nuget Packet Manager to install Hangfire.
image
Install-Package Hangfire
Now you have all the necessary dependencies installed. Let’s jump into configuring Hangfire. Open up Startup.cs and modify the code as follows.
using Hangfire;
using Microsoft.Owin;
using Owin;
using System.Configuration;
 
[assembly: OwinStartup(typeof(HangfireDemo.Startup))]
 
namespace HangfireDemo
{
    public partial class Startup
    {
        public void Configuration(IAppBuilder app)
        {
            ConfigureAuth(app);
 
            GlobalConfiguration.Configuration.UseSqlServerStorage(ConfigurationManager.ConnectionStrings["HangfirePersistence"].ConnectionString);
            app.UseHangfireDashboard();
            app.UseHangfireServer();
        }
    }
}
Here you must specify the Hangfire persistence connection string. Here I have specified the connection string in the web.config and I have created a blank database as in the connection string in my SQL Server instance. app.UseHangfireDashboard() will setup a dashboard in http://<rootsiteurl>/hangfire for you to have a look at your jobs. app.UseHangfireServer() will setup a new instance of BackgroundJobServer. Now let’s just run the application.

You will see that a set of tables has been created in the Database which you have mentioned in the persistence connection string.
image
Hangfire Persistence Related Tables
Now let’s navigate to http://<rootsiteurl>/hangfire in the browser.

image
Hangfire Dashboard
As you can see, you will be provided with a nice little Dashboard where you can find important things such as Jobs, Retries etc.

Hangfire basically provide the ability to create following three types of tasks.
  • Fire-and-forget tasks
  • Delayed tasks
  • Recurring tasks
For the demonstration purposes, let’s just create a Recurring Task which will print something to output window every minute. What you need to do is just modify the Startup.cs adding the following line just below the app.UseHangfireServer().
RecurringJob.AddOrUpdate(() => Debug.WriteLine("Minutely Job"), Cron.Minutely);
And if you run the Web API application now, you can see the following in output window. “Minutely Job” will be written to output window every minute.

image
Debug Output
Now If we have a look at the dashboard, we can see important information related to the job we just created.
image
Hangfire Dashboard - Recurring Jobs
image
Hangfire Dashboard - Succeeded Jobs
So that’s it. You can find a rich documentation about Hangfire from their site. Do explore and high five to all the developers in Hangfire.

Happy Coding.

Regards,
Jaliya

Tuesday, June 21, 2016

Integrating SignalR with ASP.NET Web API

In this post let’s see how we can integrate and trigger SignalR with ASP.NET Web API. Let’s start off by creating a solution and adding a ASP.NET Web API project and empty ASP.NET project. Let’s set the API project’s Project URL to {web_app_project_url}/api, so it will run under the Web App Project URL. And we need to modify the DefaultApi route to remove explicit “api” part as follows.
config.Routes.MapHttpRoute(
   name: "DefaultApi",
   routeTemplate: "{controller}/{id}",
   defaults: new { id = RouteParameter.Optional }
);
Now let’s install SignalR nuget package to the ASP.NET Web API project. You can use either Nuget Package Manager and Package Manager Console. I prefer using Package Manager Console by running Install-Package Microsoft.AspNet.SignalR.

image
Install-Package Microsoft.AspNet.SignalR
Now open up the Startup.cs in the Web API project and bootstrap SignalR as follows.
using Microsoft.Owin;
using Owin;
 
[assembly: OwinStartup(typeof(AspNetWebApiSignalRDemo.WebApi.Startup))]
 
namespace AspNetWebApiSignalRDemo.WebApi
{
    public partial class Startup
    {
        public void Configuration(IAppBuilder app)
        {
            ConfigureAuth(app);
            app.MapSignalR();
        }
    }
}
Now let’s create a folder inside Web API project named “Hubs” and add a SignalR Hub Class. I am naming it as “NotificationHub”.
image
SignalR Hub Class
The created file will contain a Hello() method, and I am just leaving it as it is.

Now let’s move into the empty web app project. For the sake of demonstration, I am using AngularJS to bootstrap the web app project. For that I am installing following dependencies using  bower.
image
bower dependencies
index.html
<!DOCTYPE html>
<html ng-app="AspNetWebApiSignalRDemo">
 
<head>
    <script src="bower_components/jquery/dist/jquery.min.js"></script>
    <script src="bower_components/signalr/jquery.signalR.min.js"></script>
    <script src="bower_components/angular/angular.min.js"></script>
    <script src="api/signalr/hubs"></script>
    <script src="app.js"></script>
 
    <title>ASP.NET Web API and SignalR Demo</title>
    <meta charset="utf-8" />
</head>
<body>
    <div ng-controller="AppController">
        
    </div>
</body>
</html>
app.js
'use strict';
 
angular.module("AspNetWebApiSignalRDemo", [])
 
.service("SignalrService", function () {
    var notificationHubProxy = null;
 
    this.initialize = function () {
        $.connection.hub.logging = true;
        notificationHubProxy = $.connection.notificationHub;
 
        notificationHubProxy.client.hello = function () {
            console.log("Hello from ASP.NET Web API");
        };
 
        $.connection.hub.start().done(function () {
            console.log("started");
        }).fail(function (result) {
            console.log(result);
        });
    };
})
 
.controller("AppController", ["SignalrService", function (SignalrService) {
    SignalrService.initialize();
}]);
Now if you run the solution, you will see that SignalR is making a successful connection with my NotificationHub in the ASP.NET Web API project.
image
SignalR connected successfully
To make sure whether we can invoke client side methods from the Web API project, let’s use the NotificationHub from a API action. For that I am modifying the NotificationHub class adding a static method as follows.
using Microsoft.AspNet.SignalR;
 
namespace AspNetWebApiSignalRDemo.WebApi.Hubs
{
    public class NotificationHub : Hub
    {
        private static IHubContext hubContext = GlobalHost.ConnectionManager.GetHubContext<NotificationHub>(); 

        public void Hello()
        {
            Clients.All.hello();
        }
 
        public static void SayHello()
        {
            hubContext.Clients.All.hello();
        }
    }
}
And let’s just modify Get() action in ValuesController as follows. Please note that I am attributing it with [AllowAnonymous], so I can access directly from the browser without authenticating.
[AllowAnonymous]
public IEnumerable<string> Get()
{
    NotificationHub.SayHello();
 
    return new string[] { "value1", "value2" };
}
And now if you invoke the /api/values from the browser, you will see that Web API is triggering client hub event "hello".
image
Web API + SignalR
I have made the sample code available in GitHub.
   AspNetWebApiSignalRDemo

Happy Coding.

Regards,
Jaliya