Showing posts with label PowerShell. Show all posts

Saturday, February 28, 2026

Connecting Azure to MongoDB Atlas via Private Endpoints

In this post, let's see how we can set up Azure Private Endpoints to connect to a MongoDB Atlas cluster.

When we connect to a MongoDB Atlas cluster, we typically use a connection string like this:

mongodb+srv://<CLUSTER_NAME>.bzmphh.mongodb.net

This goes over the public internet. If we are on Azure and want traffic to stay private and routed through Azure's backbone network, we need a Private Endpoint.

Setting up a Private Endpoint between Azure and Atlas involves both sides:
  • Atlas
    • A Private Link Service that our Azure VNet can connect to
  • Azure
    • A Private Endpoint in our VNet's subnet that gets a private IP
    • An Azure Private DNS Zone so our apps resolve the Atlas hostname to the private IP instead of the public one

Let's walk through how to achieve this step by step using PowerShell. Please note that we need az cli and atlas cli for this.

$atlasProjectId = "<ATLAS_PROJECT_ID>"
$atlasClusterName = "<ATLAS_CLUSTER_NAME>"
$atlasRegion = "<ATLAS_REGION>"

$subscription = "<AZURE_SUBSCRIPTION_ID>"
$resourceGroup = "<RESOURCE_GROUP>"
$location = "<REGION>"
$vnetName = "<VNET>"
$subnetName = "<SNET_FOR_PRIVATE_ENDPOINT>"

$peName = "<PE_NAME>"
$peNicName = "<PE_NAME>_nic"
First, we need to create the Private Link Service in Atlas. This is the resource that Azure will connect to.
atlas privateEndpoints azure create `
    --projectId $atlasProjectId `
    --region $atlasRegion 
--output json | ConvertFrom-Json
# Wait for some time before running below
$peServices = atlas privateEndpoints azure list
--projectId $atlasProjectId | ConvertFrom-Json

$peService = peServices[0]
$endpointServiceId = $peService.id $privateLinkServiceResourceId = $peService.privateLinkServiceResourceId
Now we create the Private Endpoint in our Azure VNet. 
az account set --subscription $subscription

$pe = az network private-endpoint create `
    --resource-group $resourceGroup `
    --location $location `
    --name $peName `
    --nic-name $peNicName `
    --vnet-name $vnetName `
    --subnet $subnetName `
    --private-connection-resource-id $privateLinkServiceResourceId `
    --connection-name "$peName-connection" `
    --manual-request true | ConvertFrom-Json

$peResourceId = $pe.id
Note the "--manual-request true" flag is required because Atlas needs to accept the connection on their side.

The Private Endpoint creates a NIC in our subnet. We need its private IP for our next step.
$pePrivateIp = az network nic show `
    --subscription $subscription `
    --resource-group $resourceGroup `
    --name $peNicName `
    --query "ipConfigurations[0].privateIPAddress" -o tsv
Now we need to ask Atlas to accept the connection.
atlas privateEndpoints azure interfaces create $endpointServiceId `
    --privateEndpointId $peResourceId `
    --privateEndpointIpAddress $pePrivateIp `
    --projectId $atlasProjectId
Now we need a Private DNS Zone so that apps inside the VNet resolve Atlas hostnames to our private IP. We can derive the DNS Zone Name from the cluster's connection string.
$cluster = atlas clusters describe $atlasClusterName `
    --projectId $atlasProjectId -o json | ConvertFrom-Json

$srvHost = $cluster.connectionStrings.standardSrv -replace "mongodb\+srv://", ""
$dnsZoneName = $srvHost.Substring($srvHost.IndexOf('.') + 1)
# Result: bzmphh.mongodb.net

az network private-dns zone create `
    --resource-group $resourceGroup `
    --name $dnsZoneName
Note that we use a specific subdomain (bzmphh.mongodb.net) rather than mongodb.net. This avoids hijacking DNS resolution for all MongoDB Atlas clusters, only our cluster's traffic goes through the private endpoint.

The DNS zone needs to be linked to our VNet so resources inside it can resolve the private records.
$vnetResourceId = az network vnet show `
    --subscription $subscription `
    --resource-group $resourceGroup `
    --name $vnetName `
    --query "id" -o tsv

az network private-dns link vnet create `
    --resource-group $resourceGroup `
    --zone-name $dnsZoneName `
    --name $vnetName `
    --virtual-network $vnetResourceId `
    --registration-enabled false
After registering the PE, Atlas generates private endpoint-specific connection strings. We can find those using the following:
$connectionStrings = atlas clusters connectionStrings describe $atlasClusterName `
    --projectId $atlasProjectId `
    -o json | ConvertFrom-Json
atlas clusters connectionStrings describe
This gives us everything we need, the PE-specific hostnames, ports, and replica set info.

Now we parse the Atlas connection strings and create the DNS records in our Private DNS Zone.
$peConnStr = $connectionStrings.privateEndpoint[0]

$srvHostFull = $peConnStr.srvConnectionString -replace "mongodb\+srv://", ""
$srvPrefix = $srvHostFull.Split('.')[0]

$connPart = ($peConnStr.connectionString -replace "mongodb://", "").Split('?')[0].TrimEnd('/')
$hostPortEntries = $connPart.Split(',')
$aRecordHostFull = $hostPortEntries[0].Split(':')[0]
$aRecordName = $aRecordHostFull -replace "\.$dnsZoneName$", ""
$ports = $hostPortEntries | ForEach-Object { $_.Split(':')[1] }

$queryParams = ($peConnStr.connectionString -split '\?')[1]
$txtValue = ($queryParams -split '&' | Where-Object {
    $_ -match "authSource|replicaSet"
}) -join '&'
Now create the actual records:
# A Record
az network private-dns record-set a add-record `
    --resource-group $resourceGroup `
    --zone-name $dnsZoneName `
    --record-set-name $aRecordName `
    --ipv4-address $pePrivateIp

# SRV Records
foreach ($port in $ports) {
    az network private-dns record-set srv add-record `
        --resource-group $resourceGroup `
        --zone-name $dnsZoneName `
        --record-set-name "_mongodb._tcp.$srvPrefix" `
        --target $aRecordHostFull `
        --priority 0 --weight 0 --port $port
}

# TXT Record
az network private-dns record-set txt add-record `
    --resource-group $resourceGroup `
    --zone-name $dnsZoneName `
    --record-set-name $srvPrefix `
    --value "`"$txtValue`""
Once done, I can see something like this in our Private DNS Zone.
Private DNS Zone: Recordsets

Why Not Just an A Record?

If the private endpoint gives us a single private IP, why do we need three types of DNS records?

When our app uses a connection string like:
mongodb+srv://<CLUSTER_NAME>-pl-0.bzmphh.mongodb.net
The MongoDB driver doesn't just do a simple hostname lookup. It performs three DNS queries:
  • SRV Record
    • This tells the driver which hosts and ports to connect to. For private endpoints, the port is 1024 (not the standard 27017). The SRV record returns:
<CLUSTER_NAME>-pl-0-0.bzmphh.mongodb.net:1024
<CLUSTER_NAME>-pl-0-0.bzmphh.mongodb.net:1025
<CLUSTER_NAME>-pl-0-0.bzmphh.mongodb.net:1026
Without SRV records, the driver wouldn't know which port to use and would default to 27017, which won't work over Private Link.
  • TXT Record
    • This provides the replica set name and auth database:
authSource=admin&replicaSet=atlas-5x58u7-shard-0
Without this, the driver wouldn't know which replica set to join or where to authenticate.
  • A Record
    • This resolves the hostname to the Private IP address of our Private Endpoint. This is what actually routes traffic through Azure Private Link instead of the public internet.
What If You Skip SRV and TXT?

You could technically use a "mongodb://" connection string instead of "mongodb+srv://" and hardcode everything:
mongodb://<CLUSTER_NAME>-pl-0-0.bzmphh.mongodb.net:1024,<CLUSTER_NAME>-pl-0-0.bzmphh.mongodb.net:1025,<CLUSTER_NAME>-pl-0-0.bzmphh.mongodb.net:1026/?authSource=admin&replicaSet=atlas-5x58u7-shard-0
But that means your application configuration now contains infrastructure details, ports, replica set names, and host entries. If anything changes on Atlas's side, you'd need to update and redeploy your app. With "mongodb+srv://", your app connection string is just "mongodb+srv://<CLUSTER_NAME>-pl-0-0.bzmphh.mongodb.net", clean and stable. If something changes, you update the DNS records (infrastructure), not the app config.

So all three are required for "mongodb+srv://" to work over Private Link.

Once everything is set up, you can run the following and verify inside the VNet:
# Check DNS resolution
nslookup <CLUSTER_NAME>-pl-0.bzmphh.mongodb.net

# Test connection
mongosh 'mongodb+srv://<CLUSTER_NAME>-pl-0.bzmphh.mongodb.net' \
    --username dbadmin --password 'yourpassword'
The A record should resolve to your private IP, and mongosh should connect without going over the public internet.

Note: The domain (bzmphh.mongodb.net), -pl-x suffix, and port numbers shown here are examples. Update them to match the values for your own Atlas cluster and Private Endpoint setup.

Hope this helps.

Happy Coding.

Regards,
Jaliya

Tuesday, January 6, 2026

Copying Azure Cosmos DB NoSQL Containers to a Database in another Account

In this post, let's see how to copy Azure Cosmos DB NoSQL containers from one database to another database in a different Azure Cosmos DB NoSQL account.

Currently within the Azure Portal itself, only Container Copy within the same account is supported.

Container Copy

There are other options like Azure Data Factory etc, but it's much easier to do this using  az cosmosdb copy from az cli cosmosdb-preview extension.

Let's have a look.

First step is adding  cosmosdb-preview extension. 

az extension add --name cosmosdb-preview

Now I am declaring script level variables.

$sourceSubsciptionId = "<sourceSubscriptionId>"
$sourceAccountResourceGroup = "<sourceAccountResourceGroup>"
$sourceAccountName = "<sourceAccountName>"

$destinationSubsciptionId = "<destinationSubscriptionId>"
$destinationAccountResourceGroup = "<destinationResourceGroup>"
$destinationAccountName = "<destinationAccountName>"

# ManagedIdentity of destination Cosmos DB account
$destinationUserAssignedManagedIdentityName = "<destinationUserAssignedManagedIdentityName>"

$destinationUserAssignedManagedIdentityPrincipalId = az identity show `
    --resource-group $destinationAccountResourceGroup `
    --name $destinationUserAssignedManagedIdentityName `
    --query principalId `
    --output tsv

$destinationUserAssignedManagedIdentityResourceId = az identity show `
    --resource-group $destinationAccountResourceGroup `
    --name $destinationUserAssignedManagedIdentityName `
    --query id `
    --output tsv

We can copy containers in two modes: Online copy and Offline copy. With Offline copy, we need to stop operations on source container, I don't want to do that. So in this post, we are going to be doing Online copy. I am also using User-Assigned managed identities for database access.

Requirements

Source Account

  1. Enable continuous backup on source Azure Cosmos DB account.
  2. Enable All version and delete change feed mode (preview) feature on the source account.
    Features: All version and delete change feed mode (preview)
  3. Add capability: EnableOnlineContainerCopy

# Existing capabilities of your account.
$cosmosdb = az cosmosdb show `
    --resource-group $sourceAccountResourceGroup `
    --name $sourceAccountName

$capabilities = (($cosmosdb | ConvertFrom-Json).capabilities)

# Append EnableOnlineContainerCopy capability in the list of capabilities.
$capabilitiesToAdd = @()
foreach ($item in $capabilities) {
    $capabilitiesToAdd += $item.name
}
$capabilitiesToAdd += "EnableOnlineContainerCopy"

# Update Cosmos DB account
az cosmosdb update `
    --resource-group $sourceAccountResourceGroup
    --name $sourceAccountName `
    --capabilities $capabilitiesToAdd

Verify the capabilities and ensure EnableOnlineContainerCopy is added.

Source Account Capabilities

Destination Account
  1. Currently cross account container copy is only supported for accounts with System-Assigned or User-Assigned default identity. So make sure in the destination database, default identity is set to destination User-Assigned managed identity.
# Show the current default identity of the destination Cosmos DB account
az cosmosdb show `
    --resource-group $destinationAccountResourceGroup `
    --name $destinationAccountName `
    --query defaultIdentity

# Update default identity for the destination Cosmos DB account
az cosmosdb update `
    --resource-group $destinationAccountResourceGroup `
    --name $destinationAccountName `
    --default-identity=UserAssignedIdentity=$destinationUserAssignedManagedIdentityResourceId
Now we need to grant the destination Cosmos DB account’s managed identity read-only access to the source Cosmos DB account, so we can read the data.
az account set --subscription $sourceSubsciptionId

$roleDefinitionId = "00000000-0000-0000-0000-000000000001" # Read-Only Role Definition Id
az cosmosdb sql role assignment create `
    --resource-group $sourceAccountResourceGroup `
    --account-name $sourceAccountName `
    --role-definition-id $roleDefinitionId `
    --scope "/" `
    --principal-id $destinationUserAssignedManagedIdentityPrincipalId

Now we are all set. Next step is creating a job to copy container.

Create Container Copy Job:

az account set --subscription $destinationSubsciptionId

$jobName = "<jobName>"

$sourceDatabase = "<sourceDatabase>"
$sourceContainer = "<sourceContainer>"

$destinationDatabase = "<destinationDatabase>"
$destinationContainer = "<destinationContainer>"

az cosmosdb copy create `
    --resource-group $destinationAccountResourceGroup `
    --job-name $jobName `
    --src-account $sourceAccountName `
    --src-nosql database=$sourceDatabase container=$sourceContainer `
    --dest-account $destinationAccountName `
    --dest-nosql database=$destinationDatabase container=$destinationContainer `
    --mode Online

az cosmosdb copy create
Once it's started, we can query the job status.

Query Job Status:

az cosmosdb copy show `
    --resource-group $destinationAccountResourceGroup `
    --account-name $destinationAccountName `
    --job-name $jobName

az cosmosdb copy show

When the processedCount becomes greater than or equal to the totalCount, complete the job.

Complete the Job:

az cosmosdb copy complete `
    --resource-group $destinationAccountResourceGroup `
    --account-name $destinationAccountName `
    --job-name $jobName

After some time, query the status again and make sure it's Completed.

az cosmosdb copy show
That's it.

Some useful commands

# List all copy jobs
az cosmosdb copy list `
    --resource-group $destinationAccountResourceGroup `
    --account-name $destinationAccountName

# Pause copy job
az cosmosdb copy pause `
    --resource-group $destinationAccountResourceGroup `
    --account-name $destinationAccountName `
    --job-name $jobName

# Resume copy job
az cosmosdb copy resume `
    --resource-group $destinationAccountResourceGroup `
    --account-name $destinationAccountName `
    --job-name $jobName

# Cancel copy job
az cosmosdb copy cancel `
    --resource-group $destinationAccountResourceGroup `
    --account-name $destinationAccountName `
    --job-name $jobName

Hope this helps.

More read:
   Copy jobs in Azure Cosmos DB (preview)
   Create and manage container copy jobs in Azure Cosmos DB (Preview)

Happy Coding.

Regards,
Jaliya

Tuesday, December 2, 2025

Microsoft Entra External ID: Disable Sign Up in a User Flow

I was setting up an application on Microsoft Entra External ID and in my User Flow, I didn't want to enable Sign Up.
Sign Up/Sign In
So wanted to remove No account? Create one.

Apparently Microsoft Entra admin center  doesn't seem to have a functionality to remove this within the portal.

It however can be done using Graph Beta API.

# Install the Microsoft Graph Beta module (required for authentication events flow management)
Install-Module Microsoft.Graph.Beta -Scope CurrentUser -Force
 
# Print version of Microsoft Graph Beta module
$mgBetaModule = Get-Module Microsoft.Graph.Beta -ListAvailable `
    | Sort-Object Version -Descending `
    | Select-Object -First 1
Write-Output "Using Microsoft.Graph.Beta: $($mgBetaModule.Version)" # As of today: 2.32.0
 
# Connect to Azure Account
Write-Output "Connecting to Azure Account..."
Connect-AzAccount
 
$tenantId = "<tenant-id>"
$targetFlowName = "<user-flow-name>"
 
# Connect to Microsoft Graph with required permissions
# Required scopes:
#   - Policy.ReadWrite.AuthenticationFlows: To read and modify authentication flows
#   - EventListener.Read.All/ReadWrite.All: To read and modify event listeners
#   - Application.Read.All/ReadWrite.All: To read and modify applications
Connect-MgGraph `
    -TenantId $tenantId `
    -Scopes "Policy.ReadWrite.AuthenticationFlows", `
        "EventListener.Read.All", `
        "EventListener.ReadWrite.All", `
        "Application.Read.All", `
        "Application.ReadWrite.All"
 
# Verify the connected tenant
$tenantId = (Get-MgContext).TenantId
Write-Output "Successfully connected to tenant: $tenantId"
 
# Retrieve all authentication events flows
$authenticationEventsFlows = Invoke-MgGraphRequest -Method GET `
    -Uri "https://graph.microsoft.com/beta/identity/authenticationEventsFlows"
 
# Find the ID of the target flow
$targetFlowId = ($authenticationEventsFlows.value `
    | Where-Object { $_.displayName -eq $targetFlowName }).id
 
if (-not $targetFlowId) {
    Write-Output "ERROR: Flow '$targetFlowName' not found."
    exit 1
}
 
# Get the target flow
$targetFlow = Invoke-MgGraphRequest -Method GET `
    -Uri "https://graph.microsoft.com/beta/identity/authenticationEventsFlows/$targetFlowId"
  
if ($targetFlow.onInteractiveAuthFlowStart.isSignUpAllowed -eq $false) {
    Write-Output "Sign-up is already disabled for this flow $targetFlowName."
    exit 0
}

Write-Output "Disabling sign-up for flow $targetFlowName..."
 
# Request body to disable sign-up
$body = @{
    "@odata.type" = "#microsoft.graph.externalUsersSelfServiceSignUpEventsFlow"
    "onInteractiveAuthFlowStart" = @{
        "@odata.type" = "#microsoft.graph.onInteractiveAuthFlowStartExternalUsersSelfServiceSignUp"
        "isSignUpAllowed" = $false
    }
} | ConvertTo-Json -Depth 5
 
# PATCH
Invoke-MgGraphRequest -Method PATCH `
    -Uri "https://graph.microsoft.com/beta/identity/authenticationEventsFlows/$targetFlowId" `
    -Body $body `
    -ContentType "application/json"
 
# Verify the update by retrieving the flow again
$updatedFlow = Invoke-MgGraphRequest -Method GET `
    -Uri "https://graph.microsoft.com/beta/identity/authenticationEventsFlows/$targetFlowId"
 
Write-Output "Updated: $($updatedFlow.onInteractiveAuthFlowStart.isSignUpAllowed)"
And that's it.
Sign In
Hope this helps.

Happy Coding.

Regards,
Jaliya

Monday, July 24, 2023

Installing SQL Server Express LocalDB in a GitHub Workflow

In this post, let's see how you can install SQL Server Express LocalDB in GitHub Workflows. This is useful when you want to run integration tests in a Workflow. 

Technically you can use this approach anywhere as long as the Agent is Windows, as this is just a set of PowerShell commands.

name: Build and deploy

on:
  push:
    branches:
      - main
  workflow_dispatch:

jobs:
  build:
    runs-on: windows-latest

    steps:
      - uses: actions/checkout@v2

      - ...

      - name: Install MSSQLLocalDB
        run: |
            Import-Module BitsTransfer
            Start-BitsTransfer `
               -Source https://download.microsoft.com/download/3/8/d/38de7036-2433-4207-8eae-06e247e17b25/SqlLocalDB.msi `
               -Destination SqlLocalDB.msi
            Start-Process `
               -FilePath "SqlLocalDB.msi" `
               -ArgumentList "/qn", "/norestart", "/l*v SqlLocalDBInstall.log", "IACCEPTSQLLOCALDBLICENSETERMS=YES" `
               -Wait
            sqlcmd -l 60 -S "(LocalDb)\MSSQLLocalDB" -Q "SELECT @@VERSION;"
First, we are importing the BITS (Background Intelligent Transfer Management) module, and downloading the  SqlLocalDB.msi. Then we are doing a silent install and the last command is to test the connectivity to the instance.

The specified link for SqlLocalDB.msi is for SQL Server 2022. If you want to use SQL Server 2019, you can this link: https://download.microsoft.com/download/7/c/1/7c14e92e-bdcb-4f89-b7cf-93543e7112d1/SqlLocalDB.msi

Hope this helps.

Happy Coding.

Regards,
Jaliya

Wednesday, March 22, 2023

Setting PowerShell Aliases Permanently in Windows Terminal

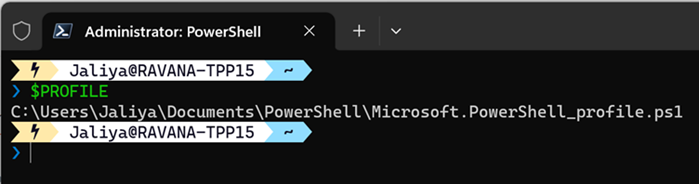
In this post let's see how we can set up PowerShell Aliases permanently in Windows Terminal. First, we need to find out the profile we are on. You can do it by running the $PROFILE command.

$PROFILE
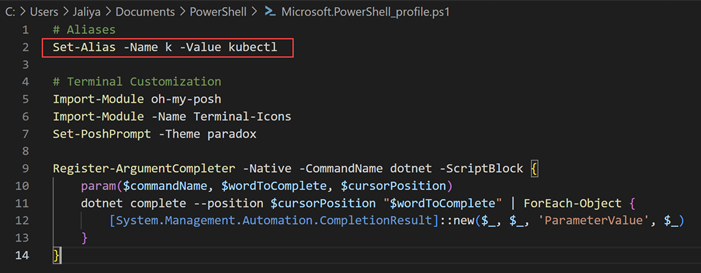
And then we need to edit the profile and add the alias using the Set-Alias command. In my case, I wanted to alias k for kubectl.
Set-Alias -Name k -Value kubectl
My PowerShell profile looks like this.
Edut PowerShell Profile
And that's about it. Now all the aliases we set up are available whenever we open up a new terminal/tab.

Hope this helps.

Regards,
Jaliya

Wednesday, March 30, 2022

Enabling Tab Completion for .NET CLI in PowerShell

In this post, let's see how we can enable Tab Completion for .NET CLI commands in PowerShell. By default, Tab completion doesn't work for .NET CLI commands.

As you can see in the below image, I am trying tab-completion after typing some letters and it doesn't resolve me the available commands in .NET CLI. Not so much of a friendly experience.
PowerShell: .NET CLI Tab Completion Does Not Work
But we can get this feature enabled in like 2 steps.

First, run the following command.
# Assuming you have VS Code
code $PROFILE
 
# If you don't have VS Code
notepad $PROFILE

Now update your PowerShell profile by adding the following code snippet.

Register-ArgumentCompleter -Native -CommandName dotnet -ScriptBlock {
    param($commandName, $wordToComplete, $cursorPosition)
    dotnet complete --position $cursorPosition "$wordToComplete" | ForEach-Object {
        [System.Management.Automation.CompletionResult]::new($_, $_, 'ParameterValue'$_)
    }
}
Save the file, close PowerShell, and open it back up. Now as you can see here, tab completion is working nicely.
PowerShell: .NET CLI Tab Completion in Action
If this doesn't work, try running the following command and ensure it works.
dotnet complete "dotnet *"

dotnet complete
If this doesn't work, make sure that .NET Core 2.0 SDK or above is installed and dotnet --version command resolves to a version of .NET Core 2.0 SDK and above.

If you want to enable .NET CLI tab completion for other Shells like bash, read more here.

Hope this helps.

Happy Coding.

Regards,
Jaliya

Wednesday, June 30, 2021

PowerShell: Running Multiple Invoke-Sqlcmd Within a Transaction

I had a requirement where I want to run set of .SQL scripts in a folder, either all scripts should get executed or none should get executed. So this is a quick post on how you can run multiple Invoke-Sqlcmd commands and that's within a transaction using PowerShell. I was initially hoping Invoke-Sqlcmd will accept an argument for Transaction, but apparently not.

This is accomplished via a native System.Transactions. This is inspired by this StackOverflow answer.

$filePath = "$(System.DefaultWorkingDirectory)\scripts"
$files = Get-ChildItem $filePath -Filter "*.sql"

$options = [System.Transactions.TransactionScopeOption]::RequiresNew
$timeout = New-Object System.TimeSpan -ArgumentList @(0, 10, 0) #10 minutes
$scope = New-Object System.Transactions.TransactionScope -ArgumentList ($options, $timeout)

Write-Host " -> Starting a transaction."

try {
    foreach ($f in $files) {
        Write-Host " -> Executing script "$filePath\$f""

        Invoke-Sqlcmd `
            -ServerInstance "$(MsSqlServer)" `
            -Database "$(Database)" `
            -Username "$(Login)" `
            -Password "$(Password)" `
            -Inputfile "$filePath\$f" `
            -ConnectionTimeout 120 `
            -ErrorAction 'Stop'
    } 
    
    $scope.Complete()
    $scope.Dispose()

    Write-Host " -> Completed the transaction."
}
catch {
    Write-Host "Error Message: " $_.Exception.Message
    $scope.Dispose()
}

So here either all the changes in SQL scripts will get applied or if any errors, none will get applied.

Happy Coding.

Regards,
Jaliya

Saturday, April 4, 2020

Invoke Invoke-SqlCmd inside a Linux Agent in Azure DevOps Pipelines

I was trying to execute Invoke-Sqlcmd command inside a Linux Agent in Azure DevOps Pipelines and getting this error.

"The term 'Invoke-Sqlcmd' is not recognized as the name of a cmdlet, function, script file, or operable program. Check the spelling of the name, or if a path was included, verify that the path is correct and try again."
The term 'Invoke-Sqlcmd' is not recognized...
Then according to this post: Invoke-Sqlcmd is Now Available Supporting Cross-Platform, installed SqlServer module from another PowerShell@2 task.
- task: PowerShell@2
  inputs:
    targetType: 'inline'
    script: 'Install-Module -Name SqlServer -AllowPrerelease'
That task passed, but still, the PS Invoke-SqlCmd task was throwing the same error. But noticed this warning inside PS Install-Module task.

"WARNING: User declined to install module (SqlServer)."
WARNING: User declined to install module (SqlServer)
Then I modified the PS Install-Module task to pass in an additional parameter -Scope CurrentUser.
- task: PowerShell@2
  inputs:
    targetType: 'inline'
    script: 'Install-Module -Name SqlServer -AllowPrerelease -Force -Verbose -Scope CurrentUser'
This time it got installed successfully.
Install-Module -Name SqlServer
And finally I was able to run Invoke-SqlCmd inside a Linux Agent in Azure DevOps Pipeline.
Invoke-SqlCmd is running
Hope this helps!

Happy Coding.

Regards,
Jaliya