Monday, May 22, 2023

Enabling CORS in Locally Running In-Process Azure Function

In this post, let's see how we can enable CORS in locally running In-Process Azure Function. 

I had a simple In-Process HTTP Trigger Azure Function that exposes SignalRConnectionInfo. When running locally, a web app that is again running locally is failing to call the endpoint. The fetch request to the HTTP endpoint (http://localhost:7071/api/negotiate?negotiateVersion=1) is getting the status CORS error.
CORS Error
But when I sent a cURL request to the endpoint, it's working fine. When deployed to Azure, again everything is working as expected (after updating CORS policies of course).

So something fishy was going on.

In Azure Functions Core Tools, when you are starting a function app, luckily you can configure CORS options.
func --help
So what I did was, modify launchSettings.json by adding commandLineArgs as follows (I was using Visual Studio). 
{
  "profiles": {
    "FunctionApp": {
      "commandName""Project",
      "commandLineArgs""--cors https://tenant1-dev20.localhost:4200 --cors-credentials true",
      "environmentVariables": {
        "ASPNETCORE_ENVIRONMENT""Development"
      }
    }
  }
}
The key things here to get it to work are, 
  • --cors: Don't specify star (*). Instead, provide comma-separated CORS origins with no spaces
  • --cors-credentials: Set this to true
And that did it.
CORS Working
More information:

Hope this helps.

Happy Coding.

Regards,
Jaliya

Thursday, May 18, 2023

Azure AD B2C Custom Policies: Include User EmployeeId in Claims on an UserJourney

In this post, let's see how we can include EmployeeId in Azure AD B2C User Profile in Claims for an Azure AD B2C Sign-In (it could be any actually) UserJourney.
AAD B2C User Profile - Employee ID
Unfortunately, AAD-UserReadUsingObjectId technical profile only retrieves the basic User Profile information and EmployeeId is not part of it (Read User profile attributes).

So in order to retrieve these additional properties what we need to do is update our UserJourney by adding another OrchestrationStep to retrieve users' EmployeeId by calling Microsoft Graph API. But an important thing to note here is, users cannot obtain tokens for Microsoft Graph API using delegated permissions (Read Working with MSAL.js and Azure AD B2C). 

In that case, we can create a simple Minimal API or a HttpTriggered Azure Function that accepts users' ObjecteId and from there, call Microsoft Graph API using Client-Credentials and retrieve the users' EmployeeId. You can have a look at this Minimal API for an example on how to call Graph API using Client-Credentials 

For simplicity, let's say we have the following endpoint.
WebApplicationBuilder builder = WebApplication.CreateBuilder(args);

WebApplication app = builder.Build();
app.UseHttpsRedirection();

app.MapPost("/claims", (GetClaimsRequest getClaimsRequest) =>
{
    // TODO: Get claims for the user by calling Graph API using ClientCredentials

    return new
    {
        employeeId = "EMP101"
    };
});

app.Run();

public class GetClaimsRequest
{
    public string ObjectId { getset; }
}
Now the first thing to do is modify our B2C_1A_TrustFrameworkExtensions and define a ClaimType for employeeId.
<ClaimsSchema>
  ...
  <ClaimType Id="employeeId">
    <DisplayName>Employee Id</DisplayName>
    <DataType>string</DataType>
  </ClaimType>
</ClaimsSchema>

And then register a Restful ClaimsProvider to call our REST endpoint and pass the objectId.

<ClaimsProviders>
  ...
  <ClaimsProvider>
    <DisplayName>Get Additional Claims via REST</DisplayName>
    <TechnicalProfiles>
      <TechnicalProfile Id="REST-GetAdditionalClaims">
        <DisplayName>Get Additional Claims via REST call and transform claims</DisplayName>
        <Protocol Name="Proprietary" Handler="Web.TPEngine.Providers.RestfulProvider, Web.TPEngine, Version=1.0.0.0, Culture=neutral, PublicKeyToken=null" />
        <Metadata>
          <Item Key="ServiceUrl">https://743q57pk-7047.aue.devtunnels.ms/claims</Item>
          <Item Key="SendClaimsIn">Body</Item>
          <Item Key="AuthenticationType">None</Item>
          <Item Key="AllowInsecureAuthInProduction">true</Item>
        </Metadata>
        <InputClaims>
          <InputClaim ClaimTypeReferenceId="objectId" PartnerClaimType="objectId" />
        </InputClaims>
        <OutputClaims>
          <OutputClaim ClaimTypeReferenceId="employeeId" PartnerClaimType="employeeId"/>
        </OutputClaims>
        <UseTechnicalProfileForSessionManagement ReferenceId="SM-Noop" />
      </TechnicalProfile>
    </TechnicalProfiles>
  </ClaimsProvider>
</ClaimsProviders>

Here, I am mapping the employeeId that is being returned from the API to ClaimTypeReferenceId="employeeIdthat we created before.

The last step is to modify our UserJourney and add an OrchestrationStep to call the REST endpoint before sending the claims.
<OrchestrationSteps>
  ...
  <OrchestrationStep Order="4" Type="ClaimsExchange">
    <ClaimsExchanges>
      <ClaimsExchange Id="AADUserReadWithObjectId" TechnicalProfileReferenceId="AAD-UserReadUsingObjectId" />
    </ClaimsExchanges>
  </OrchestrationStep>
  <OrchestrationStep Order="5" Type="ClaimsExchange">
    <ClaimsExchanges>
      <ClaimsExchange Id="RESTGetAdditionalClaims" TechnicalProfileReferenceId="REST-GetAdditionalClaims" />
    </ClaimsExchanges>
  </OrchestrationStep>
  ...
</OrchestrationSteps>
And that's about it. In my example, I am using SAML authentication, and I can see employeeId is now included in the SAML response.
EmployeeId Included In Claims
And that's about it.

Hope this helps.

Happy Coding.

Regards,
Jaliya

Wednesday, May 10, 2023

Visual Studio 2022: Apply File Scoped Namespaces using Code Cleanup Profile

In this post, let's see how we can apply File scoped namespaces to all the existing C# files using a Code Cleanup Profile.

Imagine you have an old .NET project that uses Block scoped namespaces and you are upgrading the project to the latest .NET and you need to use features like File scoped namespaces that got introduced as part of C# 10.0. If you have many files, you definitely don't need to be updating files one by one.

We can apply this change to all the files at once using a Visual Studio Code Cleanup profile.

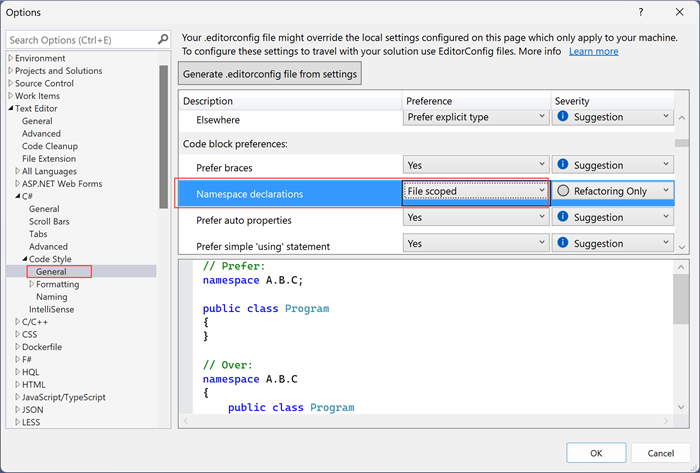
First, we need to set Namespace declarations code style preference to File scoped (if you haven't already) by going into Tools -> Options -> Text Editor -> C# -> Code Style -> General.
Update Code Style
Then go to Analyse -> Code Cleanup -> Configure Code Cleanup and configure your profile, adding the following preference.
Configure Code Cleanup
You can create a new profile just for this or update an existing profile. And then just run your Code Cleanup profile. That should update all your files with File scoped namespaces.

Hope this helps.

Happy Coding.

Regards,
Jaliya

Saturday, May 6, 2023

SSH into Linux Container in Azure App Service from Local Machine

In this post, let's see how we can SSH into Linux Container in Azure App Service from our local machine. Azure Portal has an option to SSH within the browser itself, but I personally hate that experience.

SSH from Azure Portal
We can use az webapp create-remote-connection to create a remote connection using a TCP tunnel from our local machine to the Azure App Service.

az webapp create-remote-connection `
    --subscription <subscription-id> `
    --resource-group <resource-group-name> `
    --name <app-name>

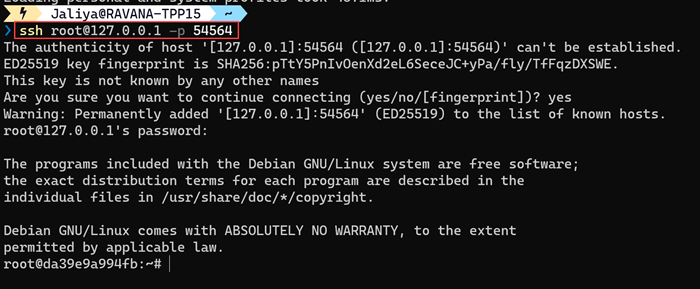
Now while is this running and the connection is open, we can open up another terminal window and SSH through the tunnel using the following command.
ssh <username>@<addr> -p <port>

SSH from Local Machine
And I am connected.

Now I can even use tools like WinSCP to file transfer between the Linux Container and my local machine.
WinSCP Connection
WinSCP Connected
Hope this helps.

Happy Coding.

Regards,
Jaliya