Wednesday, October 19, 2022

Microsoft Ignite After Party: Auckland, New Zealand

Today we had our Microsoft Ignite After Party in Auckland, New Zealand and it was great to be part of it with fellow MVPs in New Zealand.

There I was in a Panel Discussion discussing a lot of nice things coming with .NET 7.
Microsoft Ignite After Party: Auckland, New Zealand
Special thanks to Rory Braybrook and Marcus Bristol for running the party.

Happy Coding.

Regards,
Jaliya

Thursday, October 13, 2022

ASP.NET Core: HTTP Logging

In this post let's see how easy it is to set up HTTP Logging in an ASP.NET Core application.

You just need to add the HTTP Logging middleware to the HTTP pipeline.

WebApplication app = builder.Build();
 
// Enable HTTP Logging
app.UseHttpLogging();

The default logging configuration for Microsoft.AspNetCore is Warning. You might need to update appsettings.json as follows.

{
  "Logging": {
    "LogLevel": {
      "Default""Information",
      "Microsoft.AspNetCore""Warning",
      "Microsoft.AspNetCore.HttpLogging.HttpLoggingMiddleware""Information"
    }
  }
}
And now we can see basic HTTP logging.
Default Logging
You can customize the HTTP logging options using HttpLoggingOptions. For example, the below specifies what fields to be logged.
WebApplicationBuilder builder = WebApplication.CreateBuilder(args);
 
// Customize HTTP Logging options
builder.Services.AddHttpLogging(logging =>
{
    logging.LoggingFields = HttpLoggingFields.RequestPath
        | HttpLoggingFields.RequestMethod
        | HttpLoggingFields.RequestScheme
        | HttpLoggingFields.ResponseStatusCode
        | HttpLoggingFields.Response;
    
    // TODO: Customize more options
});
And the output would be something like below.
Customized Logging
A couple of important things to note,
  • This feature is only available from ASP.NET Core 6.0 onwards.
  • By default, pre-defined sensitive fields will be Redacted (ex: Authorization header). Still, you might log sensitive information if you are logging request/response bodies. So look out for what you are logging.
  • HTTP Logging can reduce performance. For example, you might not want to log huge request/response bodies. Not only that, you can get a huge bill for your Log Analytics Workspace as well (if you are using Application Insights of course).

That's pretty straightforward, isn't it?

More read:
   HTTP Logging in ASP.NET Core

Happy Coding.

Regards,
Jaliya

Friday, October 7, 2022

EF Core 7.0: Save and Query JSON in Relational Databases

In this post, let's have a look at a new feature that's going to be available with EF Core 7.0 and that's the support for saving and querying JSON columns in Relational Databases. 

You can try this feature with the latest RC builds or using daily builds.

Tip: How to get .NET Daily Builds

Add a NuGet.config file to your project with the following content.

<?xml version="1.0" encoding="utf-8"?>
<configuration>
  <packageSources>
    <clear />
    <add key="dotnet7" value="https://pkgs.dev.azure.com/dnceng/public/_packaging/dotnet7/nuget/v3/index.json" />
    <add key="NuGet.org" value="https://api.nuget.org/v3/index.json" />
  </packageSources>
</configuration>

For the purpose of this post, I am targeting Microsoft SQL Server as the relational database provider.

Consider the following scenario. Say we have a Customer entity, and a Customer has a Contact record that contains his/her Address and List of PhoneNumbers

public class Customer
{
    public int Id { getinit; }
 
    public string Name { getinit; }
 
    public Contact Contact { getset; } = null!;
 
    public Customer(string name)
    {
        Name = name;
    }
}
 
public class Contact
{
    public required Address Address { getset; }
 
    public List<PhoneNumber> PhoneNumbers { getset; } = new();
}
 
public class Address
{
    public required string Street { getset; }
 
    public required string City { getset; }
 
    public required string State { getset; }
 
    public required string PostalCode { getset; }
}
 
public class PhoneNumber
{
    public PhoneNumberType Type { getset; }
 
    public string Number { getset; }
 
    public PhoneNumber(PhoneNumberType typestring number)
    {
        Type = type;
        Number = number;
    }
}
 
public enum PhoneNumberType
{
    Mobile,
    Home
}

And whenever we load a Customer, we want his/hers Contact details to be loaded automatically because we don't want to do explicit Includes. 

In order to achieve this, we can configure the Customer entity as follows.

public class MyDbContext : DbContext
{
    public DbSet<Customer> Customers { getset; }
 
    protected override void OnConfiguring(DbContextOptionsBuilder optionsBuilder)
    {
        // Configure
    }
 
    protected override void OnModelCreating(ModelBuilder modelBuilder)
    {
        modelBuilder.Entity<Customer>()
            .OwnsOne(x => x.Contact, contactOptions =>
            {
                contactOptions.OwnsOne(x => x.Address);
                
                // Since PhoneNumbers is a Collection, it needs to be a separate table
                // Here we are just customizing the table
                contactOptions.OwnsMany(x => x.PhoneNumbers, phoneNumberOptions =>
                {
                    phoneNumberOptions
                        .Property(x => x.Type)
                        .HasConversion<string>();
 
                    phoneNumberOptions.ToTable("CustomerPhoneNumbers");
                });
            });
    }
}
And above model configuration will create a table structure as follows.
Table Structure
Since PhoneNumbers is a Collection, it needs to be in a separate table. With the JSON column support, we can store the Contact as JSON and avoid data being split across multiple tables.
protected override void OnModelCreating(ModelBuilder modelBuilder)
{
    modelBuilder.Entity<Customer>()
        .OwnsOne(x => x.Contact, contactOptions =>
        {
            contactOptions.ToJson();
 
            contactOptions.OwnsOne(x => x.Address);
 
            contactOptions.OwnsMany(x => x.PhoneNumbers);
        });
}
And this will produce a single table as follows.
Table Structure
When we store the data, it will be as follows.
JSON Column
Contact is basically stored as a JSON.

{
  "Address": {
    "City""Seattle",
    "PostalCode""98052",
    "State""WA",
    "Street""123 Main St"
  },
  "PhoneNumbers": [
    {
      "Number""111-123-4567",
      "Type""Mobile"
    },
    {
      "Number""222-123-4568",
      "Type""Home"
    }
  ]
}

Querying

We can do queries on JSON data, for example, consider the following.

List<Customer> customersInWA = await context.Customers
    .Where(x => x.Contact.Address.State == "WA")
    .ToListAsync();

The generated SQL statements will be as follows. The nice thing is EF uses JSON capabilities of SQL Server

SELECT [c].[Id], [c].[Name], JSON_QUERY([c].[Contact],'$')
FROM [Customers] AS [c]
WHERE CAST(JSON_VALUE([c].[Contact],'$.Address.State') AS nvarchar(max)) = N'WA'

Projection

List<stringdistinctStates = await context.Customers
    .Select(x => x.Contact.Address.State)
    .Distinct()
    .ToListAsync();
The generated SQL statement:
SELECT DISTINCT CAST(JSON_VALUE([c].[Contact],'$.Address.State') AS nvarchar(max))
FROM [Customers] AS [c]

Update

Customer janeDoe = await context.Customers.SingleAsync(x => x.Name == "Jane Doe");
janeDoe.Contact.Address.PostalCode = "20877";
await context.SaveChangesAsync();

The generated SQL statement:

[Parameters=[@p0='["20877"]' (Nullable = false) (Size = 9), @p1='2'], CommandType='Text', CommandTimeout='30']

SET IMPLICIT_TRANSACTIONS OFF;
SET NOCOUNT ON;
UPDATE [Customers] SET [Contact] = JSON_MODIFY([Contact], 'strict $.Address.PostalCode', JSON_VALUE(@p0, '$[0]'))
OUTPUT 1
WHERE [Id] = @p1;

Current Limitations (to my knowledge):

  • Complex queries that query through JSON arrays, still can't be translated into SQL. As far as I know, it's going to be available in EF Core 8.0. Basically, something like below won't work.

// Following query will be failed to translate into SQL
List<Customer> customersHavingHomePhoneNumbers = await context.Customers
    .Where(x => x.Contact.PhoneNumbers.Any(x => x.Type == PhoneNumberType.Home))
    .ToListAsync();

More Read:
   JSON Columns

Hope this helps.

Happy Coding.

Regards,
Jaliya

Thursday, October 6, 2022

OAuth 2.0: Authorization Code with PKCE

In this post, let's have a look at Authorization Code with PKCE (Short for Proof Key for Code Exchange, pronounced: pixy) Flow in OAuth 2.0.

In a previous post (OAuth 2.0: Authorization Code Vs Implicit Flow), I wrote about Authorization Code flow in OAuth 2.0, I'd highly suggest reading that post first before this, as I am not going to explain Authorization Code flow here in this post.

Authorization Code Flow
In the Authorization Code flow, in order to exchange authorization code to an access_token, when the Client makes to call to /token endpoint, the client needs to send the client_secret and that introduces a security risk because it has to be stored somewhere.

With the Authorization Code with PKCE, before starting the Authorization Code Flow, the Client generates a random value called code_verifier. The client then hashes this code_verifier and the result is called the code_challenge. Now the authorization code flow starts the same way, except /authorize request includes code_challenge in the query string.

GET: https://login.microsoftonline.com/<tenant>/oauth2/v2.0/authorize?
&client_id=myapplication-client
&response_type=code
&redirect_uri=https://myapplication.com/callback
&scope=Calendars.Read
&state=some-state
&code_challenge=fwfLrb--atJiWz5SBUa1-OkzAQIP1w6uuDAA2fAp-Yg

The Authorization Server stores the code_challenge for later verification and after the user authenticates, redirects back to the client with an authorization code, just like in the Authorization Code flow. Now when the client makes the request to exchange the authorization code for an access_token, it sends the code_verifier instead of the client_secret.

POST: https://login.microsoftonline.com/<tenant>/oauth2/v2.0/token
content type application/x-www-form-urlencoded
 
grant_type=authorization_code
client_id=myapplication-client
code=<code_received_from_authorize_endpoint>
code_verifier=y5jMOEF7Nk2sHLZcdZ-eR19hLd4xZL32f-79qljcJNotYRD_FQGzF5v5ouMpABFkvp0zH7JNxHe57JpV

Now the Authorization Server hashes the code_verifier and compares it to the code_challenge it stored earlier. if the hashed value matches, then only the Authorization Server will return the access_token.

Note

Microsoft identity platform and OAuth 2.0 authorization code flow requires code_challenge_method to be included in the authorization code request ( request to /authorize endpoint). That's basically the method used to generate the code_challenge. This SHOULD be S256, but the spec allows the use of plain if the client can't support SHA256.

And when exchanging authorization code for an access_token (via /token endpoint), client_secret is required for web apps and web APIs as those can store the client_secret securely on the server side. But if the client_secret is sent from a native app, /token endpoint is going to respond with a Bad Request with a message "Public clients should not send a client_secret  when redeeming a publicly acquired grant".

Hope this helps.

Happy Coding.

Regards,
Jaliya

Wednesday, October 5, 2022

OAuth 2.0: Authorization Code Vs Implicit Flow

OAuth 2.0 is something I believe most of us can get confused with (I still do at times). 

Sometimes people get confused with OAuth 2.0 and OIDC (OpenID Connect) as well.

OAuth 2.0 is a standard protocol for Authorization. But in the past, different major companies have started using OAuth 2.0 for Authentication by extending it in their own ways.  Then some genius set of people thought to make it a standard, thus they came up with  OIDC (OpenID Connect) specification which is to be used for Authentication.

So the key concept is that OIDC is an additional identity layer built on top of the OAuth 2.0 protocol. 

Anyway, in this post, thought of writing a post about the most widely used OAuth flow: Authorization Code, and have it compared with the Implicit flow. (Implicit flow is considered legacy now and its use is recommended to replace with Authorization Code with PKCE which is a slight variation of Authorization Code)

For this post, I am considering Microsoft Identity Platform as the Identity Provider, this can be Auth0, Okta, Google, or even your own Identity Server implementation. The URLs and scopes are simplified for brevity.

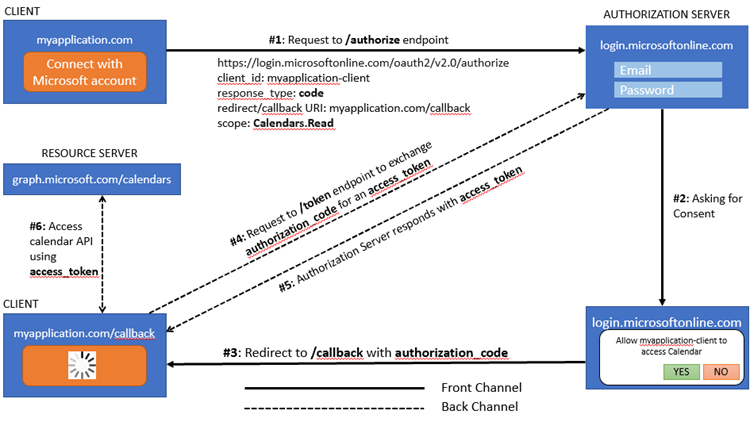
Authorization Code Flow

The Authorization Code grant type is used by confidential and public clients that use server-side technologies.

Authorization Code Flow
#1: The authorization code flow begins with the client directing the user (Resource Owner) to the /authorize endpoint. It's an HTTP GET request, something like follows.
GET: https://login.microsoftonline.com/<tenant>/oauth2/v2.0/authorize?
&client_id=myapplication-client
&response_type=code
&redirect_uri=https://myapplication.com/callback
&scope=Calendars.Read
&state=some-state
One of the most important thing here is the response_type=code, we are basically asking for an Authorization code. Now the user will be redirected to the Identity provider login page, in this case it's Microsoft.

#2: After the user has entered their Email and Password, upon successful login, the user will be presented with a consent screen. There the scopes requested will be visible.

#3: Upon accepting the consent, the user will be redirected to the redirect_uri with an authorization code.
https://myapplication.com/callback?state=some-state&code=eyJraWQiOiIzcG...

#4: Client now makes a Back channel request to /token endpoint to exchange the authorization code received to an access_token. 
POST: https://login.microsoftonline.com/<tenant>/oauth2/v2.0/token
content type application/x-www-form-urlencoded
 
grant_type=authorization_code
client_id=myapplication-client
client_secret=<client_secret>
code=<code_received_from_authorize_endpoint>
#5: For above request, the client will receive a response, something like below.
{
    "access_token": "eyJ0eXAiOiJKV1QiLCJhbGciOiJSUzI1NiIsImtpZCI...",
    "token_type": "Bearer",
    "not_before": 1664733775,
    "expires_in": 3600,
    "expires_on": 1664737375,
    "scope": "Calendars.Read"
}
#6: Now the client has the access_token in the form of a JWT token, the client can call the Resource Server using that.

A couple of important things to note here. In the picture above, note that the steps from #1 to #3 is happening on the Front channel, while the steps from #4 to #6 happen on the Back channel. The reason is, in step #3, a client_secret is involved and we shouldn't be exposing that to the outside.

Note: It is now recommended to use the Authorization Code with PKCE flow to provide better security even though a client is using a client_secret.

Implicit Flow (Legacy)

Implicit Flow
This flow was a simplified OAuth flow previously recommended for native apps and JavaScript apps (SPA). Here we are directly asking for the access_token in the first place by setting response_type=code, so the authorization code exchange step is skipped. That introduces a security risk when returning access tokens in an HTTP redirect without any confirmation that it has been received by the client. Because of that reason, Implicit flow is now deprecated and public clients such as native apps and JavaScript apps should now use the Authorization Code with PKCE flow instead.

Hope this helps.

Happy Coding.

Regards,
Jaliya