In this post let's see how we can integrate API Management (APIM) in an internal Virtual Network (VNet) and front it by an Azure Application Gateway.
I am not going to explain what APIM, VNet, Application Gateway and all the services used etc is, and I am assuming you are already comfortable with those areas.
In my current environment, I have an APIM exposing some services and it's publicly available.
- Gateway URL: https://apim-centura.azure-api.net
- Developer Portal: https://apim-centura.developer.azure-api.net
- Management API URL: https://apim-centura.management.azure-api.net
I can use the APIM Gateway URL to call underlined backends, pretty
straightforward. And Developer Portal and Management API URL is public
as well.
All my resources are in the following Resource Group and Location. And I will
be using these throughout.
Resource Group Name: rg-apim-internal
Location: East US 2

|
| Calling API via APIM |
Now let's start. The whole process has two parts.
PART I: Create/Configure a VNet and Configure APIM to be in Internal VNet mode
PART II: Create and Configure Application Gateway to front APIM
PART I: Create/Configure a VNet and Configure APIM to be in Internal VNet mode
Let's create a VNet with two subnets. One for the Application Gateway (which we
will create later) and the other for APIM.

|
| Create Virtual Network |
So I have the VNet named vnet-centura-eastus2-001 created,
- snet-appgateway: Subnet for the Application Gateway
- snet-apim: Subnet for the APIM
Now we need to update the APIMs VNet mode to Internal and place it
inside our VNets subnet for APIM.

|
| APIM: Update to Internal Mode |
Once this change is applied and saved, our APIM (or any of its access
points) is no longer publicly available. The update is going to take some time, and when
the service is updated, make note of the Private VIP.

|
| APIM: Private VIP |
Now let's create a Private DNS zone for DNS resolution in our virtual
network. I am going to name it centura.net (some name that came
to my mind).

|
| Create a Private DNS zone |
Once it's created, let's link our VNet to this private DNS zone.

|
| Private DNS zone: Virtual Networks Links |
Select the VNet and select Enable auto registration.

|
| Private DNS zone: Add virtual network link |
Next, let's add Record sets.

|
| Private DNS zone: Overview |
I am adding A type of record for the following hostnames, all
pointing to the Private VIP of APIM we have noted above.
- gateway.centura.net: APIM Gateway
- developer.centura.net: APIM Developer Portal
- management.centura.net: APIM Management API
Let's start with the Gateway.

|
| Private DNS zone: Add Record Set |
Repeat the same for Developer Portal and Management API.
Once that's done my Record sets are like below.

|
| Private DNS zone: Overview |
Now before we move to the next steps, we need to create some certificates. For the
demo purpose, I am creating certificates locally by running the following
PowerShell script.
# create trusted root certificate$trustedRootCert = New-SelfSignedCertificate `-Type Custom `-CertStoreLocation "Cert:\CurrentUser\My" `-KeySpec Signature `-Subject "CN=Centura (Fictional) CA" `-KeyExportPolicy Exportable `-HashAlgorithm sha256 `-KeyLength 4096 `-KeyUsageProperty Sign `-KeyUsage CertSign `-NotAfter (Get-Date).AddMonths(24)# create self-signed SSL server certificate for *.centura.net$sslCert = New-SelfSignedCertificate `-Type Custom `-CertStoreLocation "Cert:\CurrentUser\My" `-KeySpec Signature `-Subject "CN=*.centura.net" `-DnsName "*.centura.net","centura.net" `-KeyExportPolicy Exportable `-HashAlgorithm sha256 `-KeyLength 2048 `-Signer $trustedRootCert# export trusted root certificateExport-Certificate `-Type CERT `-Cert $trustedRootCert `-FilePath .\centura-trustedroot.cer# export self-signed SSL server certificate for *.centura.net $pfxPassword = ConvertTo-SecureString -String "SomePassword123" -AsPlainText -ForceExport-PfxCertificate `-ChainOption BuildChain `-Cert $sslCert `-FilePath .\centura.pfx `-Password $pfxPassword
This will create a trusted root certificate and a SSL certificate for
*.centura.net.

|
| Created Certificates |
Now let's navigate to the APIM and configure custom domain names.

|
| APIM: Custom Domains |
Let's add 3 custom hostnames for APIM Gateway, Developer Portal and
Management API.
Starting with Gateway.

|
| APIM: Add Custom Domain Name |
I have given the Type, Hostname, the
Certificate (SSL) we created and enabled Default SSL binding.
Repeat the same steps for Developer Portal and Management API.

|
| APIM: Custom Domains |
Now let's start the second part.
PART II: Create and Configure Application Gateway to front APIM
Let's start by creating the Application Gateway.

|
| Create Application Gateway: Basics |
I have given a name, selected the Region, selected the virtual network and subnet.
Note I have used the subnet we created for the Application Gateway.
Click on Next to set up the Frontends.
Here out Application Gateway is going to
be public and I am adding a new Public IP address.

|
| Create Application Gateway: Frontends |
Now click on Next to configure the Backends.
Here I need to add three backend pools targetting APIM Gateway, Developer
Portal, and Management API.

|
| Create Application Gateway: Backends |

|
| Create Application Gateway: Add a backend pool |
Repeat the same steps for Developer Portal and Management API. Change the IP address or FQDN respectively.
Once that is done, I have something like below.

|
| Create Application Gateway: Backends |
Now click on Next to Configurare the Application Gateway.

|
| Create Application Gateway: Routing Rules |
We need to have at least a single Routing Rule for us to be able to create the Application Gateway. Let's start with adding a routing
rule for Gateway.

|
| Create Application Gateway: Add Routing Rule -> Listener |
Here for Listener, I have selected the public Frontend IP, chose the SSL certificate, and
specified the hostname. Now move to the Backend targets tab. Here I am
selecting the Target type as the Backend pool
and selecting the correct Backend target from the dropdown.

|
| Create Application Gateway: Add Routing Rule -> Backend targets |
Now let's add an HTTP setting for the Gateway route.

|
| Create Application Gateway: Add Routing Rule -> Backend targets -> Http Setting |
Note: here we aren't using a well-known CA certificate, and I have used
the trusted root certificate we have created before. The hostname will get
picked up from the backend target and I have said No to Create
custom probes (we will be creating probes later).
Now complete the Add Routing Rule Wizard.

|
| Create Application Gateway: Configuration |
We have only created a routing rule for Gateway. That's enough for us to
complete the Application Gateway creation, let's proceed and create the
Application Gateway.
Once the Application Gateway is created, let's open it up.

|
| Application Gateway |
We are greeted with an error, but it's nothing to worry about for now. Let's
check the Backend health.

It's Unhealthy hence the error. Now if you can recall, we didn't add any
health probe when we are creating the routing rule for Gateway.
Let's add a Health Probe for the Gateway.

|
| Application Gateway: Health probes |

Note: Here I have selected the hostname to be picked up from the backend HTTP
setting. The Path is the /status-0123456789abcdef which is the
default health endpoint hosted on all the API Management services. I have
selected the HTTP setting we created as part of Application Gateway
creation, and I am skipping testing the backend health before adding the
health probe.
Once the health probe is added, let's go back to Backend health.
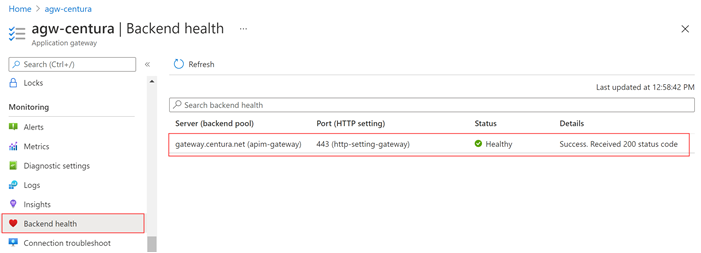 |
| Application Gateway: Backend Health |
It's healthy, so we are good with the Gateway.
Now let's configure the backends for Developer Portal and Management API.
Let's start by adding HTTP settings. Navigate to HTTP Settings.
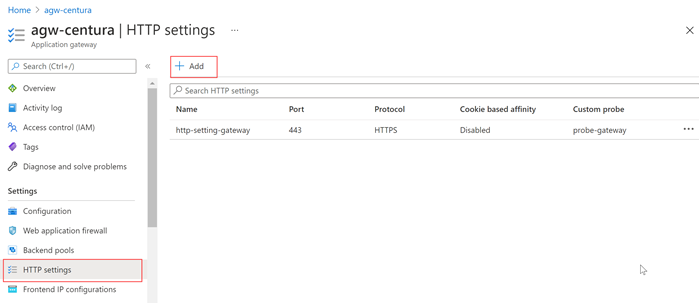 |
| Application Gateway: HTTP Settings |
|
Let's first create an HTTP setting for the Developer Portal.

|
| Application Gateway: Add HTTP Setting |
It's just the same as Add HTTP Setting in Application Gateway Creation wizard, this
time, we need to select the existing trusted root certificate and add it.
Repeat the same step for Management API and once completed, I have
something like this.

|
| Application Gateway: HTTP Settings |
Now navigate to Listeners and let's add Listeners for Developer Portal and
Management API.

|
| Application Gateway: Listeners |
Let's start by adding a listener for the Developer Portal.

|
| Aplication Gateway: Listeners -> Add |
Here again, it's the same as in the Application Gateway Creation wizard, this time, I am
selecting the existing SSL certificate. Note: I am using the respective Host name.
Repeat the same step for Management API and once completed, I have
something like this.

|
| Application Gateway: Listeners |
Now we are all set to create Routing rules for Developer Portal and
Management API. Navigate to Rules and add a new Request rotuing rule.

|
| Application Gateway: Rules |
Let's start with the Developer Portal again.

|
| Application Gatway: Add Routing Rule -> Listener |
I have selected the correct Listener. Then move to
Backend targets tab.

|
| Application Gatway: Add Routing Rule -> Backend targets |
Selected the correct Backend target and the HTTP setting from respective
dropdowns and clicking on Add.
Repeat the same step for Management API and once completed, I have
something like this.

|
| Application Gatway: Rules |
We are almost there. One last thing to configure, that is to add Health Probes for
Developer Portal and Management API. Navigate back to Health probes and click on Add.
Let's start with the Developer Portal.

|
| Application Gateway: Health Probes -> Add |
Repeat the same steps for Management API. Its path is "/ServiceStatus".

|
| Application Gateway: Health Probes |
Now technically we should be all good. Let's go back to
Backend health.
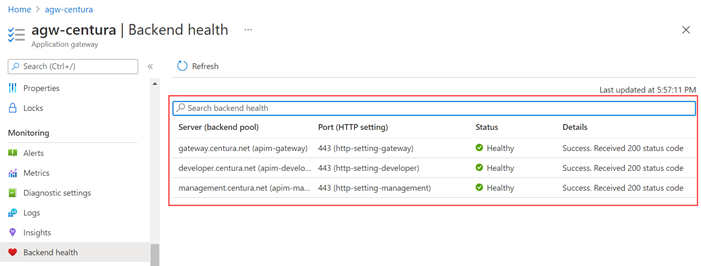 |
| Application Gateway: Backend Health |
That's it. Everything is Healthy.
Now comes the difficult part, that's testing to make sure everything is
working as expected. Note down the Application Gateway Frontend Public IP.

|
| Application Gateway: Public IP |
Now for testing locally, add the following entries to hosts file
(c:\Windows\System32\Drivers\etc\hosts).
104.46.6.83 gateway.centura.net104.46.6.83 developer.centura.net104.46.6.83 management.centura.net
Once that's done, let's do the same API call we did at the start of the post, instead, this time let's use the Gateway URL.

|
| Calling API via Application Gateway -> APIM |
It's working. Let's check the Developer Portal.

|
| Developer Portal |
Now if we want, we can introduce an Access Restriction on our APIs to only allow traffic from the APIM subnet in our virtual network, and deny everything else.

|
| Add Access Restriction on App Services |
If you want to do all this via PowerShell, you can find all the information
here,
Integrate API Management in an internal virtual network with Application
Gateway
Happy Coding.
Regards,
Jaliya


