Friday, July 7, 2023

Received Microsoft MVP Award in Developer Technologies

I am humbled and honored once again to receive the precious Microsoft Most Valuable Professional (MVP) Award for the 10th consecutive year.

This year, the announcement of new MVPs took a bit longer (usually it's on 07/01), but finally got the email.

As always looking forward to another great year on top of Microsoft Development Stack.
Microsoft Most Valuable Professional (MVP)
Thank you Microsoft for your appreciation and Thank you everyone for your continuous support.

Happy Coding.

Regards,
Jaliya

Saturday, July 1, 2023

Connecting to Azure Cache for Redis Instance from RedisInsight

In this post, let's see how we can connect to Azure Cache for Redis Instance from RedisInsight. RedisInsight is a free tool that provides an intuitive and efficient UI for Redis and Redis Stack and supports CLI interaction in a fully-featured desktop UI client.

RedisInsight
In Azure, I have created an Azure Cache for Redis Instance (with a Public Endpoint for simplicity) and copied the connecting string which is as follows.

<my-instance-name>.redis.cache.windows.net:6380,password=<some-password>,ssl=True,abortConnect=False

Now let's start.

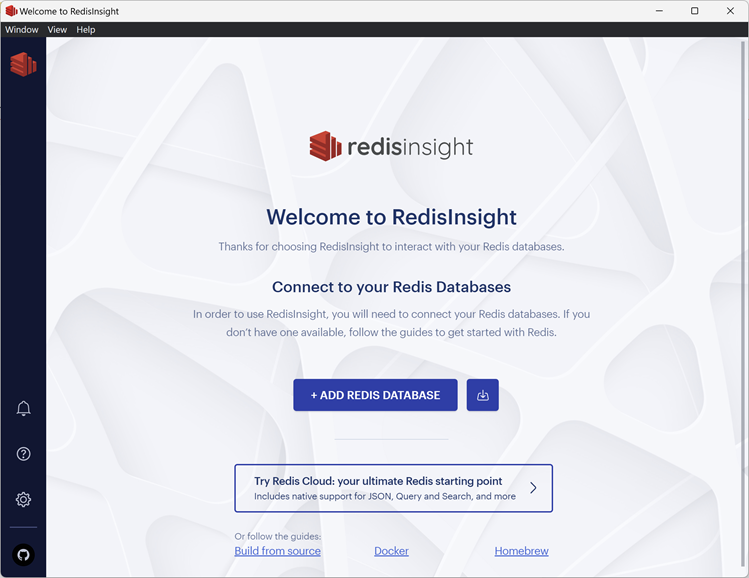
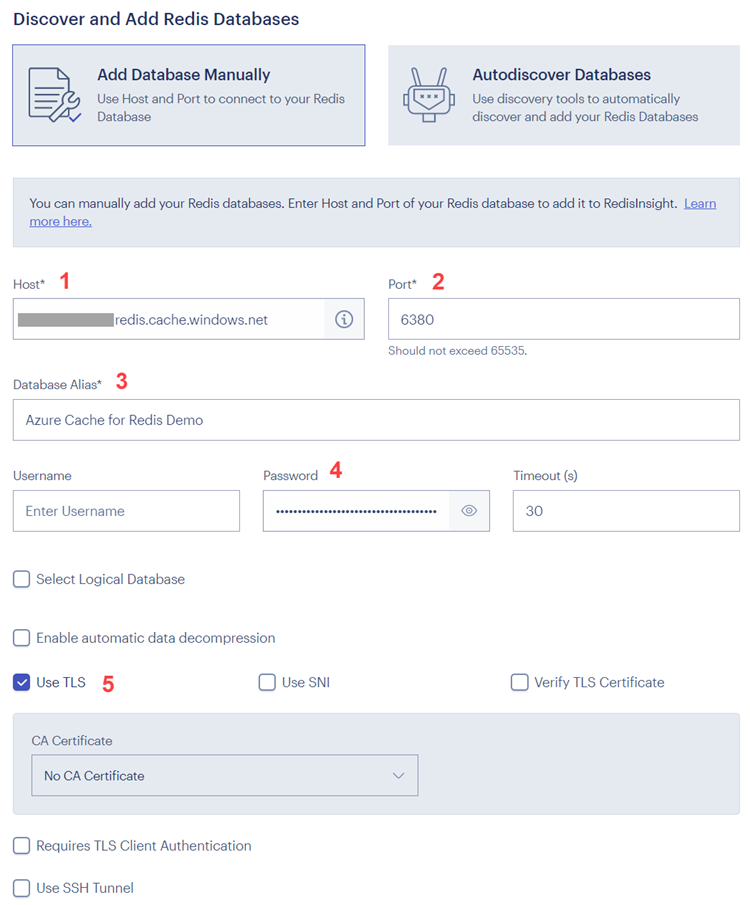
The first step is, of course, from RedisInsight click on ADD REDIS DATABASE. And then fill in the wizard as follows.

Configure Database Connection

You need to fill up the following,

  • Host
  • Port
  • Database Alias (this can be anything)
  • Password
  • Use TLS
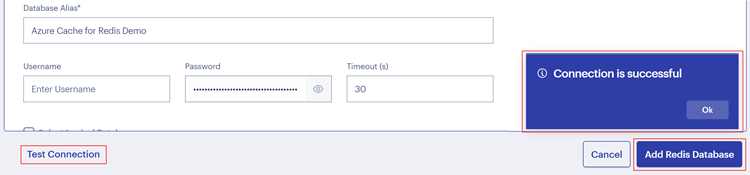
And then do a Test Connection. It should come up as follows.
Test Connection
After verifying the connection, click on Add Redis Database.
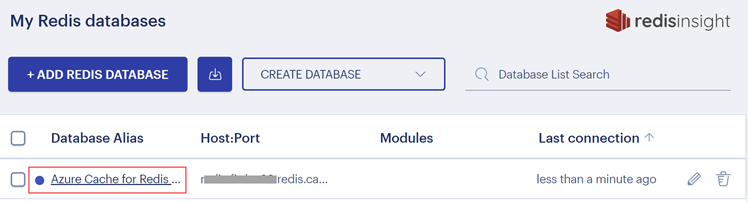
My Redis databases
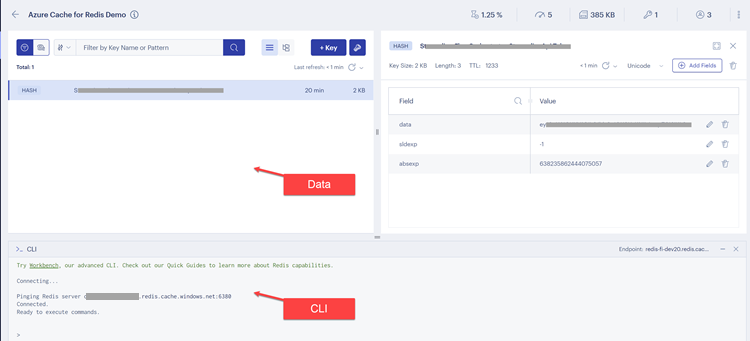
Once it's added, click on the database. Now you can easily visualize the data in your Redis Database as well as you have a CLI at your disposal.
Data Visualizer & CLI
Hope this helps.

Download RedisInsight today.

Regards,
Jaliya

Wednesday, June 21, 2023

Unit Testing JSON with FluentAssertions.Json Vs. FluentAssertions

In this post, let's see why it's important to use FluentAssertions.Json instead of FluentAssertions when unit testing JSON. FluentAssertions has been one of my favorite go-to libraries when writing unit tests. FluentAssertions.Json is a Fluent Assertions extension for Newtonsoft.Json (yes, there are still use cases to use Newtonsoft.Json and not System.Text.Json).

Let's consider the following test (please note it's not a real "Unit Test"). I have installed the FluentAssertions.Json package (which is dependent on FluentAssertions)

using FluentAssertions;
using Newtonsoft.Json.Linq;

public class ExampleTests
{
    [Fact]
    public void CompareJson_WhenItIsSame_ShouldReturnTrue()
    {
        JToken actualJson = JToken.Parse("""
        {
            "parameters": {
                "hoursWorked": 0,
                "hourlyRate": 100
            }
        }
        """
);

        JToken expectedJson = JToken.Parse("""
        {
            "parameters": {
                "hoursWorked": 40,
                "hourlyRate": 100
            }
        }
        """
);

        actualJson.Should().BeEquivalentTo(expectedJson);
    }
}

Note here I am using FluentAssertions. And if I run the test, surprisingly it's going to PASS. But we can clearly see, the actual and expected JSON is not the same.

using FluentAssertions

Now let's change our using to using FluentAssertions.Json. And now if I run the test, it's giving me  FAIL which is the expected result.

using FluentAssertions.Json
And now if I fix the code to pass the test, I can see the test is getting passed.
using FluentAssertions.Json

So if you are using FluentAssertions.Json to unit test JSON, always make sure you are using the correct namespace. You could easily be using FluentAssertions (which isn't easily noticeable) and scratching your head for a while trying to figure out why tests aren't giving your expected results.

Hope this helps.

Happy Coding.

Regards,
Jaliya

Friday, June 16, 2023

Visual Studio 2022 17.7.0 Preview 2.0: Improved File Comparisons

Visual Studio 2022 17.7.0 Preview 2.0 is released and in this post, let's have a look at one of the handy features that got improved. This feature was initially introduced with Visual Studio 2022 17.7.0 Preview 1.0, but with the latest release, the user experience is more improved.

With this feature, you can compare files within Visual Studio and you no longer have to leave the current context and use an external tool (I was using Visual Studio Code) to compare files.

You can use this feature in multiple ways. The easiest is from the Solution Explorer, multi-select two files by holding down the Ctrl button, then right-click and compare them using the "Compare Selected" option.
Compare Selected
The other options are,
  • Right-click on a single file, and select "Select for Compare". Then navigate to the second file in the Solution Explorer, right-click on that, and click on "Compare with <SelectedFile>".
  • Right-click on a single file, and then click "Compare With…". This will open up the File Explorer. Now you can navigate to any file on disk and select it for comparison.
It's a small feature, but very handy.

Happy Coding.

Regards,
Jaliya

Tuesday, June 13, 2023

Entity Framework Core 7.0 (EF 7.0): In-Built Support for Transact-SQL AT TIME ZONE

In this post, let's have a look at the new AtTimeZone functions that got introduced in Entity Framework Core 7.0 (or Entity Framework 7.0) for DateTime and DateTimeOffset.

Prior to EF 7, in order to use Transact-SQL AT TIME ZONE, we had to do something like I have described in this post: Custom EF Core Function to Use Transact-SQL AT TIME ZONE. But we don't have to do that anymore.

Let's have a look.

Consider the following orders.
List<Order> orders = new()
{
    new()
    {
        OrderDate = new DateTimeOffset(new DateTime(2023, 6, 1, 8, 30, 0), TimeSpan.Zero)
    },
    new()
    {
        OrderDate = new DateTimeOffset(new DateTime(2023, 6, 1, 9, 0, 0), TimeSpan.Zero)
    }
};
Once these are in the database, I can use AtTimeZone functions as follows.
var query = await context.Orders
    .Select(x => new
    {
        UtcTime = EF.Functions.AtTimeZone(x.OrderDate, "UTC"),
        EasternTime = EF.Functions.AtTimeZone(x.OrderDate, "Eastern Standard Time"),
        NztTime = EF.Functions.AtTimeZone(x.OrderDate, "New Zealand Standard Time")
    })
    .ToListAsync();

foreach (var order in query) {     Console.WriteLine(order); }
This is generating the following SQL.
SELECT  [o].[OrderDate] AT TIME ZONE 'UTC' AS [UtcTime], 
        [o].[OrderDate] AT TIME ZONE 'Eastern Standard Time' AS [EasternTime], 
        [o].[OrderDate] AT TIME ZONE 'New Zealand Standard Time' AS [NztTime]
FROM    [Orders] AS [o]
And the output is as follows.
{ UtcTime = 1/06/2023 8:30:00 am +00:00, EasternTime = 1/06/2023 4:30:00 am -04:00, NztTime = 1/06/2023 8:30:00 pm +12:00 }
{ UtcTime = 1/06/2023 9:00:00 am +00:00, EasternTime = 1/06/2023 5:00:00 am -04:00, NztTime = 1/06/2023 9:00:00 pm +12:00 }
Isn't it handy?

Hope this helps.

Happy Coding.

Regards,
Jaliya

Monday, June 12, 2023

.NET Upgrade Assistant CLI

In this post, let's have a look at the .NET Upgrade Assistant CLI, a CLI tool to upgrade .NET projects to use the latest .NET and benefit from all its nice features.

As you know Visual Studio has this extension .NET Upgrade Assistant for quite some time and the new CLI tool uses the same engine as the Visual Studio Extension.

First, you can install the CLI tool globally by running the following command.
dotnet tool install -g upgrade-assistant
You can upgrade the CLI tool to the latest version by running the following command.
dotnet tool update -g upgrade-assistant
Once the tool is installed, next you need to run the following command.
upgrade-assistant upgrade
upgrade-assistant --help
Why wait, bring your apps to the latest .NET.

Happy Coding.

Regards,
Jaliya

Monday, May 22, 2023

Enabling CORS in Locally Running In-Process Azure Function

In this post, let's see how we can enable CORS in locally running In-Process Azure Function. 

I had a simple In-Process HTTP Trigger Azure Function that exposes SignalRConnectionInfo. When running locally, a web app that is again running locally is failing to call the endpoint. The fetch request to the HTTP endpoint (http://localhost:7071/api/negotiate?negotiateVersion=1) is getting the status CORS error.
CORS Error
But when I sent a cURL request to the endpoint, it's working fine. When deployed to Azure, again everything is working as expected (after updating CORS policies of course).

So something fishy was going on.

In Azure Functions Core Tools, when you are starting a function app, luckily you can configure CORS options.
func --help
So what I did was, modify launchSettings.json by adding commandLineArgs as follows (I was using Visual Studio). 
{
  "profiles": {
    "FunctionApp": {
      "commandName": "Project",
      "commandLineArgs": "--cors https://tenant1-dev20.localhost:4200 --cors-credentials true",
      "environmentVariables": {
        "ASPNETCORE_ENVIRONMENT": "Development"
      }
    }
  }
}
The key things here to get it to work are, 
  • --cors: Don't specify star (*). Instead, provide comma-separated CORS origins with no spaces
  • --cors-credentials: Set this to true
And that did it.
CORS Working
More information:

Hope this helps.

Happy Coding.

Regards,
Jaliya

Thursday, May 18, 2023

Azure AD B2C Custom Policies: Include User EmployeeId in Claims on an UserJourney

In this post, let's see how we can include EmployeeId in Azure AD B2C User Profile in Claims for an Azure AD B2C Sign-In (it could be any actually) UserJourney.
AAD B2C User Profile - Employee ID
Unfortunately, AAD-UserReadUsingObjectId technical profile only retrieves the basic User Profile information and EmployeeId is not part of it (Read User profile attributes).

So in order to retrieve these additional properties what we need to do is update our UserJourney by adding another OrchestrationStep to retrieve users' EmployeeId by calling Microsoft Graph API. But an important thing to note here is, users cannot obtain tokens for Microsoft Graph API using delegated permissions (Read Working with MSAL.js and Azure AD B2C). 

In that case, we can create a simple Minimal API or a HttpTriggered Azure Function that accepts users' ObjecteId and from there, call Microsoft Graph API using Client-Credentials and retrieve the users' EmployeeId. You can have a look at this Minimal API for an example on how to call Graph API using Client-Credentials 

For simplicity, let's say we have the following endpoint.
WebApplicationBuilder builder = WebApplication.CreateBuilder(args);

WebApplication app = builder.Build();
app.UseHttpsRedirection();

app.MapPost("/claims", (GetClaimsRequest getClaimsRequest) =>
{
    // TODO: Get claims for the user by calling Graph API using ClientCredentials

    return new
    {
        employeeId = "EMP101"
    };
});

app.Run();

public class GetClaimsRequest
{
    public string ObjectId { get; set; }
}
Now the first thing to do is modify our B2C_1A_TrustFrameworkExtensions and define a ClaimType for employeeId.
<ClaimsSchema>
  ...
  <ClaimType Id="employeeId">
    <DisplayName>Employee Id</DisplayName>
    <DataType>string</DataType>
  </ClaimType>
</ClaimsSchema>

And then register a Restful ClaimsProvider to call our REST endpoint and pass the objectId.

<ClaimsProviders>
  ...
  <ClaimsProvider>
    <DisplayName>Get Additional Claims via REST</DisplayName>
    <TechnicalProfiles>
      <TechnicalProfile Id="REST-GetAdditionalClaims">
        <DisplayName>Get Additional Claims via REST call and transform claims</DisplayName>
        <Protocol Name="Proprietary" Handler="Web.TPEngine.Providers.RestfulProvider, Web.TPEngine, Version=1.0.0.0, Culture=neutral, PublicKeyToken=null" />
        <Metadata>
          <Item Key="ServiceUrl">https://743q57pk-7047.aue.devtunnels.ms/claims</Item>
          <Item Key="SendClaimsIn">Body</Item>
          <Item Key="AuthenticationType">None</Item>
          <Item Key="AllowInsecureAuthInProduction">true</Item>
        </Metadata>
        <InputClaims>
          <InputClaim ClaimTypeReferenceId="objectId" PartnerClaimType="objectId" />
        </InputClaims>
        <OutputClaims>
          <OutputClaim ClaimTypeReferenceId="employeeId" PartnerClaimType="employeeId"/>
        </OutputClaims>
        <UseTechnicalProfileForSessionManagement ReferenceId="SM-Noop" />
      </TechnicalProfile>
    </TechnicalProfiles>
  </ClaimsProvider>
</ClaimsProviders>

Here, I am mapping the employeeId that is being returned from the API to ClaimTypeReferenceId="employeeId" that we created before.

The last step is to modify our UserJourney and add an OrchestrationStep to call the REST endpoint before sending the claims.
<OrchestrationSteps>
  ...
  <OrchestrationStep Order="4" Type="ClaimsExchange">
    <ClaimsExchanges>
      <ClaimsExchange Id="AADUserReadWithObjectId" TechnicalProfileReferenceId="AAD-UserReadUsingObjectId" />
    </ClaimsExchanges>
  </OrchestrationStep>
  <OrchestrationStep Order="5" Type="ClaimsExchange">
    <ClaimsExchanges>
      <ClaimsExchange Id="RESTGetAdditionalClaims" TechnicalProfileReferenceId="REST-GetAdditionalClaims" />
    </ClaimsExchanges>
  </OrchestrationStep>
  ...
</OrchestrationSteps>
And that's about it. In my example, I am using SAML authentication, and I can see employeeId is now included in the SAML response.
EmployeeId Included In Claims
And that's about it.

Hope this helps.

Happy Coding.

Regards,
Jaliya

Wednesday, May 10, 2023

Visual Studio 2022: Apply File Scoped Namespaces using Code Cleanup Profile

In this post, let's see how we can apply File scoped namespaces to all the existing C# files using a Code Cleanup Profile.

Imagine you have an old .NET project that uses Block scoped namespaces and you are upgrading the project to the latest .NET and you need to use features like File scoped namespaces that got introduced as part of C# 10.0. If you have many files, you definitely don't need to be updating files one by one.

We can apply this change to all the files at once using a Visual Studio Code Cleanup profile.

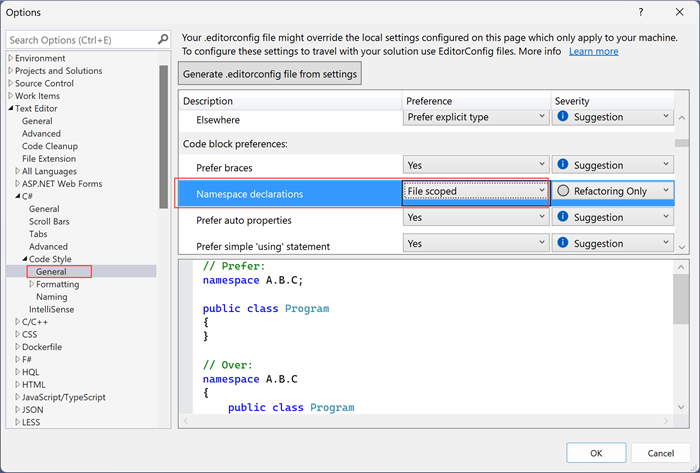
First, we need to set Namespace declarations code style preference to File scoped (if you haven't already) by going into Tools -> Options -> Text Editor -> C# -> Code Style -> General.
Update Code Style
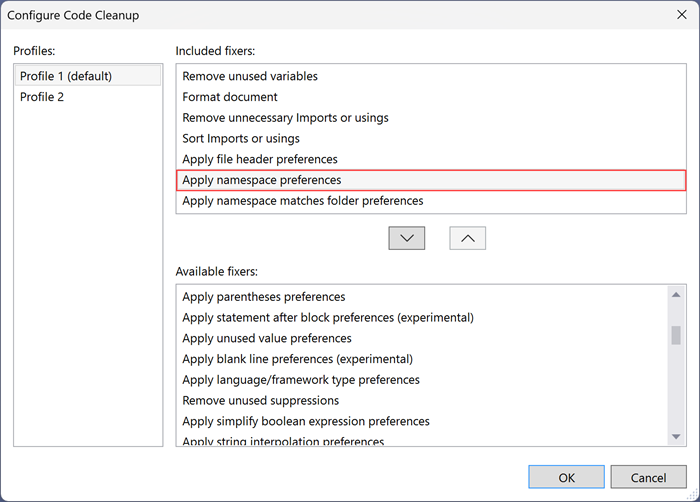
Then go to Analyse -> Code Cleanup -> Configure Code Cleanup and configure your profile, adding the following preference.
Configure Code Cleanup
You can create a new profile just for this or update an existing profile. And then just run your Code Cleanup profile. That should update all your files with File scoped namespaces.

Hope this helps.

Happy Coding.

Regards,
Jaliya

Saturday, May 6, 2023

SSH into Linux Container in Azure App Service from Local Machine

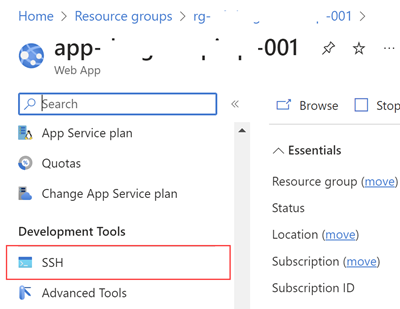
In this post, let's see how we can SSH into Linux Container in Azure App Service from our local machine. Azure Portal has an option to SSH within the browser itself, but I personally hate that experience.

SSH from Azure Portal
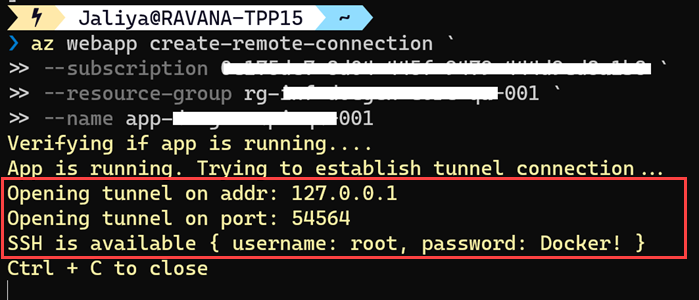
We can use az webapp create-remote-connection to create a remote connection using a TCP tunnel from our local machine to the Azure App Service.

az webapp create-remote-connection `
    --subscription <subscription-id> `
    --resource-group <resource-group-name> `
    --name <app-name>

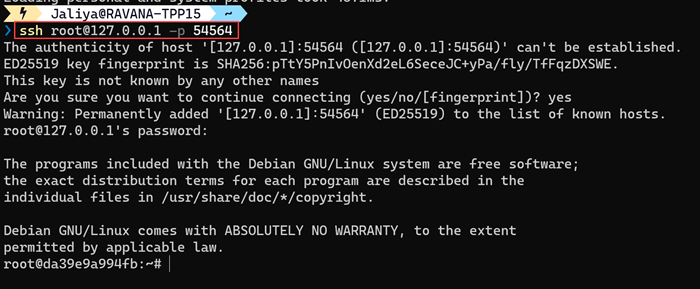
Now while is this running and the connection is open, we can open up another terminal window and SSH through the tunnel using the following command.
ssh <username>@<addr> -p <port>

SSH from Local Machine
And I am connected.

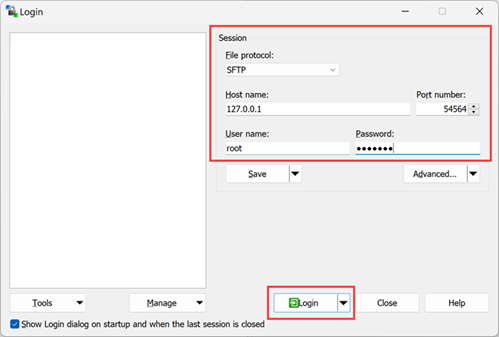
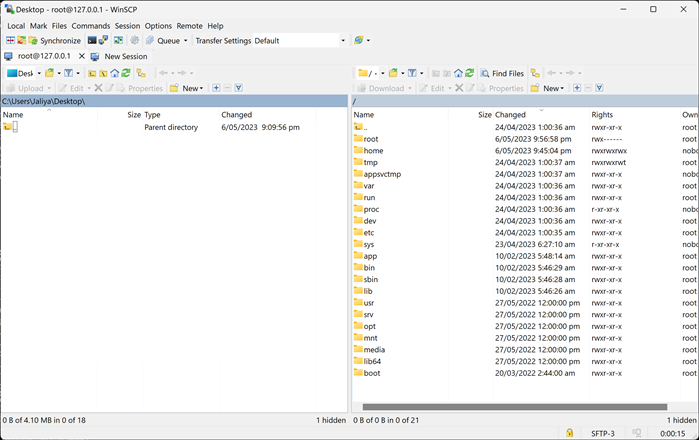
Now I can even use tools like WinSCP to file transfer between the Linux Container and my local machine.
WinSCP Connection
WinSCP Connected
Hope this helps.

Happy Coding.

Regards,
Jaliya