Friday, May 1, 2020

Visual C# Technical Guru - March 2020

Another month as a judge in Microsoft TechNet Guru Awards under Visual C# category. The TechNet Guru Awards celebrate the technical articles on Microsoft TechNet.

Post in Official Blog,
https://techcommunity.microsoft.com/t5/wiki-ninjas-blog/technet-wiki-guru-winners-march-2020/ba-p/1349990
Visual C# Technical Guru - March 2020
Happy Coding.

Regards,
Jaliya

Sunday, April 5, 2020

Basic Azure DevOps Pipeline to deploy an ASP.NET Core Containerized Application and Applying EF Core Database Migrations

In this post, I am going to share a sample azure-pipelines.yml to deploy an ASP.NET Core Containerized Application and Applying Entity Framework Core Database Migrations.

Here the pipeline is based on the following requirement which I believe is common.
  1. When doing the release, we need to apply database migrations in the target database. The migration script will be created on the fly during the execution of the pipeline and will be executed on the target database.
  2. We might need to execute some additional SQL scripts in the target database after the database is migrated, maybe to CREATE/ALTER stored procedures, etc. The pipeline assumes those scripts are residing in scripts/postdeploy folder in the root of the project.
I have left comments in the below azure-pipelines.yml itself, so I don't think any other explanation is necessary. You should be able to changes this as per your needs.

azure-pipelines.yml
trigger:
- master

resources:
- repo: self

variables:
  # Container registry service connection established during pipeline creation  
  dockerRegistryServiceConnection: '<dockerRegistryServiceConnection>'

  # Something like xxxxxx.azurecr.io
  containerRegistry: '<containerRegistry>'

  # Docker image name
  imageRepository: '<imageRepository>'

  # The relative localtion of the Dockerfile
  dockerfilePath: '$(Build.SourcesDirectory)/Dockerfile'

  # This docker image will be tagged using this
  tag: '$(Build.BuildId)'

  # Agent to be used
  vmImageName: 'ubuntu-latest'

# We have 2 stages, 
#   1. Build
#   2. Release
stages:

# This stage will and build the docker image and push it to ACR
- stage: Build
  displayName: Build and push stage
  jobs:
    - job: Build
      displayName: Build
      pool:
        vmImage: $(vmImageName)
      steps:

      - task: Docker@2
        displayName: Build and push an image to container registry
        inputs:
          command: buildAndPush
          repository: $(imageRepository)
          dockerfile: $(dockerfilePath)
          containerRegistry: $(dockerRegistryServiceConnection)
          tags: |
            $(tag)

# This stage will,
#   1. Create a database migration script named update-database.sql inside scripts folder
#   2. Execute the migration script first
#   3. Then execute all the other SQL scripts inside scripts/postdeploy folder
#   4. Finally spin up the container at the target web app
- stage: Release  
  displayName: Release stage
  jobs:
    - job: Release
      displayName: Release
      pool:
        vmImage: $(vmImageName)
      steps:

      # This task is required to run dotnet-ef which is getting installed in the next task
      - task: UseDotNet@2
        inputs:
          version: '3.1.200'

      # Install dotnet-ef
      - task: DotNetCoreCLI@2
        displayName: Install dotnet-ef
        inputs:
          command: 'custom'
          custom: 'tool'
          arguments: 'install --global dotnet-ef --ignore-failed-sources'

      # Generate update-database.sql using dotnet-ef
      - task: PowerShell@2
        displayName: Generate Database Migration Script
        inputs:
          targetType: 'inline'
          script: |
            # Splitted into multiple lines for brevity. Below command needs to be a single line
            dotnet ef migrations script 
              -i 
              -o "$(Build.SourcesDirectory)/scripts/update-database.sql" 
              --project "$(Build.SourcesDirectory)/<ProjectThatContainsTheDbContext.csproj>" 
              --startup-project "$(Build.SourcesDirectory)/<TheStartupProject.csproj>"

    # Install SqlServer module to be able to run Invoke-SqlCmd in the next task
      - task: PowerShell@2
        displayName: PowerShell Install-Module SqlServer
        inputs:
          targetType: 'inline'
          script: 'Install-Module -Name SqlServer -AllowPrerelease -Force -Verbose -Scope CurrentUser'

    # Execute the update-database.sql in the target database
      - task: PowerShell@2
        displayName: PowerShell Invoke-Sqlcmd Database Migration Script
        inputs:
          targetType: 'inline'
          script: |
            # Splitted into multiple lines for brevity. Below command needs to be a single line
            Invoke-Sqlcmd 
              -ServerInstance "<ServerInstance>" 
              -Database "<Database>" 
              -Username "<Username>" 
              -Password "<Password>" 
              -Inputfile "$(Build.SourcesDirectory)/scripts/update-database.sql" 
              -Verbose 
              -ConnectionTimeout 120

      # Execute other SQL scripts in the target database
      - task: PowerShell@2
        displayName: PowerShell Invoke-Sqlcmd Other SQL Scripts
        inputs:
          targetType: 'inline'
          script: |
            $files = Get-ChildItem $(Build.SourcesDirectory)/scripts/postdeploy
            foreach ($f in $files) 
            {
              # Splitted into multiple lines for brevity. Below command needs to be a single line
              Invoke-Sqlcmd 
                -ServerInstance "<ServerInstance>" 
                -Database "<Database>" 
                -Username "<Username>" 
                -Password "<Password>" 
                -Inputfile "$f" 
                -Verbose 
                -ConnectionTimeout 120
            }

      # All good, let's spin up a new container at the target web app
      - task: AzureWebAppContainer@1
        displayName: Spin up the container
        inputs:
          azureSubscription: '<azureSubscription>'
          appName: '<appName>'
          containers: $(containerRegistry)/$(imageRepository):$(tag)

          # Something like dotnet TheStartupProject.dll
          containerCommand: '<containerCommand>'
Hope this helps.

Happy Coding.

Regards,
Jaliya

Saturday, April 4, 2020

Invoke Invoke-SqlCmd inside a Linux Agent in Azure DevOps Pipelines

I was trying to execute Invoke-Sqlcmd command inside a Linux Agent in Azure DevOps Pipelines and getting this error.

"The term 'Invoke-Sqlcmd' is not recognized as the name of a cmdlet, function, script file, or operable program. Check the spelling of the name, or if a path was included, verify that the path is correct and try again."
The term 'Invoke-Sqlcmd' is not recognized...
Then according to this post: Invoke-Sqlcmd is Now Available Supporting Cross-Platform, installed SqlServer module from another PowerShell@2 task.
- task: PowerShell@2
  inputs:
    targetType: 'inline'
    script: 'Install-Module -Name SqlServer -AllowPrerelease'
That task passed, but still, the PS Invoke-SqlCmd task was throwing the same error. But noticed this warning inside PS Install-Module task.

"WARNING: User declined to install module (SqlServer)."
WARNING: User declined to install module (SqlServer)
Then I modified the PS Install-Module task to pass in an additional parameter -Scope CurrentUser.
- task: PowerShell@2
  inputs:
    targetType: 'inline'
    script: 'Install-Module -Name SqlServer -AllowPrerelease -Force -Verbose -Scope CurrentUser'
This time it got installed successfully.
Install-Module -Name SqlServer
And finally I was able to run Invoke-SqlCmd inside a Linux Agent in Azure DevOps Pipeline.
Invoke-SqlCmd is running
Hope this helps!

Happy Coding.

Regards,
Jaliya

Friday, April 3, 2020

dotnet ef is Failing in Azure DevOps Pipeline When the Agent is ubuntu-latest

I was trying to run dotnet ef command within Azure DevOps Pipeline and it's failing with the error: Could not execute because the specified command or file was not found. This is even after installing the dotnet ef tool.
trigger:
- master
 
resources:
- repo: self
 
variables:
  vmImageName: 'ubuntu-latest'
 
stages:
 
- stage: Build
  displayName: Build and push stage
  jobs:  
  - job: Build
    displayName: Build
    pool:
      vmImage: $(vmImageName)
    steps:
    - task: DotNetCoreCLI@2
      displayName: Install dotnet-ef
      inputs:
        command: 'custom'
        custom: 'tool'
        arguments: 'install --global dotnet-ef'
    - task: DotNetCoreCLI@2
      displayName: Check dotnet-ef version
      inputs:
        command: 'custom'
        custom: 'ef'
        arguments: '--version'
So here I have 2 tasks, in the first task is I am installing dotnet-ef and in the second task, I am just checking the version.

This is failing with the error: Could not execute because the specified command or file was not found.

The reason turned out to be, we need to use the UseDotnet@2 task first, to install the dotnet sdk and then install the dotnet ef. This will make dotnet-ef installed into same path as of dotnet sdk and will make it able to execute.
Use .NET Core
trigger:
- master
 
resources:
- repo: self
 
variables:
  vmImageName: 'ubuntu-latest'
 
stages:
 
- stage: Build
  displayName: Build
  jobs:  
  - job: Build
    displayName: Build
    pool:
      vmImage: $(vmImageName)
    steps:
    - task: UseDotNet@2
      inputs:
        version: '3.1.200'
    - task: DotNetCoreCLI@2
      displayName: Install dotnet-ef
      inputs:
        command: 'custom'
        custom: 'tool'
        arguments: 'install --global dotnet-ef'
    - task: DotNetCoreCLI@2
      displayName: Check dotnet-ef version
      inputs:
        command: 'custom'
        custom: 'ef'
        arguments: '--version'
So this works. Hope this helps!

Happy Coding.

Regards,
Jaliya

Wednesday, April 1, 2020

IdentityServer4: Adding Additional Claims to the Token

In this post let's see how we can additional claims to the token. This can be either creating tokens or when handling requests to the userinfo or introspection endpoints. In addition, let's have a look at how we can add in additional claims to a client ASP.NET Core application.

IS4, provides an interface IProfileService which we can implement to add in additional claims. It's basically going to be something like this.
public class ProfileService : IProfileService
{
    public ProfileService()
    {
    }
 
    public async Task GetProfileDataAsync(ProfileDataRequestContext context)
    {
        // Get all the claims you need to add into the token by context.Subject
        // Set it to context.IssuedClaims
        // This is expected to be populated
    }
 
    public async Task IsActiveAsync(IsActiveContext context)
    {
        // Check context.Subject is allowed to retrieve additional claims
        // Based on that set context.IsActive
        // This is expected to be set
    }
}
So here one of the important things is, context contains a property named Caller, as the name suggests that determines what triggered this call. Unfortunately, it's a type of string, but there is a set of constants in ID4, that you can use.
public static class ProfileDataCallers
{
    public const string UserInfoEndpoint = "UserInfoEndpoint";
    public const string ClaimsProviderIdentityToken = "ClaimsProviderIdentityToken";
    public const string ClaimsProviderAccessToken = "ClaimsProviderAccessToken";
}
So by checking the context.Caller, you can decide which claims you want to include based on the Caller.

Plugging in ProfileService to IdentityServer is quite simple, we can just do as follows when we are adding IdentityServer.
AddProfileService
It's pretty neat!

Sometimes, you might face a scenario, you want to add in additional claims, not when the token issued from ID4, but from the client ASP.NET Core application. Basically, this is how we protect an ASP.NET Core Web API application with an ID4.
services.AddAuthentication(JwtBearerDefaults.AuthenticationScheme)
    .AddJwtBearer(options =>
    {
        // set Authority and additional options
    });
Instead of using AddJwtBearer, we can use AddIdentityServerAuthentication authentication handler which is available in IdentityServer4.AccessTokenValidation NuGet package.
services.AddAuthentication(JwtBearerDefaults.AuthenticationScheme)
    .AddIdentityServerAuthentication(options =>
    {
        // set Authority and additional options

        options.JwtBearerEvents.OnTokenValidated = OnTokenValidated;
    });
There we can handle the OnTokenValidated event. This will be invoked after the security token has passed validation and a ClaimsIdentity has been generated. So here also we can additional claims. But there is a downside with this approach, each time the API is being called with the token, this will get invoked.
private async Task OnTokenValidated(TokenValidatedContext context)
{
    // var identity = context.Principal.Identity as ClaimsIdentity;
    // identity.AddClaim(new Claim("X","Y");
}
So hope this bit of information helps.

Happy Coding.

Regards,
Jaliya

Visual C# Technical Guru - February 2020

Another month as a judge in Microsoft TechNet Guru Awards under Visual C# category. The TechNet Guru Awards celebrate the technical articles on Microsoft TechNet. 

Visual C# Technical Guru - February 2020
Happy Coding. 

Regards,
Jaliya

Sunday, March 22, 2020

Maintain Entity Framework Core DbContext in a Separate Project

Usually, when I have an application that has an API and a Database managed with EF, I really don't like to have the Application DbContext and all the Migrations inside the API project. It's actually very easy to split it out, this is a quick post on how we can maintain Entity Framework Core DbContext in a separate project. 

I have created a Solution WebApplication1 which has 2 projects, one is ASP.NET Core Web API and the other one just a .NET Core Class Library where I am maintaining Database specific things.

Solution
For WebApplication1.Data project, I have installed Microsoft.EntityFrameworkCore.SqlServer package and my WebApplication1.Data.csproj looks like this.
<Project Sdk="Microsoft.NET.Sdk">
 
  <PropertyGroup>
    <TargetFramework>netcoreapp3.1</TargetFramework>
  </PropertyGroup>
 
  <ItemGroup>
    <PackageReference Include="Microsoft.EntityFrameworkCore.SqlServer" Version="3.1.2" />
  </ItemGroup>
 
</Project>
And I have a very simple ApplicationDbContext.
using Microsoft.EntityFrameworkCore;
 
namespace WebApplication1.Data
{
    public class Employee
    {
        public int Id { get; set; }
        public string FirstName { get; set; }
        public string LastName { get; set; }
    }
 
    public class ApplicationDbContext : DbContext
    {
        public ApplicationDbContext(DbContextOptions options) : base(options)
        {
        }
 
        public DbSet<Employee> Employees { get; set; }
    }
}
Then inside my WebApplication1.Api project, I have referenced WebApplication1.Data project and installed Microsoft.EntityFrameworkCore.Tools package there. This is very much required. This is my WebApplication1.Api.csproj looks like.
<Project Sdk="Microsoft.NET.Sdk.Web">
 
  <PropertyGroup>
    <TargetFramework>netcoreapp3.1</TargetFramework>
  </PropertyGroup>
 
  <ItemGroup>
    <PackageReference Include="Microsoft.EntityFrameworkCore.Tools" Version="3.1.2" />
  </ItemGroup>
 
  <ItemGroup>
    <ProjectReference Include="..\WebApplication1.Data\WebApplication1.Data.csproj" />
  </ItemGroup>
 
</Project>
I have the Connection String inside appsettings.json and setup the ApplicationDbContext inside Startup.ConfigureServices method.
public void ConfigureServices(IServiceCollection services)
{
    services.AddControllers();
 
    services.AddDbContext<ApplicationDbContext>(options =>
    {
        options.UseSqlServer(Configuration.GetConnectionString("ApplicationDbContext"));
    });
}
So basically that's it. Using the Package Manager Console in Visual Studio, I can run Add-Migration command targetting WebApplication.Data project.
Package Manager Console
Or alternatively using dotnet ef global tool (you need to install the tool first). The parameters are self-explanatory.
 dotnet ef migrations add Initial --project .\WebApplication1.Data\WebApplication1.Data.csproj --startup-project .\WebApplication1.Api\WebApplication1.Api.csproj                                                
And it will add all the Migrations inside WebApplication.Data project which is what I wanted.
Migrations
To apply the migrations,  again using the Package Manager Console in Visual Studio, I can run Update-Database command targetting WebApplication.Data. Or using the CLI,
dotnet ef database update --project .\WebApplication1.Data\WebApplication1.Data.csproj --startup-project .\WebApplication1.Api\WebApplication1.Api.csproj
That was easy.

Happy Coding.

Regards,
Jaliya

Wednesday, March 18, 2020

dotnet ef Command Doesn't Work inside a Docker Container

I was facing this issue where I needed to run dotnet ef command inside a docker container and it's not recognizing the command.

Basically, my Dockerfile looked something like.
FROM mcr.microsoft.com/dotnet/core/sdk:3.1-buster AS build
RUN dotnet tool install -g dotnet-ef --version 3.1.1 
RUN export PATH="$PATH:/root/.dotnet/tools"
RUN dotnet ef
I was installing dotnet-ef command, and I was setting the path. But still, I was getting this error,
Could not execute because the specified command or file was not found.
Possible reasons for this include:
  * You misspelled a built-in dotnet command.
  * You intended to execute a .NET Core program, but dotnet-ef does not exist.
  * You intended to run a global tool, but a dotnet-prefixed executable with this name could not be found on the PATH.
I have been trying different things for a couple of hours, finally, thanks to Petr Onderka with his brilliant answer managed to solve the issue. The reason is for it's to not work is the environment variables set by export don't survive across directives. What we need to do is to use the ENV directive instead.

And this worked.
FROM mcr.microsoft.com/dotnet/core/sdk:3.1-buster AS build
RUN dotnet tool install -g dotnet-ef --version 3.1.1 
ENV PATH $PATH:/root/.dotnet/tools
RUN dotnet ef --version
Thanks Petr Onderka again.

I hope this saves someone's time.

Happy Coding.

Regards,
Jaliya

Thursday, March 5, 2020

Visual C# Technical Guru - January 2020

Another month as a judge in Microsoft TechNet Guru Awards under Visual C# category. The TechNet Guru Awards celebrate the technical articles on Microsoft TechNet. 

Visual C# Technical Guru - January 2020
Happy Coding. 

Regards,
Jaliya

Saturday, February 29, 2020

ASP.NET Core Application Reading Configuration from Azure App Configuration

In this post let's see how we can setup configuration settings for ASP.NET Core Application to read from Azure App Configuration.

Azure App Configuration is a managed service by Azure that provides a way to centrally manage application settings and feature flags. Nowadays a single application consists of multiple components running in different places, so the idea behind Azure App Configuration is having a single place to manage all your configuration settings.

It's always better to go by demonstration. Let's start by creating an Azure App Configuration service in Azure.
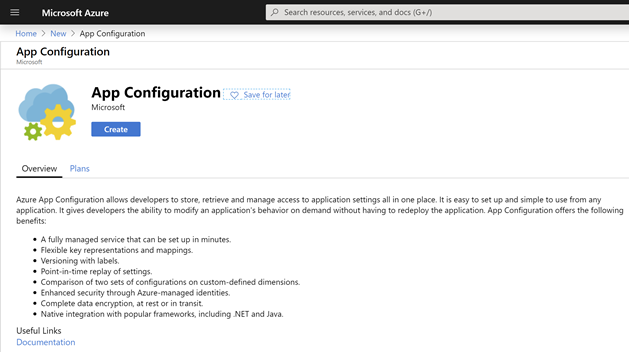
App Configuration
I am clicking on create.
App Configuration Setup
We just need to enter the basic information and I am completing the creation with the above settings.

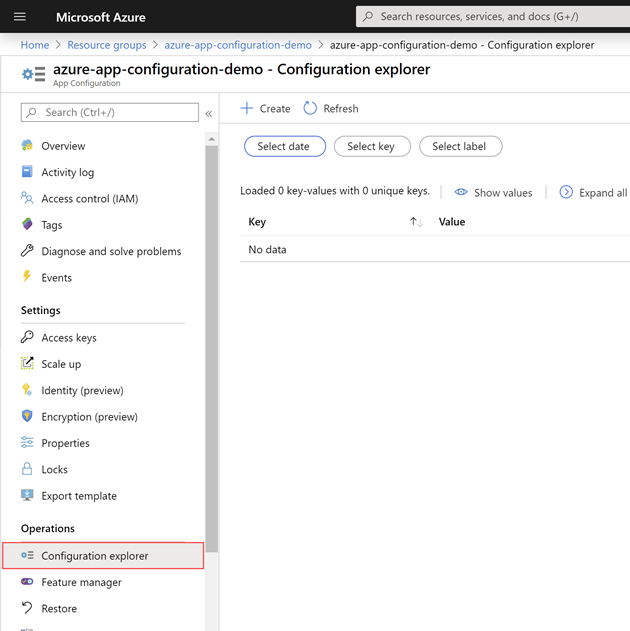
Once that is created, we can create the settings by navigating into Settings -> Configuration Explorer.
Configuration explorer
Configuration settings here are basically a Key-Value pair. Before adding any values, let's create an ASP.NET Core Application and configure it to read settings from here. For the demo purpose, I will just create an API application named AzureAppConfigurationDemo and I am adding the NuGet package Microsoft.Azure.AppConfiguration.AspNetCore which will enable adding Microsoft Azure App Configuration as a configuration source in our application.

Now I am updating the Program.cs to configure the Azure App Configuration we created above to be used in our application.
public class Program
{
    public static void Main(string[] args)
    {
        CreateHostBuilder(args).Build().Run();
    }
 
    public static IHostBuilder CreateHostBuilder(string[] args) =>
        Host.CreateDefaultBuilder(args)
            .ConfigureWebHostDefaults(webBuilder =>
            {
                webBuilder
                    .ConfigureAppConfiguration((hostingContext, config) =>
                    {
                        var settings = config.Build();
                        config.AddAzureAppConfiguration(settings["ConnectionStrings:AppConfig"]);
                    })
                    .UseStartup<Startup>();
            });
}
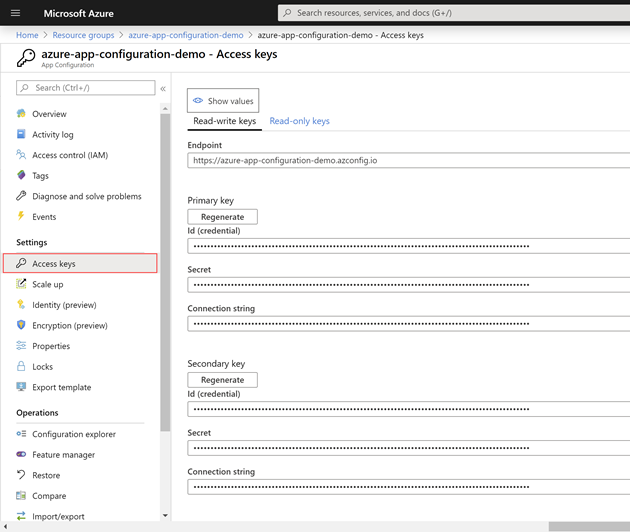
Here, under the ConfigureAppConfiguration, we can add the AzureApp Configuration with a target connection string. You can find the connection string under Settings -> Access Keys inside the Azure App Configuration.
Access Keys
Now I am adding the secret named ConnectionStrings:AppConfig to Secret Manager. We can do this by either running dotnet user-secrets set command or if you are using Visual Studio by right-clicking on the project and Manage User Secrets.
dotnet user-secrets set ConnectionStrings:AppConfig "<ConnectionString>"
The secret Manager is used only to test things locally. When the app is deployed to Azure App Service, for example, we can use the Connection Strings application setting in App Service.

In my application, I have below dummy controller, which will return the value of a key named "AzureAppConfigurationDemo:TestKey" inside the configuration settings
[ApiController]
[Route("[controller]")]
public class SettingsController : ControllerBase
{
    private IConfiguration Configuration { get; }
 
    public SettingsController(IConfiguration configuration)
    {
        Configuration = configuration;
    }
 
    public IActionResult GetValue()
    {
        string value = Configuration["AzureAppConfigurationDemo:TestKey"];
        return Ok(value);
    }
}
Now let's create the key: "AzureAppConfigurationDemo:TestKey" by going back to Settings -> Configuration Explorer in our Azure App Configuration.
Add Key
I am leaving Label and Content Type empty for now and I am clicking on Apply.

Now we are all set. Let's run the application.
Result
And here it is. Hope this helps.

Happy Coding.

Regards,
Jaliya