Tuesday, May 31, 2022

Visual Studio 2022 17.3.0 Preview 1.1: Introducing Port Tunneling for ASP.NET Core Projects

Last week, it's Microsoft Build week, and hope you have enjoyed it.  

There were some nice announcements and one of my favorites out of them all is this nice feature that got released with Visual Studio 2022 17.3.0 Preview 1.1. That's introducing the private preview of port tunneling in Visual Studio for ASP.NET Core projects. 

With this, I can run my Web Application locally and the URL it's running is public and can be accessed from outside of my local environment. With most of us working from home, I am finding this very helpful. I can do things like, 

  • Share the public URL with a colleague to test out the application. 
  • If it's a Frontend Web Application,  access the URL from my mobile, and see how it's behaving.
  • I don't have to deploy the application to test a Webhook with a third party etc
In order to use this feature, there are a couple of things you need to do first.

The first thing is obviously you need to download and install the latest preview of Visual Studio 2022. And that's Visual Studio 2022 17.3.0 Preview 1.1.

Next, you need to sign up for the private preview program of port tunneling in Visual Studio. Otherwise, you are going to get an error like below when you are going to try it.
Missing sign-up for Port Tunneling program
You can do it by filling out the form here: https://aka.ms/tunnels-signup. Something to note here is, it's going to take some time for access to be granted into the private program and at this time individual users will not be considered, only organizations with tenant IDs.

After signing up with the preview program, log in to Visual Studio with the email address you have used. Then under Tools -> Options -> Environment -> Preview Features, check Enable port tunneling for Web Applications.
Enable port tunneling for Web Applications
Now you are almost set.

Finally, create a new ASP.NET Core Web Application, and once the project is created, update the launchSettings.json as below.

launchSettings.json
{
  "$schema""https://json.schemastore.org/launchsettings.json",
  "iisSettings": {
    "windowsAuthentication"false,
    "anonymousAuthentication"true,
    "iisExpress": {
      "applicationUrl""http://localhost:4367",
      "sslPort": 44305
    }
  },
  "profiles": {
    "WebApplication1": {
      "commandName""Project",
      "dotnetRunMessages"true,
      "launchBrowser"true,
      "launchUrl""swagger",
      "applicationUrl""https://localhost:7015;http://localhost:5015",
      "environmentVariables": {
        "ASPNETCORE_ENVIRONMENT""Development"
      },
      "createTunnel"true,
      "tunnelAuthentication""public",
    },
    "IIS Express": {
      "commandName""IISExpress",
      "launchBrowser"true,
      "launchUrl""swagger",
      "environmentVariables": {
        "ASPNETCORE_ENVIRONMENT""Development"
      }
    }
  }
}
The only change I have done here is I have added the below properties under the profile I am using to run the Application.
  •  "createTunnel"true 
  • "tunnelAuthentication""public"
And that's it. Now you can launch the application.
Port Tunneling
Note: Tunnels are created with private access by default, meaning that only the user who created the tunnel can access it after signing in. You can control this access by adding the "tunnelAuthentication" property. Valid values include,
  • private - only the user who created the tunnel can access it after signing in.
  • org - only users in the organization can access it after signing in.
  • public - the tunnel is accessible by anyone and no sign-in is needed.
Hope this helps.

Happy Coding.

Regards,
Jaliya

Thursday, May 12, 2022

.NET 7 Preview 4: Introducing Self-describing Support for Minimal APIs in ASP.NET Core

.NET 7 Preview 4 is released and it includes some nice features related to ASP.NET Core Minimal APIs. One of them is the support for self-describing API endpoints. 

In this post, let's have a look at how it works.

Consider the below Minimal API endpoints prior to .NET 7 Preview 4.

app.MapGet("/employees"async (EmployeeContext dbContext) =>
{
    return Results.Ok(await dbContext.Employees.ToListAsync());
});

Now if we have a look at the Swagger document, I can see something like this.

GET: /employees
It only says the endpoint returns 200, but nothing about the response type.

Let's have a look at another example. Consider the below endpoint.

app.MapGet("/employees/{id}"async (int id, EmployeeContext dbContext) =>
{
    Employee employee = await dbContext.Employees.FindAsync(id);
    if (employee is null)
    {
        return Results.NotFound();
    }
 
    return Results.Ok(employee);
});

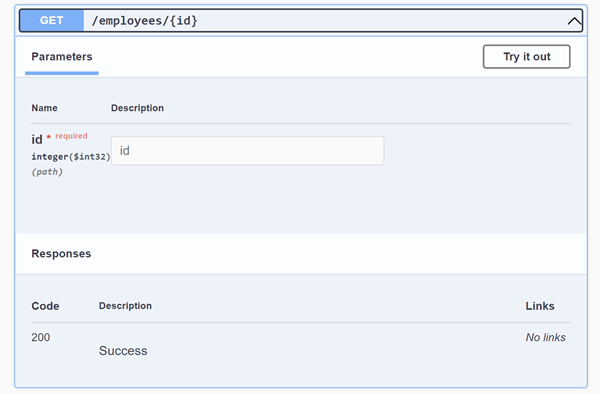
And this would appear in the Swagger document as follows.

GET: /employees/{id}
Again nothing about the Response Type, and obviously no sign about the endpoint returning 404.
 
If we are to enrich these missing details, we will have to update the code as follows.

app
    .MapGet("/employees"async (EmployeeContext dbContext) =>
    {
        return Results.Ok(await dbContext.Employees.ToListAsync());
    })
    .Produces<List<Employee>>();
 
app
    .MapGet("/employees/{id}"async (int id, EmployeeContext dbContext) =>
    {
        Employee employee = await dbContext.Employees.FindAsync(id);
        if (employee is null)
        {
            return Results.NotFound();
        }
 
        return Results.Ok(employee);
    })
    .Produces<Employee>()
    .Produces(StatusCodes.Status404NotFound);

And now we can see the Swagger document is updated.

GET: /employees
GET: /employees/{id}
But what if we can let the APIs describe themselves without adding additional annotations.

With .NET 7 Preview 4, I can change the above endpoints as follows.

app.MapGet("/employees"async (EmployeeContext dbContext) =>
{
    return TypedResults.Ok(await dbContext.Employees.ToListAsync());
});

This will describe the endpoint the same way it did with annotations. 

The only change I did here is use the new TypedResults factory class instead of Results factory class when generating the result. The new TypedResults factory class will create Typed results (as the name suggests of course) instead of IResult as it did with Results factory class. And all these Typed results implement a new interface IEndpointMetadataProvider.

public interface IEndpointMetadataProvider
{
    static abstract void PopulateMetadata(EndpointMetadataContext context);
}

The framework will call PopulateMetadata() when the endpoint is built and that adds the necessary endpoint metadata to describe the HTTP response type.

Now when we have multiple return types, we need to explicitly specify the return types as follows.

app.MapGet("/employees/{id}"async Task<Results<Ok<Employee>, NotFound>> (int id, EmployeeContext dbContext) =>
{
    Employee employee = await dbContext.Employees.FindAsync(id);
    if (employee is null)
    {
        return TypedResults.NotFound();
    }
 
    return TypedResults.Ok(employee);
});

And this also will describe the endpoint the same way it did with annotations. 

You can find the complete sample code here.
   https://github.com/jaliyaudagedara/minimal-api

More Read
   ASP.NET Core updates in .NET 7 Preview 4

Hope this helps.

Happy Coding.

Regards,
Jaliya

Wednesday, May 11, 2022

CoreWCF Is Released

CoreWCF, the .NET Core version of Windows Communication Foundation is finally released. The 1.0 release of CoreWCF is compatible with .NET Standard 2.0 so that it will work with,
  • .NET Framework 4.6.2 (and above)
  • .NET Core 3.1
  • .NET 5+
In this post, let's have a look at a sample implementation of WCF on top of .NET 6.

I have an ASP.NET Core Web API (with Minimal API support) created and installed the following packages.
<ItemGroup>
  <PackageReference Include="CoreWCF.Http" Version="1.0.1" />
  <PackageReference Include="CoreWCF.Primitives" Version="1.0.1" />
</ItemGroup>
Then I created the following services. I am exposing two services as I want to show the support for different Bindings.

GreetService.cs
[ServiceContract]
public interface IGreetService
{
    [OperationContract]
    string Greet(string message);
}
 
public class GreetService : IGreetService
{
    public string Greet(string message)
    {
        return $"You said: {message}";
    }
}
AnotherGreetService.cs
[ServiceContract]
public interface IAnotherGreetService
{
    [OperationContract]
    string AnotherGreet(string message);
}
 
public class AnotherGreetService : IAnotherGreetService
{
    public string AnotherGreet(string message)
    {
        return $"You said another: {message}";
    }
}
Now I am modifying the Startup.cs as follows.

Startup.cs
using CoreWCF;
using CoreWCF.Configuration;
using CoreWCF.Description;
using CoreWcfDemo.Server.Services;
 
var builder = WebApplication.CreateBuilder(args);
 
// Add WSDL support
builder.Services.AddServiceModelServices().AddServiceModelMetadata();
builder.Services.AddSingleton<IServiceBehavior, UseRequestHeadersForMetadataAddressBehavior>();
 
WebApplication? app = builder.Build();
app.UseServiceModel(builder =>
{
    // This service only supports BasicHttpBinding
    builder
        .AddService<GreetService>()
        .AddServiceEndpoint<GreetService, IGreetService>(new BasicHttpBinding(), 
            "/GreetService/BasicHttp");
 
    // This service supports BasicHttpBinding and WSHttpBinding
    builder
        .AddService<AnotherGreetService>()
        .AddServiceEndpoint<AnotherGreetService, IAnotherGreetService>(new BasicHttpBinding(), 
            "/AnotherGreetService/BasicHttp")
        .AddServiceEndpoint<AnotherGreetService, IAnotherGreetService>(new WSHttpBinding(SecurityMode.Transport), 
            "/AnotherGreetService/WSHttps");
});
 
var serviceMetadataBehavior = app.Services.GetRequiredService<ServiceMetadataBehavior>();
 
serviceMetadataBehavior.HttpGetEnabled = true;
serviceMetadataBehavior.HttpsGetEnabled = true;
 
serviceMetadataBehavior.HttpGetUrl = new Uri("http://localhost:5051/metadata");
serviceMetadataBehavior.HttpsGetUrl = new Uri("https://localhost:7051/metadata");
 
app.Run();
Now, I am adding a Console Application and adding Service References to the project.
Add Service Reference
Add Service Reference: WCF Web Service
Discover Services
Once the Service is discovered, I have selected Next and opted to use the defaults. And once the Service Reference is created, I have the following code to call the different WCF Service methods using different bindings.
using ServiceReference1;
 
// BasicHttpsBinding
var greetServiceClient = new GreetServiceClient(
    GreetServiceClient.EndpointConfiguration.BasicHttpBinding_IGreetService,
    "http://localhost:5051/GreetService/BasicHttp"
);
var result = await greetServiceClient.GreetAsync("Hello");
Console.WriteLine(result);
 
// WSHttpBinding
var anotherGreetServiceClient = new AnotherGreetServiceClient(
    AnotherGreetServiceClient.EndpointConfiguration.WSHttpBinding_IAnotherGreetService,
    "https://localhost:7051/AnotherGreetService/WSHttps"
);
result = await anotherGreetServiceClient.AnotherGreetAsync("Hello");
Console.WriteLine(result);
 
Console.ReadLine();
And now when I run the Console App while the Server App is running, I can see everything is working as expected.

You can find the complete code sample here:
   https://github.com/jaliyaudagedara/corewcf-demo

Hope this helps.

Happy Coding.

Regards,
Jaliya

Monday, May 2, 2022

Visual Studio 2022: Temporary Breakpoints

This is a quick post on a nice feature that got introduced in Visual Studio 2022.

Have you faced this scenario where you have set multiple breakpoints in your code while debugging, and the next time you are running the application locally (maybe after fixing the issues or you are done with the debugging), you keep getting hit on all those breakpoints back to back?

Most of the time, the breakpoints we are adding are temporary and only needed for that particular session. Visual Studio now lets you add Temporary Breakpoints and once it's hit, it's gone.

Insert Temporary Breakpoint
You can also simply use the shortcut Shift + Alt + F9, T and set the temporary breakpoint on the line desired.

Hope this helps!

Happy Coding.

Regards,
Jaliya