Thursday, January 30, 2020

Visual C# Technical Guru - December 2019

Another month as a judge in Microsoft TechNet Guru Awards under Visual C# category. The TechNet Guru Awards celebrate the technical articles on Microsoft TechNet.

Post in Official Blog,
Visual C# Technical Guru - December 2019
Happy Coding.

Regards,
Jaliya

Monday, January 27, 2020

Setting Up Azure DevOps Pipeline to CI/CD Docker Image into Azure Kubernetes Service

In this post, let's see how we can set up an Azure DevOps pipeline to Contonius Integrate and Deploy a Docker Image containing a simple ASP.NET Core Web Application to Azure Kubernetes Service (AKS).

This post is another post of a series of blog posts,
  1. Deploying an ASP.NET Core Application On a Local Kubernetes Cluster
  2. Pushing Local Docker Image to an Azure Container Registry
  3. Deploying an ASP.NET Core Application On Azure Kubernetes Service
and if you are landed directly on this post, please consider reading all of them to get the context. It's basically, I have created a docker image with a simple ASP.NET Core Web Application. In the first post, I have deployed that image into a local K8s cluster. Then in the second post, I have pushed the docker image to ACR. In the third post, I have deployed the same image to AKS and the image was picked up from ACR, and everything was manual. And this post, we are going to make it automated, that is when we do a change to our code, we are going to build and push the image to ACR, and then it will get deployed to AKS.

So I have my ASP.NET Core Web Application pushed to Azure DevOps.
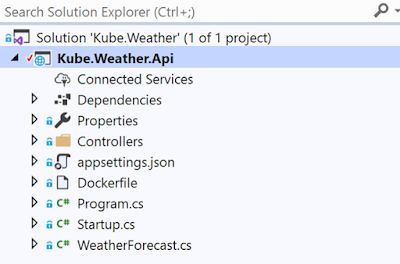
Solution
Now I am enabling Multi-stage pipelines from the Preview features.
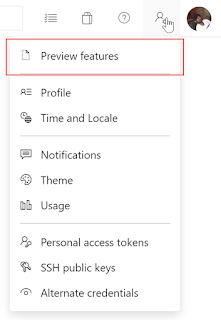
Preview features
Multi-stage pipelines
And let's start creating the pipeline. Click on the Create Pipeline.
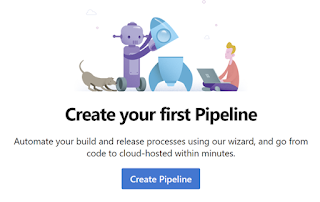
Create Pipeline
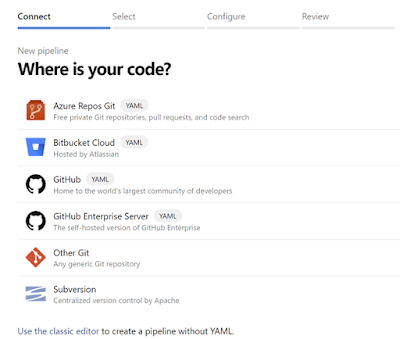
Now, where is our code?
Where is your code
I am selecting Azure Repos Git as that's where my source code is in. You can choose your git provider based on wherever you have put your source in.

And it will display the list of repositories and I am selecting my repo.
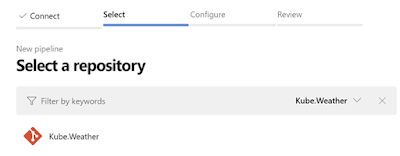
Select a repository
Next, we need to configure the pipeline.
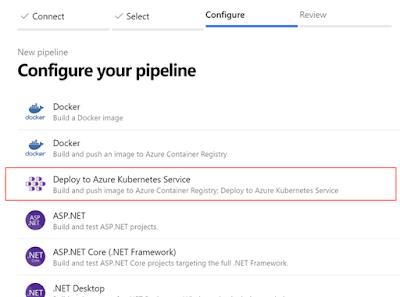
Configure your pipeline
Here different templates are displayed, what we are going to be using is Deploy to Azure Kubernetes Service and this was enabled by selecting Multi-staging pipelines under Preview features. And now, if you have multiple Azure subscriptions, a side panel will be opened to select the subscription, and you can select the subscription which you have used to create your ACR and AKS.

After that stage, now we need to select the AKS cluster and the ACR.
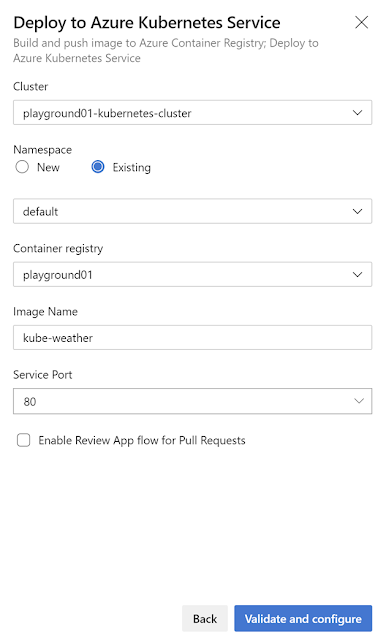
Select the cluster/container registry and the image
So here the UI is self-explanatory, I am selecting the existing AKS cluster and the container registry. About the Namespace, all Kubernetes resources, such as pods and Deployments, are logically grouped into a namespace. These groupings provide a way to logically divide an AKS cluster and restrict access to create, view, or manage resources. So here for the demo purpose, I have selected existing and selected default, and that is the namespace where pods and deployments are created when none is provided. For the Image Name, I am giving kube-weather. Service Port is 80.  And I am not enabling Review App flow for Pull Requests to keep things simple and I am clicking on Validate and configure.

And Azure DevOps will create an azure-pipelines.yml for us.
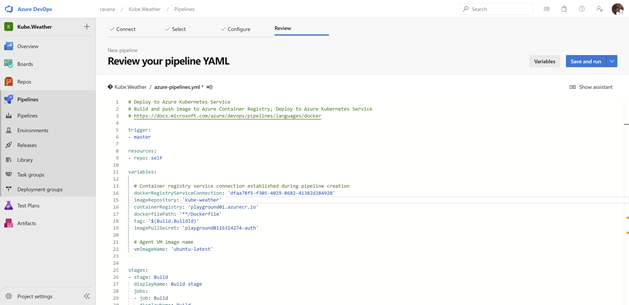
azure-pipelines.yml
azure-pipelines.yml
# Deploy to Azure Kubernetes Service
# Build and push image to Azure Container Registry; Deploy to Azure Kubernetes Service
# https://docs.microsoft.com/azure/devops/pipelines/languages/docker

trigger:
- master

resources:
repo: self

variables:

  # Container registry service connection established during pipeline creation
  dockerRegistryServiceConnection: 'dfaa78f5-f305-4029-8682-41382d284928'
  imageRepository: 'kube-weather'
  containerRegistry: 'playground01.azurecr.io'
  dockerfilePath: '**/Dockerfile'
  tag: '$(Build.BuildId)'
  imagePullSecret: 'playground0116314274-auth'

  # Agent VM image name
  vmImageName: 'ubuntu-latest'  
 
stages:
stage: Build
  displayName: Build stage
  jobs:
  job: Build
    displayName: Build
    pool:
      vmImage: $(vmImageName)
    steps:
    - task: Docker@2
      displayName: Build and push an image to container registry
      inputs:
        command: buildAndPush
        repository: $(imageRepository)
        dockerfile: $(dockerfilePath)
        containerRegistry: $(dockerRegistryServiceConnection)
        tags: |
          $(tag)

    upload: manifests
      artifact: manifests
stage: Deploy
  displayName: Deploy stage
  dependsOn: Build
  jobs:
  - deployment: Deploy
    displayName: Deploy
    pool:
      vmImage: $(vmImageName)
    environment: 'KubeWeather.default'
    strategy:
      runOnce:
        deploy:
          steps:
          - task: KubernetesManifest@0
            displayName: Create imagePullSecret
            inputs:
              action: createSecret
              secretName: $(imagePullSecret)
              dockerRegistryEndpoint: $(dockerRegistryServiceConnection)
              
          - task: KubernetesManifest@0
            displayName: Deploy to Kubernetes cluster
            inputs:
              action: deploy
              manifests: |
                $(Pipeline.Workspace)/manifests/deployment.yml
                $(Pipeline.Workspace)/manifests/service.yml
              imagePullSecrets: |
                $(imagePullSecret)
              containers: |
                $(containerRegistry)/$(imageRepository):$(tag)
If you read this file carefully, most of them are self-explanatory. But let's go through.
  1. First, we have a trigger for the master branch. That is when we merge a PR to master branch or on a direct push to master branch, this pipeline will get triggered.
  2. And then resources.repo means the repository that azure-pipelines.yml file is in, In this case, it's our repo, we really don't need this line.
  3. Then we have some variables defined based on the information we have selected on the UI.
  4. And we are doing the build and deploy using a VM and that VM will be running on the latest ubuntu.
  5. Then we have stages section, where we have 2 sections, one for Build and the other for Deploy.
    1. Build
      1. Under here our source in the master branch will get built as a docker image and will get pushed to our container registry as kube-weather and will get tagged with BuildId.
    2. Deploy
      1. Under here, we are pulling up the image from our ACR and spinning up a container in our target cluster to an environment named KubeWeather.default (this is the environment name and the namespace). And the deployment is happening using the RunOnce deployment strategy which is simplest.
You can read more about the key concepts and components that are used in Azure Pipelines from here: Key concepts for new Azure Pipelines users

So now, let's click on Save and run.
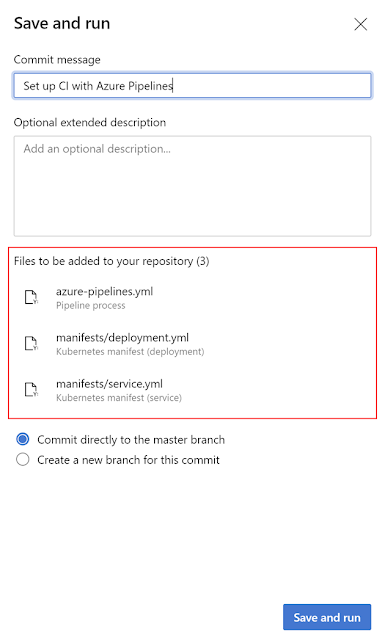
Save and run
And it's going to add 3 files to our repo, azure-pipelines.yml, we already have and it's going to add 2 new files (deployment.yml, service.yml) to a folder named manifests. In my last post: Deploying an ASP.NET Core Application On Azure Kubernetes Service, I have added these files manually (if you have read this post). In the solution, I have pushed I don't have these files checked in. Let's see what Azure DevOps is going to create for us. I am hitting on Save and run.

After some time, Build and Deploy is succeeded.

Before examining the Build/Deploy, let's do a pull from our repo's master branch and investigate the files (deployment.yml and service.yml) Azure DevOps has added.
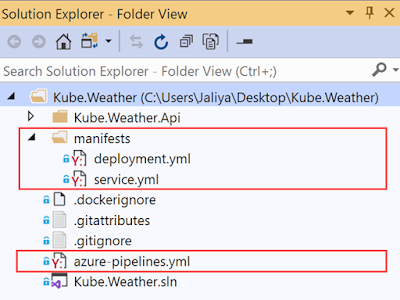
Folder View
deployment.yml
apiVersion : apps/v1beta1
kind: Deployment
metadata:
  name: kube-weather
 spec:
  replicas: 1
  template:
    metadata:
      labels:
        app: kube-weather
     spec:
      containers:
        - name: kube-weather
           image: playground01.azurecr.io/kube-weather
          ports:
          - containerPort: 80
service.yml
apiVersion: v1
kind: Service
metadata:
    name: kube-weather
spec:
    type: LoadBalancer
    ports:
    - port: 80 
    selector:
        app: kube-weather
Those basically are the files that in the previous post we have manually added with some information missing but we get the idea.

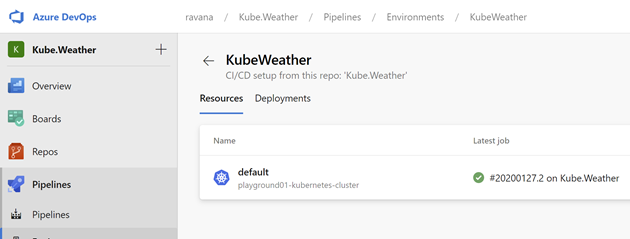
Now let's investigate the Build/Deploy, for that let's go to Pipelines -> Environments,
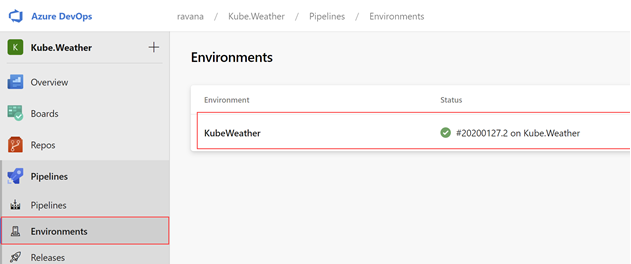
Environments
And click on the environment name.
Namespaces
And you can see our namespace. Remember: we used the namespace name default.

Workloads
And you can see the deployments. Let's click on the Services tab.

Services
And there we have the service information. You can click on it and investigate what is inside. But here I am after the External IP.

And I am opening the http://13.83.56.17/weatherforecast and it's running.
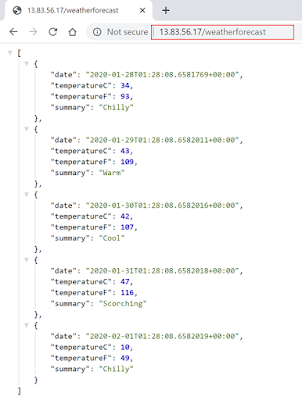
Running
Hope this helps.

Happy Coding.

Regards,
Jaliya

Saturday, January 25, 2020

Deploying an ASP.NET Core Application On Azure Kubernetes Service

So in the first post, I have created a docker image with a simple ASP.NET Core Web API application and showed how we can deploy it into a local K8s cluster. In the second post, I wrote about how we can deploy a docker image to an Azure Container Registry (ACR).

So in this post, let's see how we can deploy a docker image with an ASP.NET Core Application on Azure Kubernetes Service (AKS). Here I will be using the docker image (kube-weather:dev) which we have published to our ACR in this post. And in this post, let's see how we can do below.
  1. Setup an AKS
  2. Grant the AKS Service Principle access to our ACR
  3. Deploy the service
1. Setup an AKS

For this, let's create a Kubernetes Service in Azure.
Kubernetes Service
I am clicking on Create.

Basics
Here I have entered some basic information. And you can select a node pool with basic Node size. And here I have Node count set to 3, even 1 should be enough and I am clicking on Next: Scale.

Scale
Here default settings should be enough and going to Next: Authentication.

Authentication
This step is important. Here we need to create a new Service Principal for our cluster. But unfortunately for some reason, we weren't provided an option to give a principal name, and we are planning on using the name in a later step. Because of that, I am creating a Service Principal using Azure CLI as below. 
PS C:\Users\Jaliya> az ad sp create-for-rbac --skip-assignment --name SP-PlayGround01-Cluster
Changing "SP-PlayGround01-Cluster" to a valid URI of "http://SP-PlayGround01-Cluster", which is the required format used for service principal names
{
  "appId": "4b7ff1c6-a2ce-4b49-a197-dedabe04717b",
  "displayName": "SP-PlayGround01-Cluster",
  "name": "http://SP-PlayGround01-Cluster",
  "password": "e22efd43-60dc-4dca-8f2d-e2fced07780a",
  "tenant": "1f4a5f26-b0bc-402c-9347-e0f7d16c098f"
}
And I am using the appId and password information which were outputted and selecting Use existing in above to configure the service principal and I am going to Next: Networking.

Networking
For networking, defaults are fine and going to Next: Monitoring.

Monitoring
And for Monitoring, I have created a Log Analytics workspace with a proper name and going to Next: Tags.

Tags
I don't have any tags, I am leaving it empty and going to Review + create. In the review step, it will do some validations and once passed, I have clicked on Create. And it will take a couple of minutes to set up the AKS.

And it's created.
playground01-kubernetes-cluster
2. Grant the service principle we created above access to our ACR

For this, let's navigate to our ACR playground01 which we have created in my previous blog post: Pushing Local Docker Image to an Azure Container Registry
ACR
From there, click on Access control (IAM) and then Add a role assignment. And from the next pane, select Role AcrPull. And from Assign access to, keep the default which is Azure AD user, group and service principal. And from the Select, search for SP-PlayGround01-Cluster and Save.

For some reason, The Role dropdown doesn't work, so I am doing the above using Azure CLI. If you are also unable to do, you can use the CLI.
az role assignment create --assignee $SERVICE_PRINCIPAL_ID --scope $ACR_REGISTRY_ID --role acrpull
$SERVICE_PRINCIPAL_ID, we already know, it's the appId that was outputted when we created the service principal from Azure CLI. We can get the $ACR_REGISTRY_ID from running below command.
az acr show --name $ACR_NAME --query id --output tsv
Here $ACR_NAME is our ACR name, in my case, it's playground01.

So I ran the command and I have verified it's created by going to View role assignments.

Now we are almost at the final step.

3. Deploy the service

From Azure CLI, I am running the following command to configure kubectl to connect to my K8s cluster.
PS C:\Users\Jaliya> az aks get-credentials --resource-group playground01-kubernetes-service --name playground01-kubernetes-cluster
Merged "playground01-kubernetes-cluster" as current context in C:\Users\Jaliya\.kube\config
Now I am creating 2 yml configuration files (the same way I have created for local deployments in one of my previous posts: Deploying an ASP.NET Core Application On a Local Kubernetes Cluster). I am not going to explain these in detail, please do read the above blog post for more information.

deployment.yml
apiVersion: apps/v1
kind: Deployment
metadata:
  name: kube-weather-deployment
spec:
  selector:
    matchLabels:
      app: kube-weather-pod
  template:
    metadata:
      labels:
        app: kube-weather-pod
    spec:
      containers:
      - name: kube-weather-container
        image: playground01.azurecr.io/kube-weather:dev
        resources:
          limits:
            memory: "128Mi"
            cpu: "500m"
        ports:
        - containerPort: 80
The only difference in this file from my previous blog post sample is the image. Instead of picking up a local image, I am picking up the image from our ACR.

service.yml
apiVersion: v1
kind: Service
metadata:
  name: kube-weather-service
spec:
  selector:
    app: kube-weather-pod
  ports:
  - port: 9095
    targetPort: 80
  type: LoadBalancer
The next step is to deploy. I have navigated to my desktop from CLI as that's where I have my configuration files.
PS C:\Users\Jaliya\Desktop> kubectl apply -f .\deployment.yml
deployment.apps/kube-weather-deployment created
 
PS C:\Users\Jaliya\Desktop> kubectl apply -f .\service.yml
service/kube-weather-service created
 
PS C:\Users\Jaliya\Desktop> kubectl get services
NAME                   TYPE           CLUSTER-IP    EXTERNAL-IP   PORT(S)          AGE
kube-weather-service   LoadBalancer   10.0.67.235   <pending>     9095:30943/TCP   12s
kubernetes             ClusterIP      10.0.0.1      <none>        443/TCP          74m
 
PS C:\Users\Jaliya\Desktop> kubectl get services
NAME                   TYPE           CLUSTER-IP    EXTERNAL-IP    PORT(S)          AGE
kube-weather-service   LoadBalancer   10.0.67.235   40.81.10.239   9095:30943/TCP   17s
kubernetes             ClusterIP      10.0.0.1      <none>         443/TCP          74m
And the service is up. And when I browse to 40.81.10.239:9095 and it is running.
Running
Hope this helps.

Happy Coding.

Regards,
Jaliya

Thursday, January 23, 2020

Pushing Local Docker Image to an Azure Container Registry

In this post, let's see how we can push a local docker image to an Azure Container Registry. For this post, I am using a very simple local docker image kube-weather:dev which I have created in my previous post: Deploying an ASP.NET Core Application On a Local Kubernetes Cluster.

First, let's create an Azure Container Registry (ACR). It's actually pretty straight forward, don't think any explanations are necessary.
Create an ACR
Then we need to push our image. For that, we will be using Azure CLI and make sure you have Azure CLI installed. 

Now then open up a PowerShell window and run the below command to login to Azure.
PS C:\Users\Jaliya> az login
It will open up a browser and upon sign in, it will list down all the subscriptions (with it's information such as id etc.) you have access to. If you have multiple, run the below command to find out what subscription is selected as default by Azure CLI.
PS C:\Users\Jaliya> az account show
If it's not the subscription where you have created the ACR in, you can change the subscription by running the below command.
PS C:\Users\Jaliya> az account set --subscription {id of the target subscription}
Once the correct subscription is selected, let's sign in to our ACR. For that, run the following command.
PS C:\Users\Jaliya> az acr login --name playground01
Login Succeeded
Here the name is whatever the name you have given for your ACR. In my case, it was playground01 and I am logged in.

Now run the below command to create a new image of kube-weather:dev image.
PS C:\Users\Jaliya> docker tag kube-weather:dev playground01.azurecr.io/kube-weather:dev
Here the target image should be in the following format : YourACRLoginServer:TargetImageName:Tag.
Login server
And now if you run docker images command, you will see a new image is created referencing the original image and have the same image id.
PS C:\Users\Jaliya> docker images
REPOSITORY                                        TAG                 IMAGE ID            CREATED             SIZE
kube-weather                                      dev                 d9cd7bec80e7        2 days ago          208MB
playground01.azurecr.io/kube-weather              dev                 d9cd7bec80e7        2 days ago          208MB
Now we are almost there. The final step is to push the new image to our ACR. For that, let's run the below command. And it will take some time based on the size and will display you a progressive output.
PS C:\Users\Jaliya> docker push playground01.azurecr.io/kube-weather:dev
The push refers to repository [playground01.azurecr.io/kube-weather]
5f3ec39d44c0: Pushed
b4ab3aec213b: Pushed
05682a6a4056: Pushed
fcd021389694: Pushed
2c52aed6692d: Pushed
c51868eee26f: Pushed
556c5fb0d91b: Pushed
dev: digest: sha256:b2725ccbc89e9684e406d5a20213562f9908e93f402570821a98285bc8d9a81d size: 1790
All good. Now if you have a look at our ACR, our kube-weather image should be there.
ACR-Repositories
And it is.

Hope this helps.

Happy Coding.

Regards,
Jaliya

Wednesday, January 22, 2020

Deploying an ASP.NET Core Application On a Local Kubernetes Cluster

In this post, let's see how we can deploy an ASP.NET Core application on a local Kubernetes (K8s) cluster.

So the first is to set up a local K8s cluster and luckily Docker Desktop includes a standalone K8s server and client, as well as Docker CLI integration. The K8s server runs locally within your Docker instance, is not configurable, and is a single-node cluster.

So I have Docker Desktop installed in my Windows 10 machine and enabled Kubernetes. Once enabled, make sure you can see "Kubernetes is running" in the lower-left corner of Docker Desktop and the docker-desktop is selected as the context.
Enable K8s and is running
Context
The next step is to create a Docker Image of an ASP.NET Core Application. Here I have created an ASP.NET Core Web API application with the default template and with Docker enabled.
Solution
And I have updated the default Dockerfile as follows.

Dockerfile
FROM mcr.microsoft.com/dotnet/core/aspnet:3.1-buster-slim AS base
WORKDIR /app
EXPOSE 80
EXPOSE 443
 
FROM mcr.microsoft.com/dotnet/core/sdk:3.1-buster AS build
WORKDIR /src
COPY ["Kube.Weather.Api.csproj""./"]
RUN dotnet restore "./Kube.Weather.Api.csproj"
COPY . .
RUN dotnet build "Kube.Weather.Api.csproj" -c Release -o /app/build
 
FROM build AS publish
RUN dotnet publish "Kube.Weather.Api.csproj" -c Release -o /app/publish
 
FROM base AS final
WORKDIR /app
COPY --from=publish /app/publish .
ENTRYPOINT ["dotnet""Kube.Weather.Api.dll"]
And then I have created a Docker image by running the following command.
docker build -t kube-weather:dev .
And the image is created. And this is the image that we are going to deploy into K8s.
PS C:\Users\Jaliya\Desktop\Kube.Weather\Kube.Weather.Api> docker images
REPOSITORY      TAG        IMAGE ID         CREATED             SIZE
kube-weather    dev        d9cd7bec80e7     22 seconds ago      208MB
Actually, before deploying, it's worth to check whether the image is working fine locally. I can just spin up a new container out of the image by running the below command.
docker run -it --rm -p 9090:80 kube-weather:dev
Here I am running the image kube-weather:dev in interactive mode and binding the port 80 of the container to 9090, so I can access the application through localhost:9090.

And yes, it's working.
Running inside Docker

The next step is to deploy the image to our local K8s cluster. Let's start by adding a .yml configuration file named deployment.yml. (you can name it with whatever name you like). To scaffold the content of this file, you can use the Kubernetes extension in VS Code. And you can basically type de... and it will scaffold the file for you.
deployment.yml
And I have updated the scaffolded content as below.

deployment.yml
apiVersion: apps/v1
kind: Deployment
metadata:
  name: kube-weather-deployment
spec:
  selector:
    matchLabels:
      app: kube-weather-pod
  template:
    metadata:
      labels:
        app: kube-weather-pod
    spec:
      containers:
      - name: kube-weather-container
        image: kube-weather:dev
        resources:
          limits:
            memory: "128Mi"
            cpu: "500m"
        ports:
        - containerPort: 80
So here,
  1. A deployment named kube-weather-deployment is created.
  2. The selector field defines how the Deployment finds which Pods to manage. In this case, we have simply selected a label that is defined in the Pod template (app: kube-weather-pod)
  3. The template field contains the following sub-fields:
    1. The Pods are labeled app: kube-weather-pod the labels field.
    2. The Pod template’s specification, or .template.spec field, indicates that the Pods run one container, kube-weather-container, which runs the kube-weather:dev, my local Docker image.
    3. The container limits memory of 128Mi (Mebibyte = 1 MiB => 1.04858 MB) and CPU of 500m (The unit suffix m-milliCPU stands for "thousandth of a core")
    4. And finally, we are asking the port 80 to be exposed
Next, let's apply this deployment configuration to our local K8s cluster. Before that let's have a quick look at the status of nodes, deployments, and pods in our K8s cluster.
PS C:\Users\Jaliya\Desktop\Kube.Weather\Kube.Weather.Api> kubectl get nodes
NAME             STATUS   ROLES    AGE   VERSION
docker-desktop   Ready    master   23h   v1.14.8
 
PS C:\Users\Jaliya\Desktop\Kube.Weather\Kube.Weather.Api> kubectl get deployment
No resources found.
 
PS C:\Users\Jaliya\Desktop\Kube.Weather\Kube.Weather.Api> kubectl get pods
No resources found.
So I have a single node in ready status and there are no deployments and thus no pods so far.

Let's apply the deployment configuration by running the following command.
PS C:\Users\Jaliya\Desktop\Kube.Weather\Kube.Weather.Api> kubectl apply -f .\deployment.yml
deployment.apps/kube-weather-deployment created
And the deployment is created. Now if I checked the deployment and pods, I can see my deployment and a pod is there running.
PS C:\Users\Jaliya\Desktop\Kube.Weather\Kube.Weather.Api> kubectl get deployment
NAME                      READY   UP-TO-DATE   AVAILABLE   AGE
kube-weather-deployment   1/1     1            1           86s

PS C:\Users\Jaliya\Desktop\Kube.Weather\Kube.Weather.Api> kubectl get pods
NAME                                      READY   STATUS    RESTARTS   AGE
kube-weather-deployment-d96787866-fhrdt   1/1     Running   0          94s
Still, the application running inside the pod is not accessible to outside. For that, we need to create a service which is an abstract way to expose an application running on a set of Pods as a network service. For that, let's create another .yml configuration file named service.yml. (again you can name it with whatever the name you like). And again you can use Kubernetes extension in VS Code and you can type se... and it will scaffold the file for you.
service.yml
I have updated the scaffolded content as below.

service.yml
apiVersion: v1
kind: Service
metadata:
  name: kube-weather-service
spec:
  selector:
    app: kube-weather-pod
  ports:
  - port: 9095
    targetPort: 80
  type: LoadBalancer
So here,
  1. This specification creates a new Service object named “kube-weather-service”. 
  2. Then we are mentioning, the service targets port 80 on any Pod having the label app=kube-weather-pod.
  3. Port 9095 is where the service receives a request.
Next before applying this service, let's have a look at do we have any existing services.
PS C:\Users\Jaliya\Desktop\Kube.Weather\Kube.Weather.Api> kubectl get services
NAME         TYPE        CLUSTER-IP   EXTERNAL-IP   PORT(S)   AGE
kubernetes   ClusterIP   10.96.0.1    <none>        443/TCP   24h
It shows only the default Kubernetes service. Now let's apply the configuration for our service.
PS C:\Users\Jaliya\Desktop\Kube.Weather\Kube.Weather.Api> kubectl apply -f .\service.yml
service/kube-weather-service created
Now let's look at the services again.
PS C:\Users\Jaliya\Desktop\Kube.Weather\Kube.Weather.Api> kubectl get services
NAME                   TYPE           CLUSTER-IP       EXTERNAL-IP   PORT(S)          AGE
kube-weather-service   LoadBalancer   10.106.210.252   <pending>     9095:31888/TCP   4s
kubernetes             ClusterIP      10.96.0.1        <none>        443/TCP          24h
My service is still pending. Running the command again.
PS C:\Users\Jaliya\Desktop\Kube.Weather\Kube.Weather.Api> kubectl get services
NAME                   TYPE           CLUSTER-IP       EXTERNAL-IP   PORT(S)          AGE
kube-weather-service   LoadBalancer   10.106.210.252   localhost     9095:32226/TCP   11m
kubernetes             ClusterIP      10.96.0.1        <none>        443/TCP          24h
And now it's exposed and let's navigate to localhost:9095.
Running inside K8s
So that's it, we have an ASP.NET Core Web API application running inside a local K8s cluster. Hope this helps. Feedback is always welcome.

Happy Coding.

Regards,
Jaliya

Monday, January 20, 2020

Docker Desktop for Windows: Kubernetes stuck at starting

I wanted to set up a local Kubernetes cluster and Docker Desktop includes a standalone Kubernetes server and client, as well as Docker CLI integration. The Kubernetes server runs locally within your Docker instance, is not configurable, and is a single-node cluster.

But after enabling Kubernetes on my Docker Desktop, it was at "Kubernetes is starting" forever and was trying to figure out the issue. 
Kubernetes is starting
Some have suggested doing a complete Docker Desktop cleanup and reinstall, but I didn't want to do that. After spending a couple of hours, found the logs at this directory: C:\ProgramData\DockerDesktop. There were some service.txt files, and I have opened the recently modified one and finally able to found out what the issue is.
[19:32:58.189][ApiProxy][Error] time="2020-01-20T19:32:58+13:00" msg="Cannot list nodes: Get https://kubernetes.docker.internal:6443/api/v1/nodes: EOF"
And from there onwards, it was easy to fix. According to issues/4316, I had to remove the folder named pki inside C:\ProgramData\DockerDesktop and restarted the docker. On the start, it will create the pki folder back again.

And finally, it's all good.
Kubernetes is running
But note, this might not be the reason for all the hangs at starting, but checking the logs will definitely point you in the right direction.

Hope this helps.

Happy Coding.

Regards,
Jaliya

Thursday, January 2, 2020

Visual C# Technical Guru - November 2019

Another month as a judge in Microsoft TechNet Guru Awards under Visual C# category. The TechNet Guru Awards celebrate the technical articles on Microsoft TechNet.

Post in Official Blog,
Visual C# Technical Guru - November 2019
Happy Coding.

Regards,
Jaliya